Table of Contents
Advertisement
Advertisement
Table of Contents

Related Manuals for Ultra motor A2B Metro


Summary of Contents for Ultra motor A2B Metro
- Page 1 BA228114...
- Page 2 Owner's manual Metro...
-
Page 4: Table Of Contents
Contents 1.0 Introduction 2.0 Important Information 3.0 Your A2B 4.0 Unpacking and adjustment 7-12 5.0 Understand your A2B 13-17 6.0 Battery use, storage and disposal 18-22 7.0 Important Pre-ride Safety Information 23-25 8.0 Maintenance 26-31 9.0 Cleaning 10.0 Trouble Shooting 11.0 Technical Information... -
Page 5: Introduction
1.0 Introduction Welcome and congratulations on buying your new A2B Metro*, the electric bike that’s taking transport in a whole new direction. Your bike will give you the freedom to go your own way. New to the US, it’s the revolutionary way to get to work, pop to the shops or just get some fresh air. -
Page 6: Important Information
Provides helpful or other important related information. If you have any questions or are not sure about any instructions in this owner manual ask your Ultra Motor dealer or call our Customer Service Department: (415) 693-3110... -
Page 7: Your A2B
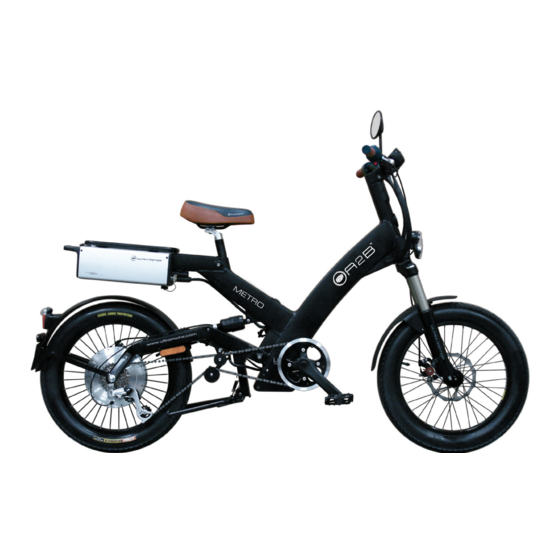
3.0 Your A2B 3.1 Components *NOTE: When we refer to the 'right side' and the 'left side' of the A2B. For clarification, 'left' and 'right' are relative to your position when sitting on the A2B in the normal riding position. - Page 8 owner's manual Saddle (seat) Quick release Seat post On/ Off switch rack battery Seat post clamp Front fork Key switch Controller Rear view mirror Head light Front mud guard Front wheel/tire Front disk brake and rotor Crank arm and chain ring Display Kickstand Chain tensioner...
- Page 9 31. Left brake lever (operates front brake) 32. Right brake lever (operates rear brake) 33. 7-speed twist shifter 34. Throttle grip 35. Left pedal 36. Right pedal...
-
Page 10: Unpacking And Adjustment
4.0 Unpacking 3. Lay the A2B on a tarpaulin or blanket to avoid scratching any unprotected surface whilst you remove the packing NOTE: Your A2B weighs 37.2 kg (82 lb). materials. LIFT WITH CARE. Two people are recommended. - Page 11 4.3 Installing the handlebar and display 1. Using a 4 mm allen key, unscrew the three bolts that hold the handlebar clamp to the handlebar stem (pic a). 2. Remove the cap from the handlebar stem (pic b). 3. Nest the handlebar into the handlebar stem, ensuring that it is centred and properly oriented.
- Page 12 Each pedal is DIFFERENT. There is an 'R' stamped on the spindle of the right-hand pedal, and there is an 'L' stamped An improperly installed pedal may fall off your A2B on the spindle of the left-hand pedal. whilst in use. This may cause an accident resulting in serious 3.
- Page 13 Can you comfortably operate the brakes? If not, take your As with all mechanical components, the bicycle is A2B to an Ultra Motor dealer and ask them to adjust the subjected to wear and high stresses. Different materials angle of the brake levers.
- Page 14 3. The minimum inside leg height is measured from the injury or death. intersection of the top tube and seat post plus 25 mm and the floor. The minimum inside leg height for the A2B is 68.5 DO NOT raise the seat beyond the 'minimum insertion' cm (27 inches) mark on the seat pillar.
- Page 15 4.8 Pre-load adjustment rear shock absorber 4.9 Rear view mirror adjustment Adjust the pre-load Mount your A2B and align the the front wheel to straight di- of the rear shock rection. Look at the rear mirror absorber according and adjust the mirror, so that to your weight.
-
Page 16: Understand Your A2B
5.0 Understand your A2B After having read this section, if you are still unsure, please ask an Ultra Motor dealer to explain any functions or features that you do not understand before your first ride. 5.1 Overview 3. Mount your A2B and get comfortable. - Page 17 7. Check out the handling and response of your A2B. to 10 meter or 0.01 mile. Familiarize yourself with how the suspension responds to brake application and rider weight shifts.
- Page 18 Using the derailleur control, adjust the gear setting to find a gear that makes pedalling comfortable while Your A2B has a 7-speed rear derailleur controlled by the assisting the motor twist gear shifter on the left side of the handlebar.
- Page 19 1. The luggage carrier is attached to the rack tube of your carrier, please be aware that rear light and reflector may A2B by 4 x T25x18 torx flat head screws. If you are frequently be obscured by your luggage.
- Page 20 • Lots of starts and stops (full power from a standing start draws the most amperage from the battery) If you have any questions, or if you feel anything about your A2B is not as it should be, ask your Ultra Motor dealer Maximize your range before you ride again.
-
Page 21: Battery Use, Storage And Disposal
A2B. Use of heating, subjecting it to intense physical shock or severe any battery not supplied with your A2B WILL void the war- vibration. ranty and may cause damage to the electrical system and the hub motor. - Page 22 Your Ultra Motor dealer should provide a fully charged pins and connect battery upon delivery of your A2B, should this not be the the charger to case, please ensure that prior to its first use, you charge the the battery by battery supplied with your A2B for at least 12 hours.
- Page 23 6.3 Battery charging • The Indicator LED will illuminate AMBER while the charger is charging the battery. Charging times Hours • The Indicator LED will change to GREEN when the Before using battery for first time battery is fully charged. Fully discharged 4 - 6 8.
- Page 24 Make sure that the power switch on the battery is switched the battery within 3 off when not in use including when the A2B is parked. If the days. It will take 4 - 6 battery pack is not used for an extended period of time, hours to fully recharge a completely discharged battery.
- Page 25 Before storing battery – half charge Prior to its first use, charge the battery supplied with your Half re-charge at least every A2B for at least 12 hours. 30 days of storage 1. Insert the key and unlock Failure to follow these battery storage charging instructions the fastener.
-
Page 26: Important Pre-Ride Safety Information
7.0 Important Pre-ride Safety Information Ensure that you and your A2B are both ready for safe and 5. Connect the battery to enjoyable use. the A2B via the large 6 pin connector. Carefully align ALWAYS wear an approved bicycle helmet. If you lend the tab and pins of the con- your A2B to someone else –... - Page 27 Check your A2B before every ride. Brakes. Check your brakes before each ride. Left brake lever Do a ‘walk around’ of your A2B before every ride checking actuates the front brakes, tires and the tightness of all the important fasteners. brake and the right...
- Page 28 If you don’t understand in the wheel falling off any aspect of the use and while you are riding which care of your A2B, ask your Ultra could result in serious or Motor dealer.
-
Page 29: Maintenance
8.0 Maintenance 8.3 Wheel rims Have your A2B checked by an Ultra Motor dealer at least once a year. The rims must be smooth, without cracks, bulges or 8.1 Wheels flat spots. Take your A2B The front and rear wheels should to an Ultra Motor dealer or be centred in the fork and frame. - Page 30 Damaged or worn tires should be replaced immediately. Should your brake pads appear to be worn down or your Take your A2B to an Ultra Motor dealer or a qualified brakes are not as responsive as they used to be, ask your bicycle mechanic to repair and/or replace your tires if Ultra Motor dealer to check and replace brake pads.
- Page 31 8.7 Removing and re-installing wheels 3. The front wheel can now be removed form the Removing front wheel bike. 1. Release the front hub quick release by rotating the quick Re-installing front wheel release lever away from 1. Position the wheel in the the hub until it is fully open.
- Page 32 If you are uncertain about any aspect of the assembly and adjustment of your A2B, ask your Ultra Motor dealer. 4. Firmly grip the fork with your left hand, and push 5.
- Page 33 6. Remove the torque arms from the A2B by sliding them off the axle. 7. Remove the rear wheel by sliding it out of the frame 3. Disconnect the motor while disengaging the chain from the freewheel.
- Page 34 Motor dealer and ask for assistance in adjusting the brakes. Improperly adjusted brakes may cause reduced braking performance, leading to an accident that could result in serious or fatal injury and/or property damage. DO NOT ride your A2B if you are not confident that the brakes are working properly.
-
Page 35: Cleaning
- Afterwards, dry off with a the salt. polishing cloth or chamois. - At the end of each ride, wash the A2B with cold water. - Do not wipe off dust or dirt - Thoroughly dry the A2B. with a dry cloth, to avoid... -
Page 36: Trouble Shooting
10.0 Trouble Shooting No power? Here are some solutions. If they do not solve your problem ask an Ultra Motor dealer for help. Problem Possible cause(s) Solution A2B does not turn on 1. Dead battery Recharge battery. See 6.2 and 6.3 2. -
Page 37: Technical Information
11.0 Technical Information Battery management system (BMS) • Controls and stops over-charging General performance specification • Controls maximum charge current • Controls over-discharge amperage (30 A max) • Overall dimensions: 1790 mm x 695 mm x 1105 mm • Tyre size: 3.0" x 20" •... -
Page 38: Warranty & Security Details
Ultra Motor dealer. 2.3.5 Your failure to follow our instructions, including, but not limited to, the owner’s manual; or 2. WARRANTY 2.1 Ultra Motor warrants that on delivery of the A2B to You and for the Time Periods, the Goods shall:... -
Page 39: Disposal
Ultra Motor’s failure to comply with this Warranty including, but 13.0 Disposal We at Ultra Motor, Ltd. support the proper disposal and recycling of our products. Please dispose of your vehicle and associated components at your local recycling facility. Disposal assistance can also be provided through your country’s local Ultra Motor customer service line. -
Page 40: Owner Registration
Battery serial number: To fully protect your A2B against theft, buy a high quality bicycle lock and chain. Secure your A2B to a stationary object every time it is left unattended and also lock your front and rear wheel and motor to the frame. - Page 41 Ultra Motor Ultra Motor USA 1661 Tennessee St. Unit 2J San Francisco CA 94107 English Edition 1.2 March, 2011 © Ultra Motor Ltd. All rights reserved, March 2009...
Need help?
Do you have a question about the A2B Metro and is the answer not in the manual?
Questions and answers