Table of Contents
Advertisement
Advertisement
Table of Contents

Related Manuals for GeneMate GM Series Balances


Summary of Contents for GeneMate GM Series Balances
- Page 1 GM-Series Balances Operation Manual...
-
Page 2: Table Of Contents
TABLE OF CONTENTS SAFETY PRECAUTIONS……………….……………………………………………………………………………. 1 GETTING STARTED…..…………….………………………………………………………………………………. 1 INSTALLATION & SET-UP……..………………………………………………………….………………………. POWER CONNECTION………….……………………………………………………..…………………………… 3 ANTI-THEFT DEVICE…………………………………………………………………..………….………………… 3 LEVELING..…………………………………………………………………….……………………………………… 3 CALIBRATION…..……………………………………………………….…………………………………………… 4 TARE FUNCTION.……………………………………………………….…………………………………………… 4 GOOD WEIGHING TECHNIQUE…………………………………….…………………………………………… DISPLAY OVERVIEW............…..………………………………………………… PROGRAMMING INSTRUCTIONS…………………………….………………………………………………… WEIGHING PROGRAMS Basic Weighing Mode.……………………………………………..…………………………………... 7 Multiple Weigh Mode.....…………………………………………….…………………………… Percent Weighing Mode..…….……………………………………..………………………………... -
Page 3: Safety Precautions
Connect only accessories and options that are designed for use with your balance. The operator shall be responsible for any modifications to the equipment and for any connection of cables, power supplies or peripheral equipment that are not compatible with GM Series Balances. Unplug... -
Page 4: Installation & Setup
INSTALLATION & SETUP Choose a location that is free from the influences of the following: Drafts: Fans, Heat/Air Duct, Doorways or High Traffic Areas. Vibrations. Extreme Temperature Fluctuations: Sunlight, Ovens, or Environments with Wide Temperature Variations. Voltage Fluctuations. Do Not Share Current with Other Instruments that Draw Voltage in an Inconsistent Manner such as Fluorescent Lights, Centrifuges and the like. -
Page 5: Power Connection
AC POWER CONNECTION - When connecting power use the original AC adapter supplied with the balance. Using an unapproved power supply may damage the instrument and void the warranty. - Ensure the power supply is compatible with your instrument AND the local line voltage. - Connect the plug to the instrument. -
Page 6: Calibration
CALIBRATION Calibration is required at installation (see Installation & Set-up) and at regular intervals thereafter. Calibrate if the balance is moved to a new location. 1. Allow a 60-minute warm-up period. 2. Press Tare to zero the balance (0.0000g) – if required. 3. -
Page 7: Good Weighing Technique
Good Weighing Technique Working with precision balances requires a steady hand and an even, uninterrupted technique. Use forceps or other suitable utensils to place the sample (and sample container) on the weigh pan as fingers are hygroscopic. If the balance has been idle and the draft chamber doors closed for an extended period, perform a number of test measurements before you begin weighing to allow the atmospheric conditions (temperature, RH and barometric pressure) inside the weighing chamber to adjust to the ambient temperature outside the chamber. -
Page 8: Display Overview
DISPLAY OVERVIEW 00000.000 Key Pad # Function On / Off Key Tare Keys (Right & Left Sides) Calibration Key Mode Key: g, lb, oz, ct, mg or kg, ozt, dwt, gn, Percent (%), Count & Animal Weigh Milligram (mg) Mode (0.01mg, 0.1mg & 0.001g Models) Kilogram (kg) Mode Key (0.01g Models) Print (Data Send) Key Stability Indicator... -
Page 9: Programming Instructions
PROGRAMMING INSTRUCTIONS The GM-Series offers several Weigh Modes, Balance Settings and Interface Options. Weigh Modes include Gram (g) Milligram (mg) / Kilogram (kg) and Percent Weighing. The GM-Series also offers adjustable settings for Auto Zero, Baud Rates, Print (data send) Commands, Electronic Filtering and Audible Key Tone functions. To access the Weigh Modes simply Press Mode Key to scroll between g, lb, oz, ct, mg or kg, ozt, dwt, gn, Parts Counting, Percent Weighing (%) and Animal Weigh. -
Page 10: Balance Settings
There are five Initial Sample Setting Options (see below). Follow the Programming Instructions listed above to adjust the Initialize Size that is appropriate to your sample. Once you have selected the Initial Sample Size Press the Mode Key until the COUNT appears on the display. Place the reference pieces on the weigh pan and Press CAL Key to assign the reference sample a value of your parts. -
Page 11: Data Interface Settings
3) Audible Key Tone Setting GM-Balances come with an adjustable Audible Key Tone Setting. The factory default setting is on. However, you may disable the Audible Key Tone by following the Programming Instructions listed on page 7. Audible Key Tone Settings Always Off C6 - - 0 Always On... -
Page 12: Programming Menu Codes - Quick Reference Guide
PROGRAMMING MENU CODES – QUICK REFERENCE GUIDE Code Function Parts Counting C1 - - 0* Sample Size = 10 C1 - - 1 Sample Size = 20 C1 - - 2 Sample Size = 50 C1 - - 3 Sample Size = 100 C1 - - 4 Sample Size = 1000 Reserved –... -
Page 13: Care & Maintenance
CARE & MAINTENANCE ü Unplug the instrument from the power source – wall outlet. ü Wear appropriate safety protection. ü Clean inside hood when appropriate. A damp cloth is recommend for basic cleaning. Do not use solvents on the instrument housing, sub-pan, keypad, power cord and power jack. ü... -
Page 14: Service & Technical Suypport
SERVICE AND TECHNICAL SUPPORT If you have ANY questions or require technical, application or service support please contact BioExpress at 800-999-2901. Please note that BioExpress and affiliates cannot take back any instrument that has been exposed to biological or hazardous material contamination for replacement, credit, repair or disposal. DISPOSAL Please consider the environment when disposing of your instrument and the packing material. -
Page 15: Specifications
SPECIFICATIONS Model Capacity Readability Linearity Tare Range B-1850-20 0.01mg 0.03mg 0 to 20g B-1850-60 0.1mg 0.2mg 0 to 60g B-1850-120 120g 0.1mg 0.2mg 0 to 110g B-1850-210 210g 0.1mg 0.2mg 0 to 210g B-1850-200 200g 0.001g 0.002g 0 to 200g B-1850-400 400g 0.001g... -
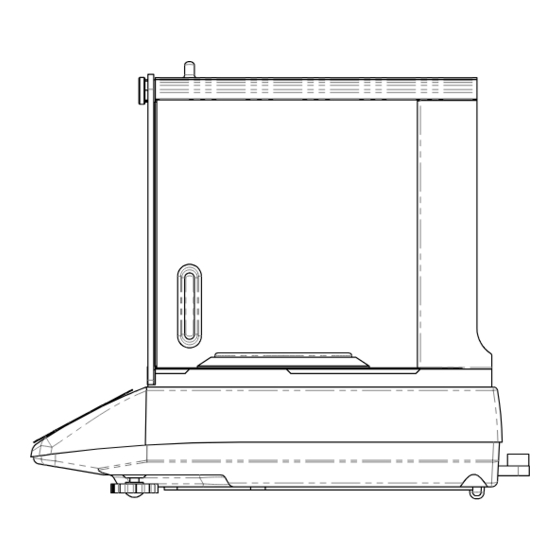
Page 16: Instrument Diagram
INSTRUMENT DIAGRAMS B-1850-20, -60, -120, -210, -200, -400, -500 & -1000 B-1850-4000 & -5000 Page 14...
Need help?
Do you have a question about the GM Series Balances and is the answer not in the manual?
Questions and answers