Table of Contents
Advertisement
Quick Links
Advertisement
Table of Contents

Related Manuals for Studio R Z.500

Summary of Contents for Studio R Z.500
- Page 1 OWNER’S MANUAL 12/2006 - REV#3 / EN...
- Page 2 Studio R exclusive Burn-in: Every Studio R amplifier is in-factory tested for three 3-hour cycles at full power in a high-temperature oven. It is cooled and tested again at every interval. This exclusive process in Brazil is the only internationally proven way of finding components of a system which could deteriorate prematurely within the equipment lifetime.
- Page 3 DANGER: THE OUTPUTS OF THIS AMPLIFIER CAN PRODUCE LETHAL VOLTAGE LEVELS. NEVER MAKE CONNECTIONS WHILE THE DEVICE IS ON. Wait for at least 1 minute after the shutoff in order to carry out modifications in your connections. WARNING: THIS EQUIPMENT IS CAPABLE OF PRODUCING HIGH SOUND PRESSURE LEVELS WHEN CONNECTED TO SPEAKERS AND SPEAKER SETS.
- Page 4 Open the transportation packing carefully and check for any apparent damage. Prior to leaving the plant all Studio R amplifiers are fully tested and inspected and ought to reach you in perfect conditions. Should any damage be found on them, please notify the carrier immediately.
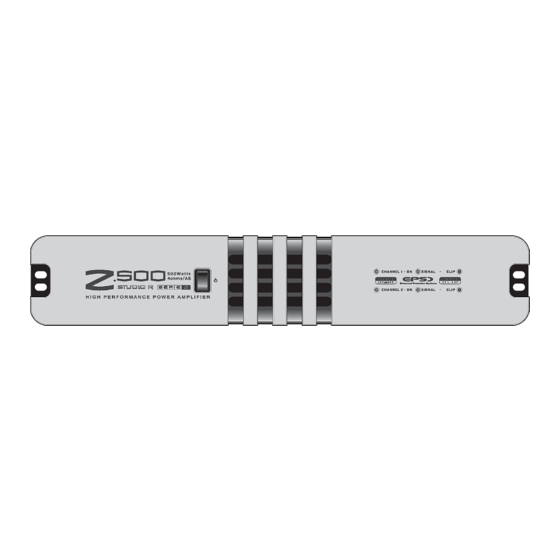
- Page 5 2.4 Connecting the inputs The input/split connections are performed by means of two 3-pin, XLR-type and two “P10”- type connectors, located on the rear panel. The connection orientation is: BALANCED UNBALANCED Pin 1 - Ground. Pin 2 – Positive (phase). The Z SERIES amplifiers contain Pin 3 –...
- Page 6 The loudspeakers should be connected to the amplifier by wires which should, first, provide the minimum current capacity necessary for the work. Wire minimum gauge in mm (Z.500) A wire for each speaker A wire for every two speakers 1,5mm Wire minimum gauge in mm (Z.700)
- Page 7 2.6 Connecting the power of your 4-ohm Z series: Your Studio R power cable has 3 wires with a 3-pin connector. The 4-ohm Z Series amplifiers are designed to operate on 110 V or 220 V.
-
Page 8: Pink Noise
0,6mm 1,5mm 1,5mm All of the Studio R Z Series amplifiers come with a power cable and connector. The user should consult the consumption table and, according to the intended use of his/her equipment, purchase the female connector with the... - Page 9 2.7 Stereo Operation: For stereo operation, place an audio signal on the channel “1” input with an amplitude consistent with the amplifier sensitivity (selectable according to the SDS table) in order to produce a signal output on channel “1” parallel lug, while a signal in “2”...
-
Page 10: Very Important
2.9 Input signal attenuators (VOL/GAIN). The rotary controls located on the back panel of your Studio R, one for each channel, allow the input sensitivity to be individually set with a reasonable resolution. - Page 11 2.9.1 Power Switch: Studio R 4-ohm Z-series amplifiers are fitted with an on/off switch located on the front panel. In the regular use, when the switch is pointing upward, this turns the amplifier on and two green LEDs will light up on the panel.
- Page 12 4.1 Impedance sensor: All Studio R amplifiers are fitted with a system to assess the type of load on its output. On an excess load, this limits the maximum output current without causing any severe distortions.
-
Page 13: Variable-Speed Fans
This type of installation is quite used successfully in bars, night clubs, churches, etc. For example, The Z.500 operates as a 30Volts line amplifier. In this way, you can connect up to five 15 watts speakers using Studio R transformers model AML... -
Page 14: Maintenance
MANUAL AND THE RELEVANT STANDARDS RELATED TO YOUR INDUSTRY. 9 – WARRANTY:: Studio R provides the purchaser of any Z Series amplifier with a warranty against defects on the components and assembly for a 3-year*** time as of the purchasing date (***Valid for Brazil. - Page 15 88,5MM x 483MM x 320mm (height x width x depth) WEIGHT/RATED POWER and Z.500 – 5kg/ 500W, 110V; 5A / 220V; 3A MAXIMUM CONSUMPTION Z.700 – 5kg/ 700W, 110V; 6,3A / 220V; 3A Z.900 – 5kg/ 700W, 110V; 8A / 220V; 4A SINUSOIDAL POWER TABLE: Valid for 120V/60Hz line (standard IEC-60268-3).
Need help?
Do you have a question about the Z.500 and is the answer not in the manual?
Questions and answers