Paloma PJC-W18FR Installation Instructions Manual
Unflued portable convection room heater
Hide thumbs
Also See for PJC-W18FR:
- Installation and operating instructions manual (28 pages) ,
- Installation and operating instructions manual (28 pages)
Table of Contents
Advertisement
UNFLUED PORTABLE CONVECTION
To suit Paloma & Rheem Models:
PJC-W25FR, PJC-S25FR & PJC-C25FR
RAC-W25FR, RAC-S25FR & RAC-C25FR
Gas Types: Natural Gas (NG) or Propane (LPG)
INSTALLATION INSTRUCTIONS
Thank you for purchasing a Paloma/Rheem Convection Gas Space Heater
1. To operate this appliance safely and correctly, please read these instructions thoroughly.
2. This appliance must be installed in accordance with:
a. Local Gas Fitting Regulations
b. Municipal Building Codes
c. Australian Standard for Gas Appliance Installations AS5601-2004
d. Any other relevant Statutory Regulation
e. Manufacturer‟s installation instructions
3. This appliance must be installed, serviced and removed by an Authorised person.
ROOM HEATER
PJC-W18FR & PJC-S18FR
CUSTOMER OPERATING
AND
1
Advertisement
Table of Contents

Subscribe to Our Youtube Channel
Related Manuals for Paloma PJC-W18FR


Summary of Contents for Paloma PJC-W18FR
-
Page 1: Installation Instructions
Gas Types: Natural Gas (NG) or Propane (LPG) CUSTOMER OPERATING INSTALLATION INSTRUCTIONS Thank you for purchasing a Paloma/Rheem Convection Gas Space Heater 1. To operate this appliance safely and correctly, please read these instructions thoroughly. 2. This appliance must be installed in accordance with: a. -
Page 2: Warranty Information
Warranty Information Please Record Below Your Retailer: ………………………………………………………………………………….. Address: ……………………………………………………………………………………….. Phone: …………………………………………………………………………………………. Date of Purchase: ……………………………………………………………………………. Invoice Number: ......................Note: There is no need to post this guarantee back, simply keep it in a safe place together with a copy of your purchase invoice. Domestic Applications Commercial Applications Description... -
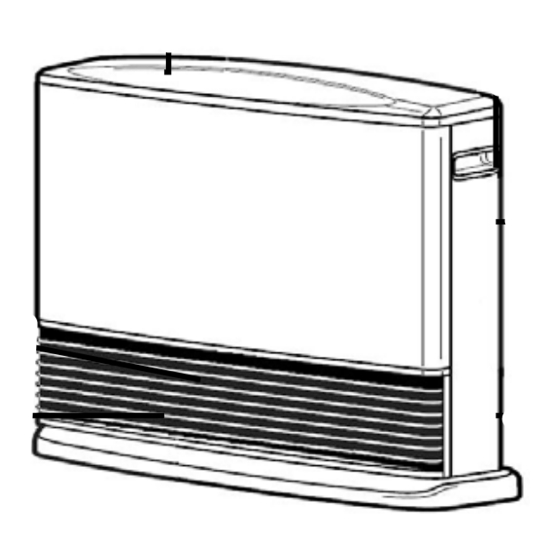
Page 3: Product Overview
Product Overview General Design Layout << FRONT VIEW >> Control Panel Carry Handle Use when carrying the heater Warning Label Warm Air Inlet Warm air is discharged. Rating Plate Shows model No. Gas Type, Month of Manufacture Louvre << REAR VIEW >> Air Filter (1) Prevents dust entering the... -
Page 4: Control Panel
Control Panel DISPLAY SCREEN SET TEMP . ROOM TEMP. TIMER2 OVER-RIDE TIMER 1 TIME. ERROR CODE [OFF] LIGHT LIGHT [OFF] LIGHT TIMER 1 TIMER2 ECONOMY ON / OFF [ON] LIGHT [ON] LIGHT LIGHT LIGHT ECONOMY OFF AM ROOM FILTER OVER TIMER TIMER TIMES... - Page 5 Features AS4553 Efficiency Star Rating of 5.9 Stars. One touch ON / OFF button. Electronic ignition. Adjustable room temperature - you can adjust the room temperature by pressing the up and down arrows on the control panel. ...
-
Page 6: Specifications
Specifications PJC-W25FR, PJC-S25FR, PJC-C25FR PJC-W18FR, PJC-S18FR MODEL RAC-W25FR, RAC-S25FR, PJC-C25FR Convection Heater Convection Heater Space Heater Type Gas Input - NG High (MJ/h) Low (MJ/h) Gas Input - LPG High (MJ/h) Low (MJ/h) Output (kW) AS4553 Effeciency Star Rating AS4553 Annual Energy... -
Page 7: Safety Instructions
EXTERNAL DIMENSIONS (mm) Preparation (1) Remove heater from carton. (2) Please ensure that the gas specified on the rating plate matches your gas supply. Using a different type of gas may cause an explosive ignition resulting in injury, damage to heater or malfunction of the oxygen depletion safety system. - Page 8 Danger If a gas leak is detected: Do not turn power switches on or off. Do not plug or unplug electrical appliances. Do not use the telephone. Flame or sparks may ignite the gas and cause a fire: ...
- Page 9 All replacement parts must be approved Paloma spare parts. This heater may circulate large volumes of air. If the air in the room contains any cigarette smoke or cooking vapours, it may affect the appearance of carpets, furniture and drapes, etc.
-
Page 10: Installation
Installation This heater must be installed with a minimum clearance of 50mm from the rear and sides. These clearances must be maintained at all times. There must be a minimum clearance of 750mm from the hot air outlet. ... -
Page 11: Turning Heater Off
Operating Instructions Before you begin ensure that the gas hose connector and electrical cord are plugged in correctly. START UP Press the ON / OFF Button once to start the heater and the operation light (green) will light up. ... - Page 12 AUTOMATIC ECONOMY OPERATION The economy operation allows the heater to heat the room to the set temperature and after a period of 30 minutes it allows the temperature to automatically reduce by one degree. After another 30 minutes the temperature is reduced by a further one degree to a maximum of two degrees. ...
-
Page 13: Override Function
OVER-RIDE FUNCTION The OVER-RIDE function allows the user to manually over-ride the preset program to operate the heater. [Press OVER-RIDE button] Over-ride operation is switched ON: The OVER-RIDE light glows After combustion the ON / OFF light glows red. ... -
Page 14: Setting The Clock
SETTING THE CLOCK Press ON / OFF button. ON / OFF Light glows The Set temp and Room temp are displayed on the screen. Press SET TIMES button Time is displayed. Adjust the time To adjust the time of day press the ▼ down or ▲ up button until the correct time is reached. -
Page 15: Programming The On / Off Timer(S)
PROGRAMMING THE ON / OFF TIMER(S) Two timers are available – Timer 1 and Timer 2. You are able to set the start time and shutdown time for TIMER 1 and TIMER 2. PROGRAMMING THE TIMER Before programming the Timers, please ensure that the correct time is set. - Page 16 Press SET TIMES button to Set TIMER 2 TIMER 2 “ON” light flashes. TIMER 2 “ON” time is displayed on the screen. Adjust TIMER 2 “ON” time as required To set the TIMER 2 “ON” time press the ▼ down or ▲...
- Page 17 Press ON / OFF button to turn off ON / OFF lamp lights The current time will be shown on the screen. Caution The operation and shut down times for the timers are stored in memory. If the requested operation and shut down times for the timers are the same it is not necessary to set up anew.
- Page 18 This section provides timer operation via the unit, but it is possible to Operation of timers control the timers by using the remote control. Please ensure that the main power is ON While main power is ON. ON / OFF light glows green or glows red after ignition.
-
Page 19: Pre-Heat Function
[Timer Operation shut down time] Selected TIMER‟s [ON] [OFF] light glows. Combustion shut down and the heater stands by for timer operation. ON / OFF light glows green. Cancelling the timers: Press ON / OFF button or OFF switch on remote control or Press the TIMER button. ... -
Page 20: Troubleshooting
Trouble Shooting Please check following important points before calling for a service technician: CONDITION SUGGESTED REMEDY The heater does not operate Check that the power cord is plugged in and the power turned on (ON/OFF- operation light does not glow green) Circuit breaker or fuse is blown Child lock is set Check that gas is turned on... -
Page 21: Error Codes
Error Codes These heaters are fitted with self diagnostics electronics. Should a fault occur the heater will shut down and the fault with a pair of digits will be displayed in the display screen. Refer to the following table for probable cause and suggested remedy Error code Problem... -
Page 22: Inspection And Maintenance
Inspection and Maintenance Disconnect gas hose and turn heater off. Unplug and wait until the heater cools down. Be sure to carry out daily inspection and maintenance. Do not use the heater if you believe something is wrong. ... - Page 23 MAINTENANCE OF THE LOUVRE Use a vacuum cleaner to remove dirt from the louvre. Make sure that the fan is not working before cleaning. White powder may form on the louvre. Wipe off with soft cloth. Caution Do not press the louvre heavily. Do not apply strong pressure to the Louvre.
- Page 24 Approval These Paloma models have been certified by the Australian Gas Association under Certificate Number: 6540 In keeping with our policy of continuous progress and product improvement, we reserve the right to make changes without notice. DISTRIBUTED IN AUSTRALIA BY:...
Need help?
Do you have a question about the PJC-W18FR and is the answer not in the manual?
Questions and answers