
Related Manuals for Ness AC-1000


Summary of Contents for Ness AC-1000
- Page 1 AC-1000 .User Guide Version Eng-1.01 Copyright 2007 By Union Community Co., LTD. www.nesscorporation.com...
-
Page 2: Glossary
Ness AC1000 User Guide VIRDI AC 1000 User Guide < Glossary > Admin, Administrator - As a user who can enter into the terminal menu mode, he/she can register/modify/delete terminal users and change the operating environment by changing settings. - If there is no administrator for a terminal, anyone can change the settings, so it is recommended to register at least one administrator. -
Page 3: Table Of Contents
Ness AC1000 User Guide VIRDI AC 1000 User Guide Table of Contents < Glossary > ....................2 Table of Contents ..................3 1. Before use....................6 Safety precautions ...............6 1.1. 1.2. Terminal description ................7 1.3. Button description................7 1.4. Screen description (during operation) ..........8 1.5. - Page 4 Ness AC1000 User Guide VIRDI AC 1000 User Guide 3.4.8. Server port settings..............27 3.5. Option settings................27 3.5.1. Application mode settings ............27 3.5.1.1. [0]: Access Control.............27 3.5.1.2. [1] Time Attendance control ..........28 3.5.1.3. [2] Meal (Cafeteria) Service control........29 3.5.2. Authentication method settings..........30 3.5.2.1.
- Page 5 Ness AC1000 User Guide VIRDI AC 1000 User Guide 4.3. Meal control ..................48 4.3.1. Meal classification..............48 4.3.2. Card authentication ..............48 4.3.3. Password authentication ............48 UNION COMMUNITY CO.,LTd. 3Fl. Hyundai Topics Bldg, 44-3 Bangi-dong, Songpa-gu, Seoul, Korea 138-050, Tel: 82-2-6488-3000, Fax: 82-2-6488-3099, E-Mail:sales@unioncomm.co.kr,...
-
Page 6: Before Use
Ness AC1000 User Guide VIRDI AC 1000 User Guide 1. Before use 1.1. Safety precautions Warning Handling with wet hands or allowing liquid to flow into it Do not place a fire source is not advised. near the unit. -> It may cause an electric ->... -
Page 7: Terminal Description
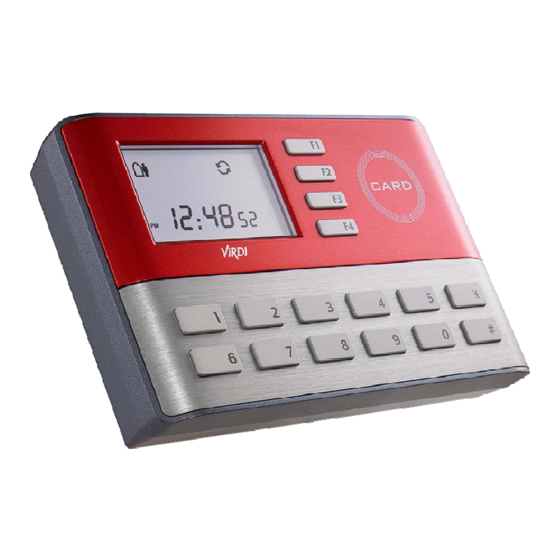
Ness AC1000 User Guide VIRDI AC 1000 User Guide 1.2. Terminal description LCD icon: Terminal operation state - LAN: Server connection status - DOOR: Door open/close status Card Reading Area - CARD: Card data is read LCD display window :... -
Page 8: Screen Description (During Operation)
Ness AC1000 User Guide VIRDI AC 1000 User Guide 1.4. Screen description (during operation) Network status with server Door open/close status Card data is read Access mode is displaying (F1, F2, F3, F4) T&A mode is displaying (START/LEAVE/OUT/BACK/NORMAL) START Menu type is displaying during cafeteria mode... -
Page 9: Lcd Icon During Operation
Ness AC1000 User Guide VIRDI AC 1000 User Guide - There is no response from the server during the authentication process. - Network to server is disconnected during the authentication process. 07/08/25 PM 4:58 - There is no user registered on the terminal or no connection to the server, so it is trying to connect. -
Page 10: Voice Information During Operation
Ness AC1000 User Guide VIRDI AC 1000 User Guide 1.6. Voice information during operation “You are authorized” Authentication is successful “Please try again” Authentication is failed 1.7. Buzzer sound during operation Confirmation Tone When a button is pressed or a card is being read... -
Page 11: Introduction
Ness AC1000 User Guide VIRDI AC 1000 User Guide 2. Introduction 2.1. Features Access control system using LAN - Communication between the terminal and authentication server is done through d TCP/IP protocol, so an existing LAN can be used as it is. It guarantees network-based administration and monitoring as well as easy expansion, high reliability, and higher speed. -
Page 12: Configuration
Ness AC1000 User Guide VIRDI AC 1000 User Guide 2.2. Configuration 2.2.1. Network configuration Network Server (Authentication Server) Switch Hub 6410 Tx R x T x R x T x R x T x Rx Tx R x T x R x... -
Page 13: Specifications
Ness AC1000 User Guide VIRDI AC 1000 User Guide 2.3. Specifications Item Spec Remark 32Bit RISC CPU 8M SDRAM User: 10,000 2M FLASH (Default) Memory Log: 20,000 User: 20,000 4M FLASH (Option) Log: 98,000 Authentication <0.2 sec. speed TCP/IP, Wiegand In&Out... -
Page 14: Environment Settings
Ness AC1000 User Guide VIRDI AC 1000 User Guide 3. Environment settings 3.1. Check items before setting the environment 3.1.1. Entering menu The following screen appears when the [ENT] button is pressed for over 2 sec. 1. User Press [0] to view menus not shown in 2. -
Page 15: Save Environment Settings
Ness AC1000 User Guide VIRDI AC 1000 User Guide 3.1.3. Save environment settings Press the [DEL] button in the main menu to save environment settings and the following screen appears: Save? Press [1] to save changes. [Y=1/N=2]: If not, press [2]. - Page 16 Ness AC1000 User Guide VIRDI AC 1000 User Guide 3.2. Menu configuration 1. User 1) Add 2) Delete 3) Modify 4) Add Admin 5) Delete All 2. Network 1) Terminal ID 2) Mode [NS/SN/NO] 3) Network Type [Static IP/DHCP] 4) IP Address...
- Page 17 Ness AC1000 User Guide VIRDI AC 1000 User Guide 4. Terminal Info Terminal ID =0001 Version =10.01.00 Application=Access Language=ENG Mode=NS Network Type=Static(1) Mac-Address=000265101111 I IP Address =192.168.0.3 Gateway =192.168.0.1 Subnet Mask =255.255.255.0 Server IP =192.168.0.2 SVR Port =2201 Card Reader =RF...
-
Page 18: User Registration
Ness AC1000 User Guide VIRDI AC 1000 User Guide 3.3. User account 3.3.1. User registration Press the [1] button in the main menu to select “1.User,” and the following screen appears:. 1. Add Press [1] to register a new user. -
Page 19: 2. Id&Pw" Registration
Ness AC1000 User Guide VIRDI AC 1000 User Guide 3.3.1.2. “2. ID&PW” registration Password registration and password authentication for a user ◆ [ENT] User ID + [ENT] Input password + [ENT] Input same password + [ENT] ◆ < Input PW >... -
Page 20: 5. Id&Pw|Rf&Pw" Registration
Ness AC1000 User Guide VIRDI AC 1000 User Guide 3.3.1.5. “5. ID&PW|RF&PW” registration RF-Card and password registration, ID input and password authentication or card and password authentication [ENT] User ID [ENT] [9][3] Place the card ◆ Input password + [ENT] Input same password + [ENT] ◆... -
Page 21: Modify User
Ness AC1000 User Guide VIRDI AC 1000 User Guide 3.3.3. Modify User [ENT] User ID + [ENT] Select changing menu ◆ Change value ◆ In the main menu, press [1] to select “1. User” to see the following screen: 1. Add To Modify a user, press [3]. -
Page 22: 2. Id&Pw" User
Ness AC1000 User Guide VIRDI AC 1000 User Guide 3.3.3.2. “2. ID&PW” user To change passwords, press [1]. To cancel it, 1. Modify PW press [DEL]. Press the [1] button to change the passwords Input new password. Password should be 1~8 <Input PW>... -
Page 23: Administrator Registration
Ness AC1000 User Guide VIRDI AC 1000 User Guide 3.3.4. Administrator registration [ENT] Admin ID + [ENT] ◆ ◆ In the main menu, press [1] to select “1.User” and press [0] to view menus not shown in the LCD window. And the following screen appears: 1. -
Page 24: Network Settings
Ness AC1000 User Guide VIRDI AC 1000 User Guide 3.4. Network settings In the main menu, press [2] to select “2.Network” to see the following screen. When the setting is chosen, press [ENT] to move to the next setting. 3.4.1. Terminal ID settings [ENT] [2] ◆... -
Page 25: Connection Method Settings
Ness AC1000 User Guide VIRDI AC 1000 User Guide - NO mode: select [2]. Even though a user is registered in the terminal, authentication is done through the server in any event. Depending on the number of terminals, the number of users, or network... -
Page 26: Subnet Mask Settings
Ness AC1000 User Guide VIRDI AC 1000 User Guide 3.4.5. Subnet mask settings < Subnet Mask > Press [DEL] to delete an old value and enter 255.255.255. 0 the new value. If the subnet mask is ‘255.255.255.0’, enter as below: [2] [5] [5] [2] [5] [5] [2] [5] [5] [0] Press [ENT] to move to the next setting. -
Page 27: Server Port Settings
Ness AC1000 User Guide VIRDI AC 1000 User Guide 3.4.8. Server port settings < Server port > Press [DEL] to delete an old value and enter Num : 2201 the new value. As the port number of the authentication server, the default is ‘2201’. Special care is required when changing this number because the corresponding number in the server should also be changed. -
Page 28: 1] Time Attendance Control
Ness AC1000 User Guide VIRDI AC 1000 User Guide 3.5.1.2. [1] Time Attendance control Default time can be set to Start/Leave/Out/Back. After authentication, the terminal display mode can be automatically changed to programmed operation mode. If <multi-key authentication> is set as the operation mode, over 40 sub modes can be defined. -
Page 29: 2] Meal (Cafeteria) Service Control
Ness AC1000 User Guide VIRDI AC 1000 User Guide 3.5.1.3. [2] Meal (Cafeteria) Service control <Breakfast> If time setting is not necessary, 00:00-00:00 Set as ‘00:00-00:00’. If <Breakfast> time is set from 07:00 to 09:00, all authentication data is recorded as <breakfast>. -
Page 30: Authentication Method Settings
Ness AC1000 User Guide VIRDI AC 1000 User Guide 3.5.2. Authentication method settings In the main menu, press [3] to select “3. Option” and the following screen appear: 1. Application To set the default authentication method, press 2. Verify Option [2]. -
Page 31: Settings For Card Only Authentication
Ness AC1000 User Guide VIRDI AC 1000 User Guide 3.5.2.3. Settings for card only authentication [ENT] [ENT] ◆ ◆ < Only Card > Default setting : ‘0’ (N=0/Y=1):0 Even for a user who is registered to be authenticated with a card & PW / card &... -
Page 32: Door Status Monitor
Ness AC1000 User Guide VIRDI AC 1000 User Guide 3.5.3.2. Door status monitor ◆ [ENT] [ENT] ◆ < Door Monitor > Default setting : ‘0’ [0/1=NO/2=NC]:0 - ‘0’: NW – no check - ‘1’: NO – dead bolt type or auto door (Lock monitoring is on when the door is locked) - ‘2’: NC - strike type... -
Page 33: Volume Settings
Ness AC1000 User Guide VIRDI AC 1000 User Guide 3.5.4. Volume settings In the main menu, press [3] to select “3. Option” and the following screen appear: 1. Application Press [4] for volume settings. 2. Verify Option 3. Set Door lock 4. -
Page 34: Current Time Settings
Ness AC1000 User Guide VIRDI AC 1000 User Guide 3.5.5. Current time settings [ENT] [5] ◆ ◆ In the main menu, press [3] to select “3. Option”. Press [5] to see the following screen: < Time Setting > 20060401211806 This is for the terminal current time. The above example represents the year 2006, month 04, date 01, hour 21, min. -
Page 35: Lcd Brightness Settings
Ness AC1000 User Guide VIRDI AC 1000 User Guide 3.5.6.2. LCD Brightness settings [Ent [Ent] ◆ ◆ <LCD Brightness> Default : ‘1’ (0-2):1 This is for LCD brightness level setting menu. The higher setting value is for high brightness. Press [ENT] to move to the next setting 3.5.6.3. -
Page 36: Terminal Information View
Ness AC1000 User Guide VIRDI AC 1000 User Guide 3.6. Terminal information view ◆ [Ent-] [4] ◆ In the main menu, press [4] to select “4.Terminal info” and the following screen appears where all the environmental settings are displayed: Terminal ID=0001 Press [0] to scroll up and down the screen. -
Page 37: Extended Functions
Ness AC1000 User Guide VIRDI AC 1000 User Guide 3.7. Extended functions In the main menu, press [5] to select “5.Ext functions” and the following screen appears: 1. Lock Terminal 2. Read Card No. 3.7.1. erminal lock settings [ENT] [1] ◆... -
Page 38: Device Settings
Ness AC1000 User Guide VIRDI AC 1000 User Guide 3.8. Device settings In the main menu, press [6] to select “6. Device” and the following screen asking for the setting password appear: A device setting is an option that is not necessary to change after installation, so it is recommended not to change it except when it is really required. -
Page 39: Language Settings
Ness AC1000 User Guide VIRDI AC 1000 User Guide 3.8.1.2. Language settings [ENT] ‘084265’ + [ENT] [ENT] ◆ ◆ < Language >:1 Default setting: ‘1’ (English) 0=KOR 1=ENG 2=JPN 3=CHN 4=SPN 5=UAE 6=ITLY 7=VIET 8=OTH Voice information languages follow these settings: ‘0’: Korean, ‘1’: English, ‘2’: Japanese, ‘3’: Spanish, ‘4’: Chinese, ‘5’: Arabic, ‘6’:Italian, ‘7’:Vietnam... -
Page 40: Card Reader Settings
Ness AC1000 User Guide VIRDI AC 1000 User Guide 3.8.3. Card reader settings ◆ [Ent-] “084265” [Ent] [3] ◆ <Card Reade>:0 Default setting: ‘0’ 0=RF/SC 1=Wiegand This is the setting for the card reader connected to a terminal. This shall be set to 0 except in the following cases:. -
Page 41: Wiegand Output Settings
Ness AC1000 User Guide VIRDI AC 1000 User Guide 3.8.4. Wiegand output settings ◆ [Ent-] ‘084265’ [Ent] [4] ◆ Wiegand Out:0 Default setting: ‘0’ 0=None 1=26bit 2=34bit When this is set to [1], “Site code + user ID” is sent to the Wiegand port of the terminal when authentication is done. -
Page 42: Settings Initialization
Ness AC1000 User Guide VIRDI AC 1000 User Guide 3.8.5.1. Settings initialization ◆ [ENT] ‘084265’ + [ENT] [1] ◆ < Init Config > To initialize settings, press [1]. If not, press [2]. [ Y=1 / N=2 ] : All the settings except Mac (physical) address are initialized, but the user and authentication records are not deleted. -
Page 43: How To Use The Terminal
Ness AC1000 User Guide VIRDI AC 1000 User Guide 4. How to use the terminal 4.1. Access control - Menu “3.Option” “1.Application” [0] Access control settings 4.1.1. Authentication mode - Authentication mode display screen Normal mode; authentication with [ENT] 07/08/25 PM 4:58 F1 mode;... -
Page 44: Card Authentication
Ness AC1000 User Guide VIRDI AC 1000 User Guide 4.1.2. Card authentication For a user who is registered as [RF], [RF|FP], or [RF|PW], when placing the card close to the default screen, a beep sound will be heard and the authentication result appears on the LCD. -
Page 45: Password Authentication
Ness AC1000 User Guide VIRDI AC 1000 User Guide 4.1.3. Password authentication If the user ID is “0001”, enter “0001” and press the function key. You will hear a beeping sound and the terminal waits for the user password to be input. Enter the password and press [ENT], and the authentication result appears on the LCD. -
Page 46: Time Attendance Control
Ness AC1000 User Guide VIRDI AC 1000 User Guide 4.2. Time Attendance control - Menu “3.Option” “1.Application” [1] T&A (Time Attendance) settings - If the start/leave time is fixed, set <start time>, <leave time>, and <normal time> to reduce user input errors. -
Page 47: Working Mode Expansion Using Multi-Key Authentication
Ness AC1000 User Guide VIRDI AC 1000 User Guide Working mode after authentication depends on <start time>, <leave time>, and <normal time> settings. The previous authentication mode is maintained if no mode is set for a specific time period. 4.2.4. Working mode expansion using multi-key authentication - If more than 5 working modes such as start, leave, outside work, return, and general are required, it can be expanded up to 41 modes. -
Page 48: Meal Control
Ness AC1000 User Guide VIRDI AC 1000 User Guide 4.3. Meal control - Menu “3. Option” “1.Application” [2] Meal settings - If the terminal is set for meal control, as the terminal is in “lock setting!’’ status during other time frames except for the meal times previously set, at least more than one time frame as meal time should be set for meal control usage.
Need help?
Do you have a question about the AC-1000 and is the answer not in the manual?
Questions and answers
we have 2 door Card Reader Ac1000RF the problem its connected with Alcad intercom prnal if anyone Ring the flat Number some time not opening
The issue with the Ness AC-1000 card reader not opening the door when connected to the Alcad intercom could be due to the card reader setting being incorrect. The card reader should be set to ‘0’ for 125kHz or 13.56MHz cards. If an additional card reader is connected through a Wiegand interface (e.g., HID reader), it should be set to ‘1’. If the setting does not match the type of card reader or connection used, the system may not recognize the card and fail to open the door. Also, network trouble or disconnection during authentication could prevent door access.
This answer is automatically generated