Table of Contents
Advertisement
Owner's Manual
Table of Contents
Welcome...............................................................2
Warranty.............................................................3
Records/Specifications.....................................4
Warnings.............................................................5
Product Introduction ...................................6-7
Diagrams........................................................8-11
Setup & Operation.......................................12-14
Disassembly/Assembly...............................15-16
Cleaning............................................................17
Troubleshooting.............................................18
www.GreenTechEnv.com
Advertisement
Table of Contents

Subscribe to Our Youtube Channel
Related Manuals for GreenTech gt3000


Summary of Contents for GreenTech gt3000
-
Page 1: Table Of Contents
Owner’s Manual Table of Contents Welcome...............2 Warranty.............3 Records/Specifications........4 Warnings.............5 Product Introduction ........6-7 Diagrams............8-11 Setup & Operation........12-14 Disassembly/Assembly.......15-16 Cleaning............17 Troubleshooting..........18 www.GreenTechEnv.com... -
Page 2: Welcome
The GT3000 is designed to provide years of trouble-free service when it is properly maintained. Keep this manual. It will guide you through the steps to operate your machine and the maintenance procedures which will keep your GT3000 in tip- top shape for years to come. -
Page 3: Warranty
Limited Warranty Your GT3000 Air Purifier is warranted to be free from all defects in material and workmanship in normal household use for a period of (1) year from date of purchase. The warranty is granted only to the original purchaser and members of his or her immediate household. The warranty is subject to the following provisions. -
Page 4: Records/Specifications
Records Consumer Information Purchase Date: _______________________________________ GreenTech Environmental declines all responsibility for all damages arising from improper use of the unit or in case of tampering with the unit. Model Number: _______________________________________ Specifications Serial Number: _______________________________________ Unit Size: 12” high x 9” wide x 12” deep Weight: 10.2 lb. -
Page 5: Warnings
Warnings Review this list before use and performing any maintenance or cleaning of your unit. WARNING: Never operate unit near heat source, open flame or flammable/combustible fluids. WARNING: Do not operate unit unless all parts (including PCO Cell, Purification Plate, Rear Filter Assembly and Rear Cover) are properly installed. CAUTION: Directly viewing the lamp inside unit for an extended period (longer than 20 min.) may result in eye damage. -
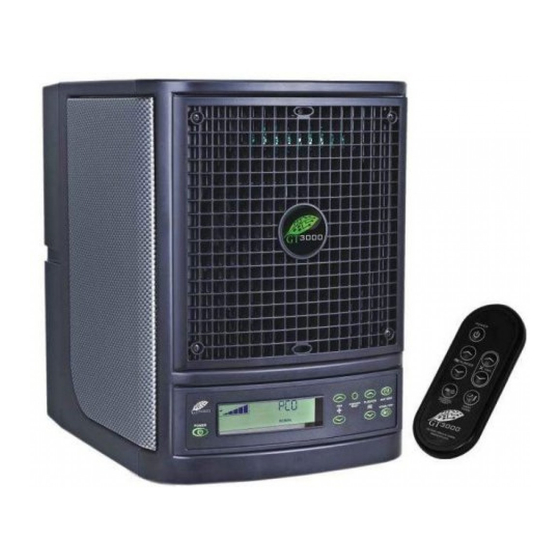
Page 6: Product Introduction
The GT3000 is your hassle-free provider for clean air and healthy living. With proper care and maintenance (see “CLEANING” page 17), the GT3000 will operate with the same robust power and efficiency for several years beyond the date of purchase. With the push of a button the GT3000 starts working to eliminate the biological contaminates and dangerous pathogens in your home or office. - Page 7 Electrostatic Filtration The GT3000 generates a continuous stream of millions of negative ions that An advanced electrostatic filter is included with the GT3000 to help keep the purifier circulate throughout the home. These ions charge particles (such as dust, dander or clean while at the same time filter out the clumped particles (See Needlepoint bacteria) causing them to attract other particles and clump together.
-
Page 8: Diagrams
(Unit) Front of Unit Rear of unit Side of Unit Ionization Needle Rear Cover Screw Rear Cover Front Grille Rear Cover Clasps Unit Rear Control Panel Power Adapter Inlet Unit Front Copyright © 2011 GreenTech Environmental | All Rights Reserved... - Page 9 (Unit) Rear of Unit (Rear Cover Removed) Rear of Unit (Filter Assembly Removed) Power Supply Brass Thumbscrews PCO Cell Power Cord Filter Assembly PCO Cell Nuts Power Cord Plug Filter Assembly Clasps PCO Cell Connector Power Adapter Purification Plate Power Adapter Plug...
- Page 10 Purifier Level Control Purification Level Control Fan Speed Control Away Mode Toggle Normal/High Mode Control Infrared Receiver Normal/High Toggle Away Mode Control Reminder Reset Button Fan Level Control Sleep Mode Control Copyright © 2011 GreenTech Environmental | All Rights Reserved...
- Page 11 (Controls) Control Panel Screen Mode Specific Display NORMAL PURIFIER SETTING MUST NOT EXCEED SIZE OF AREA PURIFIER SETTING MUST NOT EXCEED SIZE OF AREA REPLACE PLATE AREA MUST BE REPLACE PCO CELL HIGH UNOCCUPIED NORMAL HIGH AWAY PERFORM CLEANING AREA MUST BE UNOCCUPIED AWAY Maintenance Reminders...
-
Page 12: Setup & Operation
To ensure the unit works properly, there should be as much space as possible in After 24 hours, set the unit to HIGH mode and set the square footage to front of your GT3000 so that it can efficiently process the air in the area. 250 square feet. - Page 13 Operating the Unit Turning the Unit On/Off Press the Power Button on the Control Panel or Remote to turn the unit on. The unit will initially be set to Normal Mode. Press the Power Button once more to turn the power off. Using Normal Mode Press Normal/High button until “Normal”...
- Page 14 Replace PCO Cell When “Replace PCO Cell” appears, the PCO Cell has reached the end of its useful life and must be replaced. Contact your distributor or GreenTech Environmental (www. GreenTechEnv.com) to order a replacement. Once a replacement has been obtained, follow the instructions in “DISASSEMBLY/ASSEMBLY” to replace your old PCO Cell with your new one.
-
Page 15: Disassembly/Assembly
Disassembly/Assembly Disassembly Tools Required Removing the Purification Plate: You will need a #2 Phillips screwdriver. Grasp the Purification Plate on the ceramic and gently pull it out of the grooves on the sides. Workspace Recommendations Clean (see “CLEANING: Purification Plate” page 17) and set the Purification Plate aside. A countertop or flat surface is ideal for disassembling/assembling your unit. - Page 16 Purification Plate Slot as this could seriously damage your unit. Press the power button. The unit will be set to Normal Mode once again. Ensure that the unit’s settings are adjusted to suit the environment (see “Operations” on page 13). Copyright © 2011 GreenTech Environmental | All Rights Reserved...
-
Page 17: Cleaning
Cleaning Your unit should be cleaned monthly to be kept running at peak performance, but depending upon the pollution or odor levels present during initial setup, it is advisable to clean the unit more frequently (weekly or bi-weekly) until the environment has been treated. Cleaning the Unit (Exterior): Wipe down the exterior with a damp cloth or use compressed air or a vacuum cleaner to remove dust. -
Page 18: Troubleshooting
The Purification Plate Generates an Electrical Arc, an Arcing Noise or a Burning Odor This means the Purification Plate is damaged and must be replaced. The unit may or may not display the Replace Plate LCD reminder. To order a replacement, contact your distributor or GreenTech Environmental (www.GreenTechEnv.com). - Page 19 Notes...
- Page 20 TO MAXIMIZE THE EFFECTIVENESS OF YOUR GT3000 WE RECOMMEND THE COMBINED USE OF OUR..Ozone Plate Cleaning Kit Harsh Environment Pre-Filters & 12-Pack 1-Year Supply Benefits of the Ozone Plate Cleaning Kit Ask Yourself if Your Environment is: • Deeper, more effective cleaning than scrubbing •...
Need help?
Do you have a question about the gt3000 and is the answer not in the manual?
Questions and answers
where is a list of replacement parts GT3000
A list of replacement parts for the GreenTech GT3000 can be found on the GreenTech Environmental Canada website under the "pureParts" section.
This answer is automatically generated