
Related Manuals for Sparsh SE4204

Summary of Contents for Sparsh SE4204
- Page 1 H.264 Network Digital Video Recorder User Manual USER MANUAL eYe Series DVR Dual Streaming H.264 Multiplex 4CH/8CH/16Ch Network DVR Model: SE4204/SE4208/SE1216 ...
-
Page 2: Important Safeguards And Warnings
H.264 Network Digital Video Recorder User Manual Welcome Thank you for purchasing our DVR! This manual is designed to be a reference tool for the installation and operation of your system. Here you can find information about this series DVR features and functions, as well as a detailed menu tree. Before installation and operation please read the following safeguards and warnings carefully! Important Safeguards and Warnings Do not place the heavy object on the DVR. -
Page 3: Table Of Contents
H.264 Network Digital Video Recorder User Manual Directory 1 Production Introduction ..........................5 1.1 Product overview ..........................5 1.2 Main functions ............................ 5 2 Open-package check and cable connections ....................7 2.1 Open-package check ......................... 7 2.2 Hard disk installation .......................... 7 2.3 Front panel ............................ - Page 4 H.264 Network Digital Video Recorder User Manual 4.3.6 Abnormal ..........................30 4.4 System ..............................34 4.4.1 General...........................34 4.4.2 Encode ...........................35 4.4.3 Network ..........................37 4.4.4 NetSevice ..........................37 4.4.5 GUI Display ..........................43 4.4.6 PTZ ............................45 4.4.8 Tour ............................45 4.5 Advanced ............................46 4.5.1 HDD Manage ..........................46 4.5.2 Account...........................47 4.5.3 Online user ..........................50 4.5.4 Output adjust ..........................50...
- Page 5 H.264 Network Digital Video Recorder User Manual Page 5...
-
Page 6: Production Introduction
H.264 Network Digital Video Recorder User Manual 1 Production Introduction 1.1 Product overview The series DVR is designed specially for security and defense field which is an outstanding digital surveillance product. It introduces embedded LINUX operating system which is more stable. It introduces standard H.264mp video compressed format and G.711A audio compressed format which insures the high quality image, low error coding ratio and single frame playing. - Page 7 H.264 Network Digital Video Recorder User Manual standard ethernet network interface which fulfills the telecommuting function Intelligent operating mouse action function fast copy and paste operating for the same setting Page 7...
-
Page 8: Open-Package Check And Cable Connections
H.264 Network Digital Video Recorder User Manual 2 Open-package check and cable connections 2.1 Open-package check When you receive the DVR, please check first. First, please check whether there is any visible damage to the package appearance. The protective materials used for the package of the DVR can protect most accidental clashes during transportation. -
Page 9: Front Panel
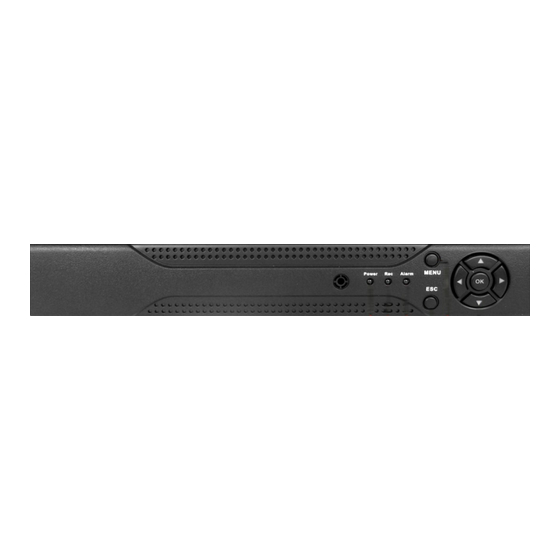
H.264 Network Digital Video Recorder User Manual ⑨ cover the machine fix the cover Installation finished 2.3 Front panel (1) Power indication light (2) Record indication light (3) Alarm indication light (4) ESC (5) Menu (6) Direction and OK 2.4 Rear panel 2.5 Audio and video input and output connections 2.5.1 Video input connections The video input port is BNC connector plug. -
Page 10: Video Output Connections And Options
H.264 Network Digital Video Recorder User Manual 2.5.2 Video output connections and options The video output is divided into PAL/NTSC BNC (1.0V , 75Ω) and VGA output(selective configuration). When replace the monitor by the computer display, there are some issues to notice. 1.Do not stay in the turn-on state for a long time. -
Page 11: Basic Operation
H.264 Network Digital Video Recorder User Manual 3 Basic operation Note: The button in gray display indicates nonsupport. 3.1 Turn on Plug the power supply and turn on the power supply switch. Power supply indicator light shining indicates turning on the video recorder. After the startup you will hear a beep. The default setting of video output is multiple-window output mode. -
Page 12: Preview
H.264 Network Digital Video Recorder User Manual Picture 3.1 System Login Password protection: If the password is continuous wrong three times, the alarm will start. If the password is continuous wrong five times, the account will be locked. (Through reboot or after half an hour, the account will be unlocked automatically). -
Page 13: Playback
H.264 Network Digital Video Recorder User Manual Picture3.3 Main Menu 3.5.2 Playback There are two methods for you to play the video files in the hard disk. 1、 In the desktop shortcut menu. 2、 Main menu>Record->Playback Note: The hard disk that saves the video files must be set as read-write or read-only state.(4.5.1) Picture 3.4 video playback 1. - Page 14 H.264 Network Digital Video Recorder User Manual 【File backup】Backup the chosen file. Click the button and operate as followed. Note: The storage must be installed before the file backup. If the backup is terminated, the already backup can playback individually. Picture 3.5 detect the storage Detect: Detect the storage connected with the DVR such as hard disk or universal disk.
- Page 15 H.264 Network Digital Video Recorder User Manual 【File searching】Search the file according to the searching parameter. Picture 3.7 file searching File type: Set the searching file type. Channel: Set the searching channel. Start Time: Set the searching time scan. 【Playback control】Refer to the following sheet for more information. Button Function Button...
-
Page 16: Record Mode
H.264 Network Digital Video Recorder User Manual 3.5.3 Record Mode Please check current channel status: “○” means it is not in recording status, “●” means it is in recording status. You can use desktop shortcut menu or click [main menu]> [recording function]> [recording set] to enter the recording control interface. - Page 17 H.264 Network Digital Video Recorder User Manual 【Iris】Click button to adjust the iris of the camera. 【Direction control】Control the PTZ rotation. 8 directions control is supportive.(4 directions in Front panel is supportive ) 【High speed PTZ】Full-screen show channel image. Left press mouse and control PTZ to rotate orientation. Left press mouse and then rotate the mouse to adjust the zoom multiple of the camera.
- Page 18 H.264 Network Digital Video Recorder User Manual Value input blank Picture 3.12 PTZ Control 2.Cruise between Points Multiple preset points connected cruise lines, call cruise between points, the PTZ run around on the line 1)Cruise Between Points Settings Cruise lines is connected by multiple preset points, setting procedure is as follows: Step1: In Picture 3.10, the Direction key will turn PTZ to designated location , click Settings button to enter Picture 3.13, Step 2: click Cruise buttons, the write proper value into the Cruise Line and Preset Points blank,...
- Page 19 H.264 Network Digital Video Recorder User Manual Preset Points Blank Cruise Button Cruise Line Blank Picture 3.13 Cruise Between Points Settings 2)The Calls of Cruise between Points In Picture 3.10, click Page Shift button, enter PTZ control menu as shown in Picture 3.12. Please input the number of cruise in the value blank, then click Cruise between Points button, PTZ begins to work on the cruise line.
- Page 20 H.264 Network Digital Video Recorder User Manual 2)Scan Calls In Picture 3.10, click Page Shift button, then enter PTZ control menu as shown in Picture 3.12. Please input the number of scan in the value blank , then click Scan button, PTZ begins to work on the scan line . Click Stop button to stop.
-
Page 21: Color Setting
H.264 Network Digital Video Recorder User Manual 8. Page Shift In Picture 3.12, click Page Shift button into Picture3.16, setting auxiliary function. Auxiliary number corresponding auxiliary switch on the decoder. Picture 3.16 Auxiliary Function Control 【Intuitive Auxiliary Operation】 choose auxiliary equipment, select Open or Close button, switch control; 【Auxiliary Number】The operation of corresponding auxiliary switch according to PTZ agreement;... -
Page 22: Logout
H.264 Network Digital Video Recorder User Manual Picture 3.19 Output Adjust 3.5.7 Logout Logout, shut down the system or reboot up. You can use the desktop shortcut menu or enter [main menu]. Picture 3.20 Logout/Reboot the system 【logout】Quit the menu. Offer password next entrance. 【reboot】Quit the system. -
Page 23: Main Menu
H.264 Network Digital Video Recorder User Manual 4 Main menu 4.1 Main menu navigation Main menu Sub menu Function Record Config Set the recording configuration, recording type, recording time section playback Set recording look-up, recording play, video file storage backup Detect or format backup equipment, back the selective files Alarm Motion... -
Page 24: Record
H.264 Network Digital Video Recorder User Manual TV adjust Adjust TV upside, downside, nearside, starboard distance Automatic Set automatic reboot system and automatic deleting files. maintenance Restore Resume setup state: common setup, code setup, recording setup, alarm setup, network setup, network service, preview playback, serial port setup, user management System Hard disk... -
Page 25: Playback
H.264 Network Digital Video Recorder User Manual 【Redundancy】Choose the redundancy function option to implement the file double backup function. Double backup is writing the video files in two hard disks. When you do the double backup, make sure that there are two hard disks installed. -
Page 26: Motion Detect
H.264 Network Digital Video Recorder User Manual 【Stop】Stop the backup. 【Backup】Click backup button and the dialog box is popped up. You can choose the backup file according to the type, channel and time. Picture 4.4 File Backup Remove:Clear the file information. Add:Show the file information satisfying the set file attributes. - Page 27 H.264 Network Digital Video Recorder User Manual Picture 4.4 Motion Detect 【Channel】Choose the set motion detect channel. 【Enable】■ means that the motion detect function is on. 【Sensitivity】Choose in the six options according to the sensitivity. 【Region】Click setup and enter the set area. The area is divided into PAL 8x8. Green block means the current cursor area.
- Page 28 H.264 Network Digital Video Recorder User Manual Picture 4.6 set the time section 【Interval】Only one alarm signal is turned on even there are several motion detect signals in the set interval. 【Alarm output】Start the external equipment of corresponding linkage alarm when the motion detect alarm is turned on.
-
Page 29: Video Blind
H.264 Network Digital Video Recorder User Manual 【Delay】When alarm is over,recording will last some seconds(10~300sec),then stop. 【Show message】Pop the alarm information dialog box in the local host computer screen. 【Send EMAIL】■ means sending an email to user when the alarm is turned on. Note: Set in the [NetService] and send email. -
Page 30: Abnormal
H.264 Network Digital Video Recorder User Manual Set method: refer to chapter 4.3.1. Motion detect Note:"Advanced" button is the same as rightclick. 4.3.4 Abnormal Analysing and inspecting current software and hardware of the device: When some abnormal events happen, the device will make a relative answer such as show message and buzzer. Picture 4.12 Abnormal 【Event Type】... -
Page 31: System
H.264 Network Digital Video Recorder User Manual 4.4.1 General Picture 4.13 General setup 【System time】Set the system data and time. 【Date format】Choose the data format: YMD, MDY, DMY. 【Date Separator】Choose list separator of the data format. 【Time Format】Choose time format: 24-hour or 12-hour. 【Language】... -
Page 32: Encode
H.264 Network Digital Video Recorder User Manual Picture 4.14 DST (week) Picture 4.15 DST (date) 4.4.2 Encode setup Set the video/audio code parameter: video file, remote monitoring and so on. Set every independent channel’s coding parameter in the left part, and set the combine encode parameter in the right part. Note: Combine encode introduces video compression technique which combines and compresses multi-channel’s video to a special channel. -
Page 33: Network
H.264 Network Digital Video Recorder User Manual 【Compression】Standard H.264 main profile. 【Resolution】Resolution type:D1/ HD1/CIF / QCIF. 【Frame Rate】P:1 frame/s~25 frame/s; N: 1 frame/s~30 frame/s 【Bit Rate Type】You can choose limited code stream or variable code stream. When you choose the variable code stream there are six image quality options. -
Page 34: Netsevice
H.264 Network Digital Video Recorder User Manual 【Net Card】You can choose cable network card or wireless network card. 【DHCP Enable】Obtain IP address automatically(not suggested) Note:DHCP server is preinstalled. 【IP address】Set the IP address. Default: 192.168.1.10. 【Subnet mask】Set the subnet mask code. Default: 255.255.255.0. 【Gateway】Set the default gateway. - Page 35 H.264 Network Digital Video Recorder User Manual 【PPPoE setup】 Picture4.19 PPPOE Input the user name and password that ISP(Internet service provider)provides. After saving it reboot up your System. Then the DVR will build a network connection based on PPPoE. The IP address will change into dynamic IP address after above operation is well done.
- Page 36 H.264 Network Digital Video Recorder User Manual 【EMAIL setup】 If the alarm is turned on or the alarm linkage photos are taken, send an email about the alarm information and the photos to appointed address. Picture 4.21 EMAIL SMTP server: Email server address. It could be an IP address or domain name. Domain name can be translated only it is the correct DNS configuration.
- Page 37 H.264 Network Digital Video Recorder User Manual Picture 4.22 IP IP FILTER 【DDNS】 It is the abbreviation of dynamic domain name server. Local domain name:Provide the domain name registered by DDNS. User name:Provide the account registered by DDNS. Password:Provide the password registered by DDNS. When the DDNS is successfully configured and start, you can connect the domain name in the IE address column to visit.
- Page 38 H.264 Network Digital Video Recorder User Manual Picture 4.24 FTP setup 【Enable】Click Enable, then all settings will be available 【Server IP】 IP address for FTP server 【Port】 Domain Port of FTP,default 21 【User Name】User name of FTP 【Password】Password of user 【Max File Length】Max length for upload files at every packed, default 128M 【DirName】Directory of uploading files 【Mobile Monitor Setup】...
-
Page 39: Gui Display
H.264 Network Digital Video Recorder User Manual 【Port】 It’s a port of mobile monitoring which you need to make a router mapping of if want to visit it by mobile 【UPNP】 UPNP protocol can auto port forwarding on router,make sure UPNP is running on router before use Picture 4.27 【Enable】Choose Enable to make sure all UPNP settings available 【HTTP】Route will automatically distribute HTTP port for the device, when IE viewing, it need this port(e.g. - Page 40 H.264 Network Digital Video Recorder User Manual Picture 4.28 GUI Display 【Channel Title】 Click the channel name modify button and enter the channel name menu. Modify the channel name. The 16 Chinese characters and 25 letters are supportive. 【Time Display】means the selective state. Display the system data and time in the surveillance window. 【Channel Title】means the selective state.
-
Page 41: Ptz
H.264 Network Digital Video Recorder User Manual 4.4.6 PTZ setup Picture 4.29 PTZ setup 【Channel】Choose the dome camera input channel. 【Protocol】Choose the corresponding dome protocol. (PELCOD as an example) 【Address】Set as the corresponding dome address. Default: 1.(Note:The address must be consistent with the dome address.)... -
Page 42: Advanced
H.264 Network Digital Video Recorder User Manual Picture 4.31 tour setup 【interval】Set the patrol switch interval. The set range is 5-120 seconds. means turn off/on the patrol. Note: 4.5 Advanced 4.5.1 HDD Manage Configure and manage the hard disk. The menu displays current hard disk information: hard disk number, input port, type, status and overall capability. -
Page 43: Account
H.264 Network Digital Video Recorder User Manual Picture4.32 HDD Manage 4.5.2 Account Manage the user purview. Note:1. The character length is 8 bytes at most for the following user and user team name. The blank ahead or behind the character string is invalid.The middle blank in the character string is valid. Legal characters include: letter, number, underline, subtraction sign, dot. - Page 44 H.264 Network Digital Video Recorder User Manual Picture 4.33 Account 【Modify User】Modify the existed user attribute. 【Modify Group】Modify the existed team attribute. 【Modify Password】Modify the user password. You can set 1-6 bit password. The blank ahead or behind the char string is invalid. The middle blank in the char string is valid. Note:...
- Page 45 H.264 Network Digital Video Recorder User Manual Picture 4.35 add user 【Add Group】Add a user team and set the purview. There are 36 different purviews: shut down the equipment, real time surveillance, playback, recording setup, video file backup and so on. Picture 4.36 Add Group 【Delete User】Delete the current user.
-
Page 46: Online User
H.264 Network Digital Video Recorder User Manual Picture 4.37 Delete Group 4.5.3 Online User Look up the network user information in the local DVR. You can choose the network user and cut the connection. Then the user is locked until next boot-strap. Picture 4.38 Online User 4.5.4 TV adjust Refer to chapter 3.5.7. -
Page 47: Restore
H.264 Network Digital Video Recorder User Manual Picture 4.39 Auto maintain 4.5.6 Restore The system restore to the default setup. You can choose the items according to the menu. Picture 4.40 Restore 4.5.7 Upgrade Upgrade Picture 4.41 Page 47... -
Page 48: Device Info
H.264 Network Digital Video Recorder User Manual 【 Upgrade】choose USB interface. 【Upgrade file】choose the file which needs upgraded. 4.5.8 Device Info Provide device interface info like audio in,alarm in/out to be conveniently used for user. Picture 4.42 Device Info. 4.6 Info 4.6.1 HDD info Display the hard disk state: hard disk type, overall capability, residual capability, the recording time and so on. -
Page 49: Bps
H.264 Network Digital Video Recorder User Manual the damaged hard disks, then install a new one. * behind serial number means the current working disk such as 1*. If the corresponding disk is damaged, the information will show “?”. 4.6.2 BPS Display the code stream(Kb/S)and hard disk capability (MB/H)in real time. -
Page 50: Version
H.264 Network Digital Video Recorder User Manual 4.6.4 Version Display the basic information such as hardware information, software edition, issue data and so on. Picture 4.46 Version 4.7 Shut down system Refer to chapter 3.5.8. Page 50... -
Page 51: Faq And Maintenance
H.264 Network Digital Video Recorder User Manual 5 FAQ and maintenance 5.1 FAQ If the problems are not listed, please contact the local service or call the HQ service. We are willing to offer the service. 1、 The DVR can not boot up normally. Possible reasons are as followed: The power supply is not correct. - Page 52 H.264 Network Digital Video Recorder User Manual image becomes black and white. The DVR is not matched the monitor impedance. The video transmission distance is too far or the loss of the video transmission line is too large. The color and brightness setting of the DVR is wrong. 6、...
- Page 53 H.264 Network Digital Video Recorder User Manual The address of the PTZ decoder and the DVR are not matched. When multiple decoders are connected, the far port of the PTZ decoder line A(B) must connect Ω a 120 resistance to reduce the reflection otherwise the PTZ control is not stable. The distance is too far.
- Page 54 H.264 Network Digital Video Recorder User Manual The backup equipment is not compatible. The backup equipment is damaged. 17、 The keyboard cannot control the DVR. Possible reasons are as followed: The serial port of the DVR is not set correctly. The address is not correct.
-
Page 55: Maintenance
H.264 Network Digital Video Recorder User Manual Please contact the local service or call the HQ service. We will offer the service according the machine type and the program edition. 5.2 Maintenance Please brush printed circuit boards, connectors, fans, machine box and so on regularly. Please keep the grounding well done to prevent the video or audio signal interfered and the DVR from static or inductive electricity. -
Page 56: Appendix 1.Remote Controller Operation
H.264 Network Digital Video Recorder User Manual Appendix 1.Remote controller operation Serial Name Function number Multi-window button Same function as Multi-window button in the front panel Numeric button Code input/number input/channel switch 【Esc】 Same function as【Esc】button in the front panel Direction button Same function as direction button in the front panel Record control... -
Page 57: Appendix 2.Mouse Operation
H.264 Network Digital Video Recorder User Manual Appendix 2.Mouse operation *Take right hand as an example The mouse in USB connection is supported. Operation Function Double click one item in the file list to playback the video Double click the playback video to zoom in or out the Double left click screen Double click the channel to make it full screen display... -
Page 58: Appendix 3.Hard Disk Capability Calculation
H.264 Network Digital Video Recorder User Manual Appendix 3.Hard disk capability calculation Make sure the hard disk installed to the DVR for the first time. Pay attention to the IDE hard disk lines connection. 1、 Hard disk capability There is no limit for recording machine. We recommend 120G~250G size to keep better stability. 2、... -
Page 59: Appendix 4.Technique Parameters
H.264 Network Digital Video Recorder User Manual Appendix 4.Technique parameters Type 16ch Main processor High performance embedded microprocessor Operation system Embedded LINUX operation system System System resource synchronous multi-channel recording, synchronous multi-channel sub-code stream, synchronous multi-channel playback, synchronous network operation Operation interface 16 bit true color graphical menu interface, mouse operation supportive Interface... - Page 60 H.264 Network Digital Video Recorder User Manual Video output 1 BNC, 1 VGA Audio input 4 RCA 1 RCA Audio output 1 RCA Network port RJ45 10M/100M PTZ control port 1 RS485 USB port 2* USB2.0 ports Hard disk port 1 SATA port Power supply 12V/2A external power supply...
- Page 61 H.264 Network Digital Video Recorder User Manual Samriddhi Automations Private Limited Corporate Office: B - 118, Sector - 10, Noida, U.P. (India) Tel : + 91 - 120 - 4518 900 (20 Lines) Works: Plot No. : 75, Sector - 7, I.I.E., SIDCUL, Haridwar (India) Tel : + 91- 01334 - 645 011, 239 396 Service Center: A - 1 / 15, New Kondli, New Delhi.
Need help?
Do you have a question about the SE4204 and is the answer not in the manual?
Questions and answers