
Related Manuals for Acorp LAN110

Summary of Contents for Acorp LAN110
-
Page 1: Adsl Router
ADSL Router User’s Manual User’s Manual ACORP ADSL Router LAN110 / LAN410 (1-Port / 4-Port) (с) ACORP 2008 Revision 2.0 Page 1 of 58... -
Page 2: Table Of Contents
MAC Filtering......................21 3.3.3.3 Port Forwarding....................23 3.3.3.4 DMZ........................24 3.3.3.5 URL Blocking......................25 3.3.3.6 Domain blocking....................27 3.3.4 IGMP Proxy Configuration .................... 28 3.3.5 UPnP Configuration ...................... 30 3.3.6 RIP Configuration......................31 (с) ACORP 2008 Revision 2.0 Page 2 of 58... - Page 3 1483 Routed Mode ........................ 55 Appendices ..............................56 A.1 1483 Bridged Model ........................56 A.2 1483 MER Model..........................56 A.3 PPPoE Model ..........................57 A.4 PPPoA Model ..........................57 A.5 1483 Routed Model ......................... 58 (с) ACORP 2008 Revision 2.0 Page 3 of 58...
-
Page 4: System Overview
ADSL2+ (G.992.5) 1.2.2 Software Features RFC-1483/2684 LLC/VC-Mux bridged/routed mode RFC-1577 Classical IP over ATM RFC-2516 PPPoE RFC-2364 PPPoA ITU-T 1.610 F4/F5 OAM send and receive loop-back 802.1d Spanning-Tree Protocol DHCP Client/Server/Relay (с) ACORP 2008 Revision 2.0 Page 4 of 58... -
Page 5: Management
RJ-45 Ethernet cable RJ-11 ADSL line 2.2 Hardware Setup Procedures 1. Connect RJ-11 line from LAN110/LAN410H5200 to DSLAM. 2. Connect RJ-45 line from your PC to LAN110/LAN410 Ethernet port. 3. Connect the 12V/1A AC power. (с) ACORP 2008 Revision 2.0... -
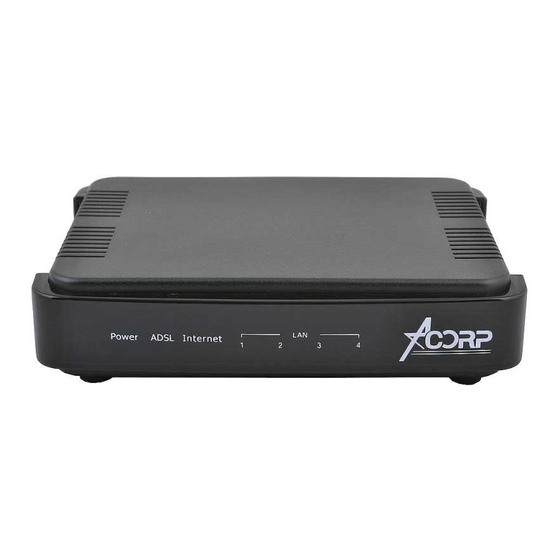
Page 6: Descriptions Of Leds And Interfaces
ADSL Router User’s Manual 2.3 Descriptions of LEDs and Interfaces 2.3.1 Front Panel LAN110 1port ADSL Router Power ADSL Internet Color Status Descriptions Power OFF Power Green GREEN Power ON Can not find DSLAM ADSL Green BLINK Start to handshaking with DSLAM... -
Page 7: Rear Panel
ADSL Router User’s Manual 2.3.2 Rear Panel LAN110 1 port ADSL Router LINE RESET POWER ON/OFF Items Usage Resets to factory defaults. To restore factory defaults, keep the device powered RESET on and push a paper clip into the hole. Press down the button over 5 seconds and... -
Page 8: Software Configuration
OK. (the default user name is “ ” and password is Admin “ ”) Once you have connected to ADSL2+ router. You will see the status page. (с) ACORP 2008 Revision 2.0 Page 8 of 58... -
Page 9: Lan Configuration
Click to save the setting to the configuration. New parameters will take effect after save into flash memory and reboot the system. See section “Admin” for save details. Undo Discard your changes. (с) ACORP 2008 Revision 2.0 Page 9 of 58... -
Page 10: Wan Configuration
And there are several channel modes to be selected for each PVC channel. For each of the channel modes, the setting is quite different accordingly. Please reference to the section – Channel Mode Configuration for details. (с) ACORP 2008 Revision 2.0 Page 10 of 58... - Page 11 VCC was found With the connection established, the PVC is stored in flash as the connection default PVC. Therefore upon reboot, this PVC is automatically chosen as the PVC for that connection. (с) ACORP 2008 Revision 2.0 Page 11 of 58...
-
Page 12: Atm Setting
Virtual Channel Identifier. This is read-only field and is selected on the Select column in the Current ATM VC Table. The VCI, together with VPI, is used to identify the next destination of a cell as it passes through to the ATM switch. (с) ACORP 2008 Revision 2.0 Page 12 of 58... - Page 13 Set new PVC OoS mode for the selected PVC. New parameters will take effect after save into flash memory and reboot the system. See section “Admin” for save details. Undo Discard your settings. (с) ACORP 2008 Revision 2.0 Page 13 of 58...
-
Page 14: Adsl Setting
Function buttons in this page: Tone Mask Choose tones to be masked. Masked tones will not carry any data. Apply Changes Click to save the setting to the configuration and the modem will be retrained. (с) ACORP 2008 Revision 2.0 Page 14 of 58... -
Page 15: Services Configuration
The Lease Time is the amount of time that a network user is allowed to maintain a network connection to the device using the current dynamic IP address. At the end (с) ACORP 2008 Revision 2.0 Page 15 of 58... -
Page 16: Dhcp Relay Configuration
Internet access, the device contacts your ISP to obtain the IP configuration, and then forward that information to the host. You should set the DHCP mode after you configure the DHCP relay. (с) ACORP 2008 Revision 2.0 Page 16 of 58... -
Page 17: Dns Configuration
Select this item if you want to use the DNS servers obtained by the WAN interface Automatically via the auto-configuration mechanism. Set DNS Manually Select this item to configure up to three DNS IP addresses. (с) ACORP 2008 Revision 2.0 Page 17 of 58... -
Page 18: Dynamic Dns
DNS server and access your device each time using the same host name. The Dynamic DNS page allows you to enable/disable the Dynamic DNS feature. (с) ACORP 2008 Revision 2.0 Page 18 of 58... - Page 19 User-name assigned by the DDNS service provider. Password Password assigned by the DDNS service provider. Function buttons in this page: Add this registration into the configuration. Remove Remove the selected registration from the Dynamic DNS Table. (с) ACORP 2008 Revision 2.0 Page 19 of 58...
-
Page 20: Firewall Configuration
Specify the default action on the WAN to LAN forwarding path. Function button for this first setting block: Apply Changes Click to save the setting of default actions to the configuration. (с) ACORP 2008 Revision 2.0 Page 20 of 58... -
Page 21: Mac Filtering
3.3.3.2 MAC Filtering The MAC filtering feature allows you to define rules to allow or deny frames through the device based on source MAC address, destination MAC address, and traffic direction. (с) ACORP 2008 Revision 2.0 Page 21 of 58... - Page 22 MAC address space and are considered as don’t care. Destination MAC Address The destination MAC address. It must be xxxxxxxxxxxx format. Blanks can be used in the MAC address space and are considered as don’t care. (с) ACORP 2008 Revision 2.0 Page 22 of 58...
-
Page 23: Port Forwarding
Port Forwarding entry will create a tunnel through your firewall so that the computers on the Internet can communicate to one of the computers on your LAN on a single port. (с) ACORP 2008 Revision 2.0 Page 23 of 58... -
Page 24: Dmz
Internet. Enter the IP address of that computer as a DMZ (Demilitarized Zone) host with unrestricted Internet access. When doing this, the DMZ host is no longer behind the firewall. (с) ACORP 2008 Revision 2.0 Page 24 of 58... -
Page 25: Url Blocking
URLs based on string matches. This can allow large numbers of URLs to be blocked by specifying only a FQDN (such as tw.yahoo.com). The URL Blocking enforce a Web usage policy to control content downloaded from, and uploaded to, the Web. (с) ACORP 2008 Revision 2.0 Page 25 of 58... - Page 26 Add FQDN into URL Blocking table. Delete Selected (FQDN) Delete the selected FQDN from the URL Blocking table. You can click the checkbox at the Select column to select the Blocked FQDN. Delete All (FQDN) (с) ACORP 2008 Revision 2.0 Page 26 of 58...
-
Page 27: Domain Blocking
Field Description Domain Blocking Enable / Disable the Domain Blocking feature. Domain The blocked domain. e.g. If the URL of Taiwan Yahoo web site is tw.yahoo.com, the domain can be yahoo.com. (с) ACORP 2008 Revision 2.0 Page 27 of 58... -
Page 28: Igmp Proxy Configuration
The IGMP Proxy page allows you to enable multicast on WAN and LAN interfaces. The LAN interface is always served as downstream IGMP proxy, and you can configure one of the available WAN interfaces as the upstream IGMP proxy. (с) ACORP 2008 Revision 2.0 Page 28 of 58... - Page 29 Enable/disable IGMP proxy feature Proxy Interface The upstream WAN interface is selected here. Function buttons in this page: Apply Changes Click to save the setting to the configuration. Undo Discard your settings. (с) ACORP 2008 Revision 2.0 Page 29 of 58...
-
Page 30: Upnp Configuration
Enable/disable UPnP feature. WAN Interface Select WAN interface that will use UPnP from the drop-down lists. Function buttons in this page: Apply Changes Click to save the setting to the system configuration. (с) ACORP 2008 Revision 2.0 Page 30 of 58... -
Page 31: Rip Configuration
RIP. Your ISP requests that you run RIP for communication with devices on their − network.. Fields on the first setting block: Field Description Enable/disable RIP feature. (с) ACORP 2008 Revision 2.0 Page 31 of 58... - Page 32 Add a RIP entry and the new RIP entry will be display in the table Delete Selected Entry Delete a selected RIP entry. The RIP entry can be selected on the Select column of the RIP Config Table. Delete All Delete all selected RIP entry. (с) ACORP 2008 Revision 2.0 Page 32 of 58...
-
Page 33: Advance Configuration
Save this bridge configuration. New configuration will take effect after saving into flash memory and rebooting the system. See section “Admin” for details. Show MACs List MAC address in forwarding table. (с) ACORP 2008 Revision 2.0 Page 33 of 58... -
Page 34: Routing
ISP services, or if you connect to a remote corporate LAN. Fields in this page: Field Description Enable Check to enable the selected route or route to be added. (с) ACORP 2008 Revision 2.0 Page 34 of 58... -
Page 35: Snmp Configuration
Figure. 3.4.3 SNMP Configuration Simple Network Management Protocol (SNMP) is a troubleshooting and management protocol that uses the UDP protocol on port 161 to communicate between clients and (с) ACORP 2008 Revision 2.0 Page 35 of 58... - Page 36 MIB. Function buttons in this page: Apply Changes Save SNMP configuration. New configuration will take effect after saving into flash memory and rebooting the system. See section “Admin” for details. (с) ACORP 2008 Revision 2.0 Page 36 of 58...
-
Page 37: Ip Qos
Traffic Classification rule. You can configure any or all field as needed in these two QoS blocks for a QoS rule. (с) ACORP 2008 Revision 2.0 Page 37 of 58... - Page 38 Select this field to mark the 3-bit user-priority field in the 802.1p header of the packet that match this classification rule. Note that this 802.1p marking is workable on a given PVC channel only if the VLAN tag is enabled in this PVC channel. (с) ACORP 2008 Revision 2.0 Page 38 of 58...
-
Page 39: Remote Access
HTTP service for example; when it is changed to 8080, the HTTP server address for the WAN side is http://dsl_addr:8080, where the dsl_addr is the WAN side IP address of the DSL device. (с) ACORP 2008 Revision 2.0 Page 39 of 58... -
Page 40: Diagnostic
Go! To start the ping command, the ping result will then be shown in this page. Fields in this page: Field Description Host Address The IP address you want to ping. (с) ACORP 2008 Revision 2.0 Page 40 of 58... -
Page 41: Atm Loopback
The ATM OAM flow type. The selection can be F5 Segment or F5 End-to-End. Loopback Location ID The loop-back location ID field of the loop-back cell. The default value is all 1s (ones) to indicate the endpoint of the segment or connection. (с) ACORP 2008 Revision 2.0 Page 41 of 58... -
Page 42: Adsl
ADSL Router User’s Manual 3.5.3 ADSL This page shows the ADSL diagnostic result. Click Start button to start the ADSL diagnostic. (с) ACORP 2008 Revision 2.0 Page 42 of 58... -
Page 43: Diagnostic Test
LAN and WAN sides. Fields in this page: Field Description Select the Internet The available WAN side interfaces are listed. You have to select one for the WAN Connection side diagnostic. (с) ACORP 2008 Revision 2.0 Page 43 of 58... -
Page 44: Admin
IMPORTANT! Do not turn off your modem or press the Reset button while this procedure is in progress. 3.6.2 Backup/Restore This page allows you to backup and restore your configuration into and from file in your host. (с) ACORP 2008 Revision 2.0 Page 44 of 58... -
Page 45: System Log
ADSL Router User’s Manual 3.6.3 System Log This page shows the system log. (с) ACORP 2008 Revision 2.0 Page 45 of 58... -
Page 46: Password
Confirm your selection. − Click the Upload button to start upgrading. − IMPORTANT! Do not turn off your DSL device or press the Reset button while this procedure is in progress. (с) ACORP 2008 Revision 2.0 Page 46 of 58... -
Page 47: Acl
The Access Control List (ACL) is a list of permissions attached to the DSL device. The list specifies who is allowed to access this device. If ACL is enabled, all hosts cannot access this device except for the hosts with IP address in the ACL table. (с) ACORP 2008 Revision 2.0 Page 47 of 58... -
Page 48: Time Zone
DSL device Fields in this page: Field Description Current Time The current time of the specified time zone. You can set the current time by yourself or configured by SNTP. (с) ACORP 2008 Revision 2.0 Page 48 of 58... -
Page 49: Statistics
ISP to diagnose network and Internet data transmission problems. To display updated statistics showing any new data since you opened this page, click Refresh. (с) ACORP 2008 Revision 2.0 Page 49 of 58... -
Page 50: Adsl
ADSL router supports multiple channel operation modes. This section will show procedures to configure the router. 4.1 Bridge Mode ADSL modem/router is bridge mode enabled by factory default. There is a 1483-bridged mode PVC 5/35 in system. (с) ACORP 2008 Revision 2.0 Page 50 of 58... - Page 51 3. Click “Add” button to add this channel into VC table. 4. Open the WEB page at “Admin/ Commit/Reboot”. Press “Commit” to save the settings into flash memory. 5. The new settings will take effect after reboot the system. (с) ACORP 2008 Revision 2.0 Page 51 of 58...
-
Page 52: Mer (Mac Encapsulating Routing) Mode
4. Click “Add” button to add this channel into VC table. 5. Open the WEB page at “Admin/ Commit/Reboot”. Press “Commit” to save the settings into flash memory. 6. The new settings will take effect after reboot the system. (с) ACORP 2008 Revision 2.0 Page 52 of 58... -
Page 53: Pppoe Mode
6. Set DNS address from your ISP. Reference to section 3.3.2 DNS Configuration. 7. Open the WEB page at “Admin/ Commit/Reboot”. Press “Commit” to save the settings into flash memory. 8. The new settings will take effect after reboot the system. (с) ACORP 2008 Revision 2.0 Page 53 of 58... -
Page 54: Pppoa Mode
6. Set DNS address from your ISP. Reference to section 3.3.2 DNS Configuration. 7. Open the WEB page at “Admin/ Commit/Reboot”. Press “Commit” to save the settings into flash memory. 8. The new settings will take effect after reboot the system. (с) ACORP 2008 Revision 2.0 Page 54 of 58... -
Page 55: 1483 Routed Mode
4. Click “Add” button to add this channel. 5. Open the WEB page at “Admin/ Commit/Reboot”. Press “Commit” to save the settings into flash memory. 6. The new settings will take effect after reboot the system. (с) ACORP 2008 Revision 2.0 Page 55 of 58... -
Page 56: Appendices
ADSL Router User’s Manual Appendices Appendix : Protocol Stacks A.1 1483 Bridged Model A.2 1483 MER Model (с) ACORP 2008 Revision 2.0 Page 56 of 58... -
Page 57: Pppoe Model
ADSL Router User’s Manual A.3 PPPoE Model A.4 PPPoA Model (с) ACORP 2008 Revision 2.0 Page 57 of 58... -
Page 58: 1483 Routed Model
ADSL Router User’s Manual A.5 1483 Routed Model (с) ACORP 2008 Revision 2.0 Page 58 of 58...
Need help?
Do you have a question about the LAN110 and is the answer not in the manual?
Questions and answers