Table of Contents
Advertisement
Advertisement
Table of Contents

Related Manuals for TruTech 15"

Summary of Contents for TruTech 15"
- Page 1 008-09-0001 FULLSCREEN 15" THIN LCD TV...
-
Page 2: Safety Precautions
SAFETY PRECAUTIONS WARNING: TO REDUCE THE RISK OF ELECTRIC SHOCK, DO NOT REMOVE COVER (OR BACK). NO USER- SERVICEABLE PARTS INSIDE. REFER SER VICING QUALIFIED PERSONNEL. The lightning flash with an arrowhead within a triangle WARNING: TO PREVENT FIRE OR alerts you to uninsulated SHOCK HAZARD, DO NOT EXPOSE dangerous voltage within the... -
Page 3: Important Safety Instructions
IMPORTANT SAFETY INSTRUCTIONS 1. Read Instructions - All the safety radiators, heat registers, stoves, and operating instructions should o t h e r i t e m s ( i n c l u d i n g be read before you use the unit. amplifiers) that produce heat. -
Page 4: Table Of Contents
TABLE OF CONTENTS SAFETY PRECAUTIONS ............2 IMPORTANT SAFETY INSTRUCTIONS ........3 REMOTE CONTROL .............. 5 ACCESSORIES ..............5 REMOTE CONTROL REFERENCE GUIDE ........6 UNIT REFERENCE GUIDE ............7 CONNECTIONS ..............8-10 Connect the power cord .......... 8 Connection a TV antenna ......... 8 Connecting to audio/video devices ...... -
Page 5: Remote Control
REMOTE CONTROL USING THE REMOTE CONTROL REMOVE THE PLASTIC • Point the remote control at the SHEET BEFORE USING THE REMOTE SENSOR located on the REMOTE CONTROL. unit. • When using this unit in very bright light, the infrared REMOTE CONTROL SENSOR may not work properly. -
Page 6: Remote Control Reference Guide
REMOTE CONTROL REFERENCE GUIDE 1) 1) 1) 1) AV2 button AV2 button AV2 button AV2 button 9) 9) 9) 9) TV button TV button TV button TV button AV2 button TV button Directly selects AV2 input. Press to select TV channel mode. 2) 2) 2) 2) FUNCTION button FUNCTION button... -
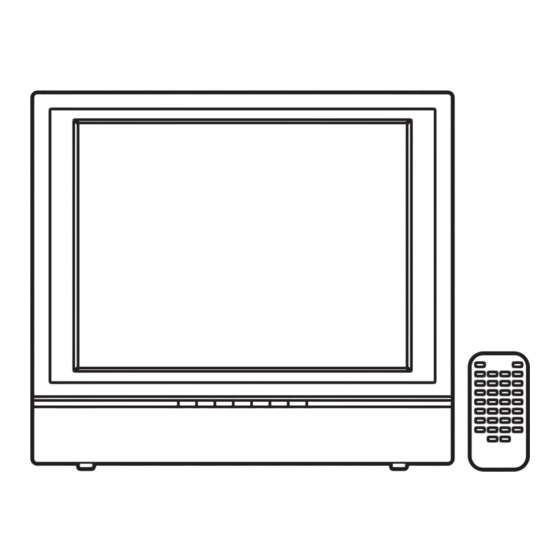
Page 7: Unit Reference Guide
UNIT REFERENCE GUIDE 1) 1) 1) 1) Color LCD Screen Color LCD Screen Color LCD Screen Color LCD Screen Color LCD Screen FUNCTION button FUNCTION button FUNCTION button FUNCTION button FUNCTION button 2) 2) 2) 2) STANDBY STANDBY STANDBY STANDBY indicator STANDBY Select AV1, AV2 or TV. -
Page 8: Connections
CONNECTIONS CONNECT THE POWER CORD CONNECT THE POWER CORD CONNECT THE POWER CORD CONNECT THE POWER CORD CONNECT THE POWER CORD • Be sure the AC power cord is disconnected and all functions are off before making connections. • Make sure that all the components are connected correctly. •... -
Page 9: Connecting To Audio/Video Devices
CONNECTIONS A. CONNECTING TO AUDIO/VIDEO DEVICES A. CONNECTING TO AUDIO/VIDEO DEVICES A. CONNECTING TO AUDIO/VIDEO DEVICES A. CONNECTING TO AUDIO/VIDEO DEVICES A. CONNECTING TO AUDIO/VIDEO DEVICES Connecting to Devices with an S-Video Output To connect to A/V devices such as a VCR, DVD player, or camcorder: Connect the right (red) and left (white) audio output... -
Page 10: Connecting To Sources With Component Video Output (Dvd - Only 480I, 480P, 720P & 1080I Are Supported)
CONNECTIONS B.CONNECTING TO B.CONNECTING TO B.CONNECTING TO SOURCES WITH COMPONENT VIDEO OUTPUT SOURCES WITH COMPONENT VIDEO OUTPUT SOURCES WITH COMPONENT VIDEO OUTPUT SOURCES WITH COMPONENT VIDEO OUTPUT B.CONNECTING TO B.CONNECTING TO SOURCES WITH COMPONENT VIDEO OUTPUT (DVD - ONL (DVD - ONL (DVD - ONL (DVD - ONL (DVD - ONLY 480I, 480P... -
Page 11: Installation
INST INST ALLA ALLA TION TION INST INST INST ALLA ALLA ALLA TION TION TION MOUNTING ON THE W MOUNTING ON THE W MOUNTING ON THE WALL MOUNTING ON THE W MOUNTING ON THE W This unit is designed to work with standard wall-mounting kits (sold separately). -
Page 12: Tv Setup
TV SETUP MAIN MENU MAIN MENU MAIN MENU MAIN MENU MAIN MENU 1. 1. 1. 1. Press the MENU MENU MENU MENU MENU button. 2. 2. 2. 2. Use button to select the options (Picture / Sound / Setup / TV Setting / Restore Setting). -
Page 13: Sound Menu
TV SETUP SOUND MENU SOUND MENU SOUND MENU SOUND MENU SOUND MENU 1. 1. 1. 1. Press the MENU MENU MENU MENU MENU button. 2. 2. 2. 2. Use button to select the Sound menu Sound menu Sound menu Sound menu Sound menu, then press and use the button to confirm the setting. -
Page 14: Parental Setting
TV SETUP PARENT PARENTAL SETTING PARENT AL SETTING AL SETTING AL SETTING PARENT PARENT AL SETTING LOCK CODE LOCK CODE LOCK CODE LOCK CODE LOCK CODE 1. Press the MENU button. 2. Use button to select the Setup menu, then press button to confirm the setting. - Page 15 TV SETUP PARENT PARENT PARENTAL SETTING AL SETTING AL SETTING AL SETTING PARENT PARENT AL SETTING CHILD LOCK CHILD LOCK CHILD LOCK CHILD LOCK CHILD LOCK 1. 1. 1. 1. Press the MENU MENU MENU MENU MENU button. 2. 2. 2.
-
Page 16: Sleep-Timer Setting
TV SETUP TIMERS SETTING TIMERS SETTING TIMERS SETTING TIMERS SETTING TIMERS SETTING 1. 1. 1. 1. Press the MENU MENU MENU button. MENU MENU 2. 2. 2. 2. Use button to select the Setup menu Setup menu Setup menu Setup menu Setup menu, then press button. -
Page 17: Tv Setting
TV SETUP TV SETTING TV SETTING TV SETTING TV SETTING TV SETTING 1. 1. 1. 1. Press the MENU MENU MENU button. MENU MENU 2. 2. 2. 2. Use button to select the TV setting menu TV setting menu TV setting menu TV setting menu TV setting menu, then press button. -
Page 18: Troubleshooting Guide
TROUBLE SHOOTING GUIDE SYMPTOM CAUSE (AND REMEDY) • Check that the AC cord is connected. No power. • Turn on the unit. • Remove any obstacles between the remote and the The remote does unit. not function. • Use the remote near the unit. •... - Page 20 Printed in China 811-161591-011...
Need help?
Do you have a question about the 15" and is the answer not in the manual?
Questions and answers