Table of Contents
Advertisement
Available languages
Available languages
Quick Links
INSTRUCTION MANUAL ENCLOSED
MANUEL D'INSTRUCTION À L'INTÉRIEUR
MANUAL DE INSTRUCCIONES ADJUNTO
STOP
IF YOU HAVE ANY PROBLEMS OR QUESTIONS, EMAIL
OR CALL CUSTOMER SERVICE BEFORE YOU RETURN
THIS PRODUCT TO THE STORE WHERE IT WAS PURCHASED.
ARRÊT
SI VOUS AVEZ DES PROBLÈMES OU QUESTIONS,
ENVOYEZ UN COURRIEL AU SERVICE À LA CLIENTÈLE OU
APPELEZ LE SERVICE À LA CLIENTÈLE AVANT DE RETOURNER
CE PRODUIT OÙ VOUS L'AVEZ ACHETÉ.
pour le service en français: 866-661-1219
PARE
SI TIENE ALGÚN PROBLEMA O PREGUNTAS, ENVÍE UN
MENSAJE DE CORREO ELECTRÓNICO O LLAME AL SERVICIO
DE ATENCIÓN AL CLIENTE ANTES DE DEVOLVER ESTE
PRODUCTO A LA TIENDA EN LA QUE LO COMPRÓ.
Línea para llamadas en español: 866-661-1219
INSTRUCTION MANUAL ENCLOSED
MANUEL D'INSTRUCTION À L'INTÉRIEUR
MANUAL DE INSTRUCCIONES ADJUNTO
ATTENTION
For Customer Service:
www.twinstarhome.com
in English Call: 866-661-1218
ATTENTION
Pour le service à la clientèle:
www.twinstarhome.com
ATENCIÓN
Servicio de atención al cliente:
www.twinstarhome.com
1
STOP
ARRÊT
PARE
Advertisement
Chapters
Table of Contents

Related Manuals for Twin-Star International 26MM4995


Summary of Contents for Twin-Star International 26MM4995
- Page 1 INSTRUCTION MANUAL ENCLOSED MANUEL D’INSTRUCTION À L’INTÉRIEUR MANUAL DE INSTRUCCIONES ADJUNTO ATTENTION STOP STOP IF YOU HAVE ANY PROBLEMS OR QUESTIONS, EMAIL OR CALL CUSTOMER SERVICE BEFORE YOU RETURN THIS PRODUCT TO THE STORE WHERE IT WAS PURCHASED. For Customer Service: www.twinstarhome.com in English Call: 866-661-1218 ATTENTION...
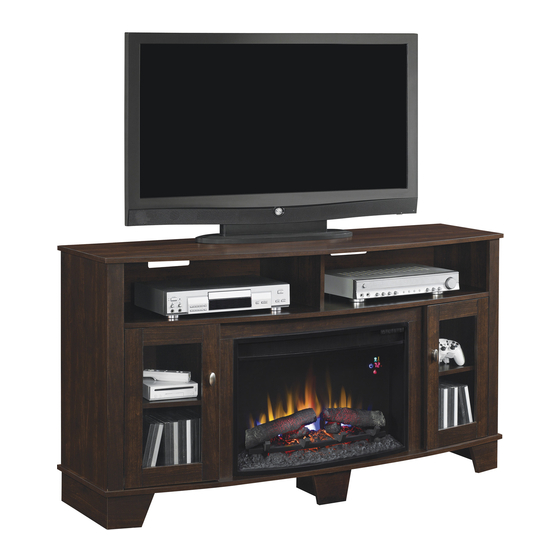
- Page 2 Note: Flat Panel TVs with base support should be placed squarely in the center of the stand with no overhang on any side. A T T E N T I O N For Customer Service: Twin-Star International, Inc. www.twinstarhome.com Requires-Electric Fireplace Requires-Electric Fireplace...
- Page 3 PACKAGE CONTENTS Part Description Quantity Hearth/Base Center Left Side Panel Center Right Side Panel Center Front Panel Left Side Panel Right Side Panel Mantel/Top Wood Shelf Side Back Panel Center Back Panel Center Shelf Left Front Door Right Front Door Back Cross Panel Left Foot Right Foot...
- Page 4 HARDWARE CONTENTS Picture (Shown to size) Description Quantity Part Bolt Washer Wood Dowel Bolt Shelf Pin Screw Knob (with bolt) Tipping Restraint Hardware Screw Plastic Connector Touch-up Pen...
- Page 5 SAFETY INFORMATION WARNING • Before assembly, carefully use scissors or utility knife to cut and unwrap all parts. Make sure you do not discard the hardware. CAUTION • Use care in assembling your new fireplace. Take your time and use the hardware provided and a quality Phillips head screwdriver.
- Page 6 2. Connect the center left side panel (B) and center Fig. 2 right side panel (C) to center front panel (D) by tightening screws (FF) into pre-drilled holes corresponding with connection plate on center front panel (D). HAND TIGHTEN ONLY. Hardware Used Screw Fig.
- Page 7 5. Insert Wood Dowel (CC).Attach the Hearth/Base (A) Fig. 5 to the completed assembly from step 4. Using Bolts (DD) through the pre-drilled holes in the Plastic Connector. HAND TIGHTEN ONLY. Hardware Used Bolt Screw Wood Dowel 6. Insert Wood Dowel (CC) into the pre-drilled holes of Fig.
- Page 8 8. Insert Wood Dowels (CC) into the pre-drilled holes Fig. 8 on the Left/Right Side Panels (E,F). Locate Top Panel (G) and lay fi nished side up on top of completed assembly, using Bolts (DD) through the pre-drilled holes in the Top Panel (G) and tighten. Hardware Used Wood Dowel Bolt...
- Page 9 11. Choose desired height of Shelf (H) and place the Fig. 11 four Shelf Pin (EE) into same height shelf holes inside side panels. Insert Wood Shelf (H), allow Wood Shelf (H) to rest on the Shelf Pin (EE). Hardware Used Shelf Pin 12.
- Page 10 13. We have included two Tipping Restraints for this Fig. 13 unit. You must install this hardware to prevent accidents or injuries. When properly installed, this restraint can provide protection against unexpected tipping of the Unit due to small tremors, bumps or climbing.
- Page 11 A T E N C I Ó N Servicio de atención al cliente: Twin-Star International, Inc. www.twinstarhome.com Necesitará, Además, El Delray Beach, FL 33445 Inglés llamadas:: 866-661-1218...
- Page 12 CONTENIDO DEL PAQUETE Pieza Descripción Cantidad Base Del Hogar Panel Central – Lado Izquierda Panel Central – Lado Derecho Panel Delantero Central Panel Lateral Izquierda Panel Lateral Derecho Repisa/Parte Superior Tabla De Madera Paneles Posteriores Laterales Panel Posterior Central Estante Central Puerta Delantero Izquierda Puerta Delantero Derecho Panel Posterior Transversal...
-
Page 13: Table Of Contents
HERRAJES INCLUIDOS Imagen (Tamaño real) Descripción Cantidad Parte Perno Arandela Espiga De Madera Perno Clavijas Del Estante Tornillo Botón (Con Perno) Herrajes Contra Caídas Tornillo Plástico conecto Bolígrafo Para Retocar... -
Page 14: Aa Perno
INFORMACIÓN DE SEGURIDAD ADVERTENCIA • Antes del montaje, corte con unas tijeras o un bisturí y desenvuelva las piezas cuidadosamente. Asegúrese de no desechar los herrajes. PRECAUCIÓN • Haga el montaje de su nuevo calefactor con cuidado. Tómese su tiempo y utilice las piezas proporcionadas y un destornillador de calidad Phillips Head. -
Page 15: Ff Tornillo
2. Conecte el panel lateral izquierdo central (B) y el Fig. 2 panel lateral derecho central (C) al centro del panel frontal (D) apretando tornillos (FF) en los agujeros pre-agujereados correspondientes a la paleta de conexión en el panel frontal central (D). Hardware Used Tornillo Fig. - Page 16 5. Inserte Toneles de Madera (CC).Adjunte el Suelo/ Fig. 5 Base (A) al montaje completo del paso 4. Usando Tornillos (DD) a través de los agujeros pre- agujereados en el Plástico Conector. Hardware Used Perno Tornillo Espiga De Madera 6. Inserte Toneles de Madera (CC) en los agujeros Fig.
-
Page 17: Gg Botón (Con Perno)
8. Inserte Toneles de Madera (CC) en cada uno Fig. 8 de los agujeros pre-agujereados del Panel Lateral Izquierdo y Derecho (E,F). Localice el Panel Superior (G) y coloque la cara acabada hacia arriba encima del montaje completo, usando Tornillos (DD) a través de los agujeros pre-agujereados del Panel Superior y apriete. - Page 18 11. Elija la altura deseada para la instalación de la Fig. 11 Tabla (H) e inserte las cuatro clavijas en los orifi cios de misma altura, dentro de los paneles laterales. Inserte la Tabla (H) y asegúrese de que la tabla descanse sobre las Clavijas Para Tabla (EE).
-
Page 19: Hh Herrajes Contra Caídas
13. Hemos incluido dos Herrajes contra Caídas para Fig. 13 esta unidad. Debe instalar estos herrajes para evitar accidentes o lesiones. Cuando se los instala correctamente, brindan protección contra la caída inesperada del gabinete debido a temblores leves, o a que alguien choque la unidad o se trepe aella. Taco De Pared Advertencia: Debe instalar el Herraje contra Caídas para evitar accidentes o que se dañe la... - Page 20 Remarque : Placez le téléviseur à écran plat avec support de base au centre du pied, tout en évitant qu’il dépasse des bords. A T T E N T I O N Pour le service à la clientèle : Twin-Star International, Inc. www.twinstarhome.com Nécessite AUSSI un foyer-insert Nécessite AUSSI un foyer-insert...
- Page 21 CONTENU DU CARTON Pièce Description Quantité Panneau Base Panneau Latéral Central Gauche Panneau Latéral Central Droit Panneau Frontal Central Panneau latéral gauche Panneau latéral droit Panneau Supérieur Tablette en bois Panneau Arrière Latéral Panneau Arrière Central Etagère Centrale Porte Gauche de Devant Porte Droite de Devant Panneau Barre Arrière Pied Gauche...
- Page 22 CONTENU DU MATÉRIEL Illustration (en taille réelle) Description Quantité Pièce Boulon Rondelle Goujon en bois Boulon Cheville pour tablette Boutons (arec boulon) Quincaillerie d’arrimage anti basculement Connecteur Crayon pour retouches...
-
Page 23: Aa Boulon
INFORMATION DE SÉCURITÉ AVERTISSEMENT • Avant l’assemblage, à l’aide de ciseaux ou d’un couteau universel, coupez et déballez soigneusement toutes les pièces. Assurez-vous de ne pas jeter de matériel. MISE EN GARDE • Faites preuve de prudence dans l’assemblage de votre nouvelle cheminée. Prenez votre temps et utilisez le matériel fourni et un tournevis cruciforme de qualité. -
Page 24: Ff Vis
2. Fixer le Panneau Latéral Central Gauche (B) et le Fig. 2 Panneau Latéral Central Droit (C) au Panneau Avant Central (D) en serrant les Vis (FF) dans les trous pré forés correspondant avec les plaques de raccord sur le Panneau Avant Central (D). Matériel Utilisé... - Page 25 5. Insérer les Chevilles en Bois (CC).Attacher la Base Fig. 5 (A) sur l’assemblage complété de l’étape 4. En utilisant les Vis (DD) au travers des trous pré forés dans les connecteurs plastiques. Matériel Utilisé Boulon Goujon en bois 6. Insérer les Chevilles en Bois (CC) dans les trous pré Fig.
-
Page 26: Gg Boutons (Arec Boulon)
8. Insérer les Chevilles en Bois (CC) dans les trous Fig. 8 pré forés sur les Panneaux Latéraux Gauche/Droit (E,F). Localiser la Tablette (G) et la déposer à l’endroit au sommet de l’assemblage complété, en utilisant les Vis (DD) au travers des trous pré forés de la Tablette (G) et serrer. - Page 27 11. Choisir la hauteur désirée pour l’installation de la Fig. 11 tablette (H) et insérer les quatre chevilles (EE) à la même hauteur dans les orifi ces intérieurs. Insérer la tablette en bois (H) et voir à ce que la tablette repose bien sur les chevilles pour tablettes (EE).
- Page 28 13. Deux pièces pour l’arrimage anti-basculement ont Fig. 13 été incluses avec le meuble. Il est nécessaire d’installer ces pièces pour éviter les accidents ou les blessures. Si ces pièces sont installées correctement, elles constituent une protection contre tout basculement imprévu du meuble attribuable à...
Need help?
Do you have a question about the 26MM4995 and is the answer not in the manual?
Questions and answers