
Related Manuals for Hoover HMGS 2594 DBK CH


Summary of Contents for Hoover HMGS 2594 DBK CH
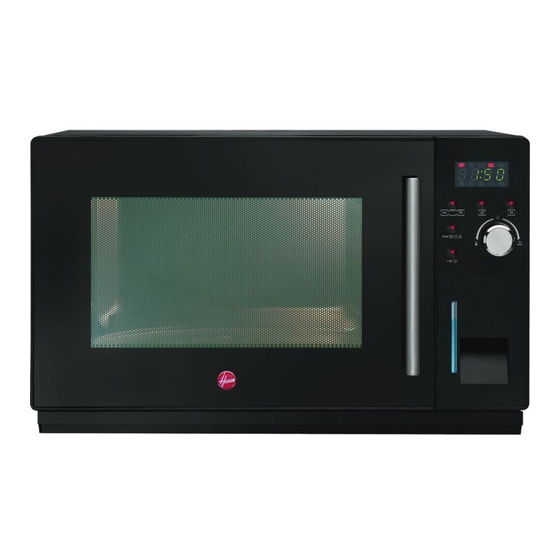
- Page 1 HMGS 2594 DBK CH MICROWAVE OVENS USER INSTRUCTIONS FORNI A MICROONDE MANUALE DI ISTRUZIONI...
-
Page 2: Microwave Oven
Microwave Oven INSTRUCTION MANUAL MODEL:HMGS 2594 DBK CH Read these instructions carefully before using your microwave oven,and keep it carefully. If you follow the instructions, your oven will provide you with many years of good service. SAVE THESE INSTRUCTIONS CAREFULLY... -
Page 3: Precautions To Avoid Possible Exposure To Excessive Microwave Energy
If the apparatus is not maintained in a good state of cleanliness, its surface could be degraded and affect the lifespan of the apparatus and lead to a dangerous situation. Specifications Model: HMGS 2594 DBK CH 230V~50Hz Rated Voltage: 1450W Rated Input Power(Microwave):... -
Page 4: Important Safety Instructions
IMPORTANT SAFETY INSTRUCTIONS To reduce the risk of fire, electric shock, injury to persons WARNING or exposure to excessive microwave oven energy when using your appliance, follow basic precautions, including the following: 1. Warning: Liquids and other foods must 15. Use this appliance only for its intended not be heated in sealed containers since uses as described in manual. -
Page 5: To Reduce The Risk Of Injury To Persons Grounding Installation
To Reduce the Risk of Injury to Persons Grounding Installation DANGER Electric Shock Hazard This appliance must be grounded. In the event of Touching some of the internal an electrical short circuit, grounding reduces the components can cause serious risk of electric shock by providing an escape wire personal injury or death. -
Page 6: Materials You Can Use In Microwave Oven
See the instructions on "Materials you can use in UTENSILS microwave oven or to be avoided in microwave oven." There may be certain non-metallic utensils that are not CAUTION safe to use for microwaving. If in doubt, you can test the Personal Injury Hazard utensil in question following the procedure below. -
Page 7: Setting Up Your Oven
Materials to be avoided in microwave oven Utensils Remarks Aluminum tray May cause arcing. Transfer food into microwave-safe dish. Food carton with May cause arcing. Transfer food into microwave-safe dish. metal handle Metal or metal- Metal shields the food from microwave energy. Metal trim may trimmed utensils cause arcing. -
Page 8: Water Tank Installation
Water Tank Installation 1.Open the water tank (ref. H) and pour water into the tank. Don't put water over the MAX indication on the frontal panel. Then cover the lid of the water tank. 2.Push the water tank into the unit with force,otherwise , if the water tank is not installed properly, the steam function cannot be used but the oven can still work under microwave and grill function. - Page 9 Pay Special Attention to: 1.Under steam function, if the water level of the water tank is lower than the MIN ,the unit will stop working with display "E-2"and the buzzer sounds for alert .At this time ,you should pull out the water tank , fill the water in, then push it into the oven again as above guidence 2.
-
Page 10: Turntable Installation
Turntable Installation a. Never place the glass tray upside down. The glass Hub (underside) tray should never be restricted. b. Both glass tray and turntable ring assembly must always be used during cooking. Glass tray c. All food and containers of food are always placed on the glass tray for cooking. -
Page 11: Operation Instructions
Operation Instructions Special Instructions 1. Do not open the oven door! If it is open,the fan will continue working for 3 minutes.This is normal. 2. When "E-2" displays, which means no water or few water, the fan will continue working for 3 minutes.This is normal. - Page 12 4) Turn " " to adjust the cooking time until the oven displays "20:00". 5) Press " " to start cooking . Note: the step quantities for the adjustment time of the coding switch are as follow: 0---1 : 5 seconds 1---5 : 10 seconds 5---10 min...
- Page 13 3) Press " " to confirm, and the screen displays "C-1". 4) Turn " " to adjust the cooking time until the oven displays "10:00". 5) Press " " to start cooking . Note:If half the grill time passes, the oven sounds twice, and this is normal. In order to have a better effect of grilling food, you should turn the food over, close the door, press "...
- Page 14 The menu chart: Menu Display Weight Sausage 550 g A-2 Oat 1100 1100 g 1 piece A-3 Burger 2 pieces 4 pieces A-4 Bancon 8 pieces 150g 350g Chicken Pieces 500g 100g Pasta 150g 500g 750g Soup 1000 1000g 4 pieces(110g/piece) A-8 Mince Meat Example: If you want to use "Auto Menu"...
- Page 15 8. Steam Menu 1) Turn " " right to choose the menu, and "S-01" to "S-07" will display, which means potato,vegetable,fish,chop,steak,chicken and pizza. 2) Press " " to confirm. 3) Turn " " to choose the default weight as the menu chart. 4) Press "...
- Page 16 Example: If you want to use "Auto Menu" to cook fish for 350g. 1) Turn " " clockwise till "S-03" display. 2) Press " " to confirm. 3) Turn " " to select the weight of fish till "350" display. 4) Press "...
- Page 17 11. Steam Protection Function Code Cause Trouble The sensor temperature cannot arrives at 40 The oven stops the buzzer will sound twice degrees when the oven works for 2 minutes, working. When the sensor temperature arrives at 135 degrees,the oven stops working.The buzzer will sound twice.If no water added, it will display all The oven has no water the time.If water added,the screen will display the...
- Page 18 1 . Sensor Protection Function Code Cause Trouble During steam and cleaning process, if the the buzzer will sound twice sensor is disconnected, the oven will stop The sensor is disconnected working. You must press " " or electricified once again. During steam and cleaning process, if the sensor is short circuit, the oven will stop The sensor is short circuit.
-
Page 19: Maintenance
Maintenance Troubleshooting It is forbidden to run the unit without any food inside. It is very dangerous. - Page 20 This appliance is marked according to the European directive 2002/96/EC on Waste Electrical and Electronic Equipment (WEEE). By ensuring this product is disposed of correctly, you will help prevent potential negative consequences for the environment and human health, which could otherwise be caused by inappropriate waste handling of this product.
-
Page 21: Using The Crusty Plate
Using the Crusty Plate Your HOOVER microwave oven has a crusty plate as an additional accessory. This crusty plate allows you to brown food not only on the top with the grill, but also the bottom of the food turns crispy and brown due to the high temperature of the crusty plate. -
Page 22: Crusty Plate Setting
Using the Crusty Plate How to clean the Crusty Plate Clean the crusty plate with warm water and detergent and rinse off with clean water. Do not use a scrubbing brush or a hard sponge otherwise the top layer will be damaged. Please Note The crusty plate is not dishwasher-safe. - Page 23 Crusty Plate Setting Food Portion Power Preheati Cooking Recommendations ng Time Time Fish Fingers 150g 4min. 6-6½min. Preheat crusty plate. (frozen) (5pcs) 8½-9min. Brush plate with 1 tbsp. 300g Put fish fingers in a (10pcs) circle on the plate. Turn over after 3½...
-
Page 24: Forno A Microonde
Forno a microonde MANUALE DI ISTRUZIONI MODELLO: HMGS 2594 DBK CH Leggere attentamente le istruzioni prima di utilizzare il forno a microonde e conservarle con cura. Il rispetto delle istruzioni garantirà un corretto funzionamento del forno per molti anni. CONSERVARE CON CURA LE PRESENTI ISTRUZIONI... - Page 25 Se l’elettrodomestico non viene mantenuto ben pulito, la sua superficie potrebbe danneggiarsi, potrebbe ridursi la durata dell’elettrodomestico e si potrebbero verificare situazioni pericolose. Caratteristiche tecniche Modello: HMGS 2594 DBK CH Tensione nominale: 230 V~50 Hz Potenza di ingresso nominale 1450 W...
- Page 26 IMPORTANTI ISTRUZIONI PER LA SICUREZZA Per ridurre il pericolo di incendi, scosse elettriche, infortuni o eccessiva esposizione all’energia del forno a microonde durante AVVERTENZA l’uso dell’elettrodomestico, attenersi alle precauzioni fondamentali riportate di seguito: Avvertenza: i liquidi e i prodotti alimentari previsto descritto nel manuale.
- Page 27 Per ridurre il pericolo di infortuni Installazione con messa a terra PERICOLO Pericolo di folgorazione: il Questo apparecchio deve essere collegato a terra. Nel contatto con alcuni caso di cortocircuito elettrico, la messa a terra riduce il componenti interni può pericolo di folgorazioni, garantendo la disponibilità...
- Page 28 UTENSILI Consultare le istruzioni nella sezione “Materiali utilizzabili e non nel forno a microonde”. Alcuni utensili non metallici non sono adatti all’uso nel microonde. In caso di dubbi, è possibile provare l’utensile in questione attenendosi alla ATTENZIONE procedura riportata di seguito. Pericolo di infortuni L’esecuzione di operazioni di Prova degli utensili:...
- Page 29 Materiali non utilizzabili nel forno a microonde Utensili Commenti Vassoi di alluminio Possono causare archi elettrici. Trasferire il cibo in contenitori adatti al microonde. Cartoni per cibo con Possono causare archi elettrici. Trasferire il cibo in contenitori impugnatura in metallo adatti al microonde.
- Page 30 INSTALLAZIONE SERBATOIO ACQUA 1. Aprire il serbatoio dell’acqua (rif. H) e versare l'acqua al suo interno. Non versare acqua oltre l’indicazione “MAX” riportata sul pannello frontale. Quindi coprire il serbatoio di acqua con l’apposito coperchio trasparente. 2. Spingere il serbatoio dell’acqua nell’unità con forza, altrimenti, se il serbatoio non è...
- Page 31 Prestare particolare attenzione a: 1. Durante la funzione vapore, se il livello di acqua del serbatoio è inferiore a “MIN”, l'unità smette di lavorare mostrando sul display l’indicazione "E-2" con contemporaneo segnale acustico per avvertire dell’anomalia. In questo momento, si dovrebbe estrarre il serbatoio, riempirlo con acqua, quindi spingerlo nell’unità...
-
Page 32: Installazione
Montaggio del piatto girevole Perno (parte inferiore) a. Non posizionare il vassoio in vetro capovolto. Il vassoio in vetro non dovrebbe mai presentare restrizioni. b. Sia il vassoio in vetro sia il gruppo dell’anello per piatto Vassoio in girevole devono essere utilizzati sempre durante la vetro cottura. - Page 33 Istruzioni di funzionamento Istruzioni speciali 1. Non aprire lo sportello del forno. Se è aperto, la ventola continua a funzionare per 3 minuti. È un comportamento normale. 2. Quando viene visualizzato “E-2”, avvertenza che indica la mancanza di acqua, la ventola continua a funzionare per 3 minuti.
- Page 34 4) Ruotare “ ” per regolare il tempo di cottura finché il display del forno non visualizza “20 00”. 5) Premere “ ” per avviare la cottura. Nota: il selettore consente di aumentare o diminuire il tempo di cottura secondo i seguenti incrementi: 0-1 min 5 secondi...
- Page 35 3) Premere “ ” per confermare; sul display viene visualizzato “C-1”. 4) Ruotare “ ” per regolare il tempo di cottura finché sul display del forno non viene visualizzato “10:00”. 5) Premere “ ” per avviare la cottura. Nota: nella modalità grill, una volta trascorsa la metà del tempo impostato, il forno emette due segnali acustici;...
- Page 36 Tabella dei menu: Menu Peso Display Salsiccia 550 g Avena 1100 g 1100 1 pezzo Hamburger 2 pezzi 4 pezzi Pancetta 8 pezzi 150 g Pollo 350 g 500 g 50 g Pasta 100 g 150 g 500 g Minestra 750 g 1000 g 1000...
- Page 37 8. Menu a vapore 1) Ruotare “ ” verso destra per selezionare il menu; verranno visualizzati i menu da “S-01” a “S-07”, corrispondenti rispettivamente a patate, verdure, pesce, costata, bistecca, pollo e pizza. 2) Premere “ ” per confermare. 3) Ruotare “ ”...
- Page 38 Esempio: utilizzare “Auto Menu” per cuocere un pesce di 350 g. 1) Ruotare “ ” in senso orario finché non viene visualizzato “S-03”. 2) Premere “ ” per confermare. 3) Ruotare “ ” per selezionare il peso del pesce finché non viene visualizzato “350”. 4) Premere “...
- Page 39 11. Funzione di protezione dal vapore Codice Problema Causa La temperatura del sensore non raggiunge 40° se il forno rimane in funzione per 2 minuti. Quando la temperatura del sensore raggiunge 135°, il forno smette di funzionare. Viene emesso Mancanza di acqua. due volte il segnale acustico.
- Page 40 1 . Funzione di protezione del sensore Codice Problema Causa Sensore scollegato. Durante i processi di cottura a vapore e pulizia, il forno smette di funzionare se il sensore viene scollegato. Premere “ ” oppure ricolle g are la s p ina alla p resa di corrente. Durante i processi di cottura a vapore e pulizia, il Cortocircuito del sensore.
-
Page 41: Manutenzione
Manutenzione Risoluzione dei problemi Normale La ricezione radiotelevisiva può subire interferenze Il forno a microonde quando il forno a microonde è in funzione. Le interferenze interferisce con la ricezione sono simili a quelle di altri elettrodomestici, come mixer, televisiva aspirapolvere e ventilatori elettrici. È un comportamento normale. - Page 42 Questa apparecchiatura è marchiata secondo la Direttiva Europea 2002/96/CE per lo smaltimento delle apparecchiature elettriche ed elettroniche (Waste Electrical and Electronic Equipment, WEEE). Facendo in modo che questo prodotto venga smaltito correttamente aiuterete a prevenire potenziali conseguenze negative per l’ambiente e la salute dell’uomo, che potrebbero essere causate da uno smaltimento non corretto.
- Page 43 Servizio clienti dell’operatore telefonico utilizzato. Dettagli sono presenti sul sito internet www.hoover.it MATRICOLA DEL PRODOTTO. Dove si trova? E’ indispensabile che comunichi al Servizio Assistenza Tecnica Autorizzato la sigla del prodotto ed il numero di matricola (16 caratteri che iniziano con la cifra 3) che troverà...
- Page 44 Utilizzo del piatto crisper Il vostro forno a microonde HOOVER ha un piatto crisper come accessorio aggiuntivo. Il piatto crisper permette di dorare il cibo non solo sulla cima con il grill, ma anche il fondo del cibo diventerà croccante e dorato grazie all'alta temperatura della piatto crisper.
- Page 45 Impostazione del piatto crisper Si raccomanda di preriscaldare il piatto crisper direttamente sul piatto rotante. Preriscaldare il piatto crisper con la funzione 600W+Grill e seguire i tempi e le istruzioni in tabella. Cibo Porzione Potenza Tempo di Tempo di Raccomandazioni preriscal cottura damento...
- Page 46 Impostazione del piatto crisper Cibo Porzione Potenza Tempo di Tempo di Raccomandazioni preriscal cottura damento i n. Bastoncini 150g 6-6½min. Preriscaldare il piatto di pesce (5 pezzi) 8½-9 min. crisper. Spennellare il (surgelati) 300g piatto con 1 cucchiaio (10 pezzi) da tavola di olio.
Need help?
Do you have a question about the HMGS 2594 DBK CH and is the answer not in the manual?
Questions and answers