Advertisement
Table of Contents
THANK YOU FOR PURCHASING YOUR TIMEX
Please read instructions carefully to understand how to operate
your Timex
watch. Your model may not have all of the features
®
described in this booklet.
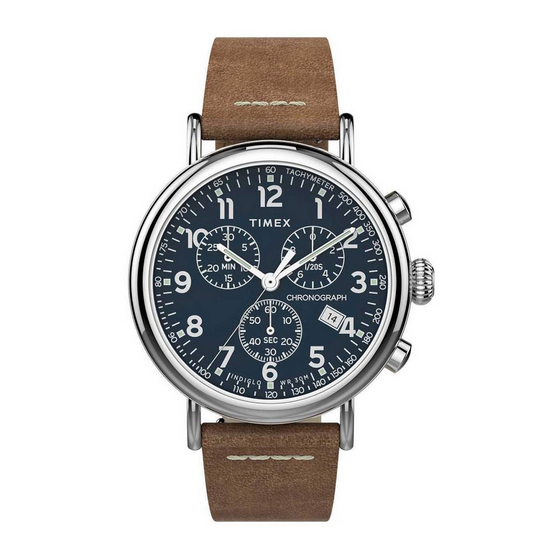
CHRONOGRAPH
CHRONOGRAPH
• 6 o'clock eye shows seconds.
• 10 o'clock eye shows "minutes elapsed" for chronograph.
• 2 o'clock eye shows "1/20 seconds elapsed" for chronograph.
• Chronograph second hand shows "seconds elapsed" for chronograph.
To set the time:
1. PULL crown out to "C" position.
2. TURN crown either way to correct time.
3. PUSH crown in to "A" position.
To adjust to a new time zone:
1. PULL crown out to "B" position.
2. TURN crown either way to move the hour hand in hour increments.
To set the calendar:
1. PULL crown out to "B" position.
2. TURN crown either way to move hour hand. Two complete
revolutions relative to the 12 o'clock position will move the date
forward or backward. This will correct both date and 24-hour time.
3. PUSH crown in to "A" position.
NOTE: The date changes automatically every 24 hours.
The chronograph is capable of measuring:
• 1/20 seconds elapsed up to 1 second (2 o'clock eye).
• Seconds elapsed up to 1 minute (chronograph second hand).
• Minutes elapsed up to 30 minutes (10 o'clock eye).
NOTE: Chronograph will operate continuously for 4 hours, after which
it will automatically stop and reset.
NOTE: The hand does not move during chronograph function, the
1/20th seconds are indicated when chronograph is stopped and not
yet reset.
BEFORE USING THE CHRONOGRAPH, adjust all the chronograph hands
to the "0" or 12-hour positions.
To adjust chronograph hands:
1. PULL crown out to "B" position.
2. PRESS pusher "B" until the hand at the 10 o'clock eye resets to the
"30" position.
3. PULL crown out to "C" position.
4. PRESS pusher "A" until the chronograph second hand resets to the
"0" or "60" or 12-hour position.
5. PRESS pusher "B" until the hand at the 2 o'clock eye resets to the
"0" position.
6. PUSH in Crown to "A" position.
NOTE:
• Make sure the chronograph is stopped and reset before adjusting.
• PRESSING and HOLDING either pusher "A" or "B" for 2 seconds will
cause the hands to move continuously until the pusher is released.
Standard chronograph measurement:
1. PRESS pusher "A" to start timing.
2. PRESS pusher "A" to stop timing.
3. PRESS pusher "B" to reset.
Split Time Measurement:
1. PRESS pusher "A" to start timing.
2. PRESS pusher "B" to split.
3. PRESS pusher "B" to resume timing.
4. PRESS pusher "A" to stop timing.
5. PRESS pusher "B" to reset.
With the crown in the "A" position, PUSH crown to the "D" position.
Entire dial will be illuminated. Electroluminescent technology used in
INDIGLO
night-light illuminates entire watch face at night and in low
®
light conditions.
To use NIGHT-MODE
1. PUSH and HOLD Crown to "D" position for 4 seconds to activate
NIGHT-MODE
night-light to stay on for 3 seconds.
2. NIGHT-MODE
3. Or PUSH and HOLD Crown to "D" position for 4 seconds to deactivate
NIGHT-MODE
If your watch is water-resistant, meter marking or (O) is indicated.
Water-Resistance Depth
30m/98ft
50m/164ft
100m/328ft
*pounds per square inch absolute
WARNING: TO MAINTAIN WATER-RESISTANCE, DO NOT PRESS ANY
BUTTONS UNDER WATER.
1. Watch is water-resistant only as long as lens, push buttons and case
remain intact.
2. Watch is not a diver watch and should not be used for diving.
3. Rinse watch with fresh water after exposure to salt water.
BRACELET LINK REMOVAL
Removing Links: Place bracelet upright and insert
pointed tool in opening of link. Push pin forcefully
in direction of arrow until link is detached (pins are
designed to be difficult to remove). Repeat until
desired number of links are removed.
Reassembly: Rejoin bracelet parts. Push pin back into link in opposite
direction of arrow. Press pin down securely into bracelet until it is flush.
SOLID LINK BRACELET
Removing Links: Using a very small screwdriver,
remove screws by turning counterclockwise.
Repeat until desired number of links are removed.
Do not remove links adjacent to clasp.
Reassembly: Rejoin bracelet parts and insert
screw in end of opening where it was removed.
Turn screw clockwise until tight and flush with bracelet.
Timex strongly recommends that a retailer or jeweler replace
battery. If applicable, push reset button when replacing battery. Battery
type is indicated on caseback. Battery life estimates are based on
certain assumptions regarding usage; battery life may vary depending
on actual usage.
DO NOT DISPOSE OF BATTERY IN FIRE. DO NOT RECHARGE. KEEP
LOOSE BATTERIES AWAY FROM CHILDREN.
The slide rule function of the top ring operates by rotating the outer
ring. The inner ring does not move. The outer ring is always related to
"distance" or "speed", or any data that varies with time. The inner ring
only notes units of time.
Outer Ring
On the outer ring, the figure "10"
represents factors or multiples of
10, such as 0.1, 1.0, 10, or 100
Inner Ring
On the inner ring, "MPH" (mile per
hour) refers to "speed index". This
index is used to calculate the speed
involving any data per hour. On the
inner ring, "STAT" (statute miles) and "NAUT" (nautical miles) are for
conversion of distance units.
The following examples serve as a guide of how to use the slide rule.
SPEED CALCULATION:
What speed is required to go 10 nautical miles in 15 minutes?
Known Factors: Distance: 10 nautical miles Time: 15 minutes
• Align "10" arrow on the outer ring with "15" on the inner ring.
• The speed required can be found directly above the "MPH"
marking on the inner ring
The answer: 40 nautical miles per hour
TIME CALCULATION:
How long will it take to go 10 nautical miles at a speed of 40 miles
per hour?
Known Factors: Speed: 40 miles per hour Distance: 10 nautical miles
• Align "40" on the outer ring with the mark "MPH" marking
on the inner ring.
• The time required can be found directly below the "10"
arrow on the outer ring, which is "15" on the inner ring.
The answer: 15 minutes
DISTANCE CALCULATION:
How far can you travel at 40 miles per hour for 15 minutes?
Known Factors: Speed: 40 nautical miles per hour Time: 15 minutes
• Align "40" on the outer ring directly above the mark "MPH"
on the inner ring.
• The distance travelled can be obtained above the "15"
marker on the inner ring. The number indicated on the outer
ring is "10".
The answer: the distance travelled is 10 nautical miles.
UNIT CONVERSION:
To convert distance from nautical miles to statute miles and kilometers
Known Factor: Distance to convert is 10 nautical miles
• Align the "10" arrow on the outer ring above the "NAUT" on
the inner ring. The conversion in statute miles (11.5) is found
above the inner ring "STAT" marking, and the conversion
to kilometers (18.5) is found above the inner ring "MPH"
marking.
Printed in the Philippines
www.timex.com
W-91
BASIC OPERATIONS
MINUTE
MINUTE
HOUR
SECOND
SECOND
CHRONOGRAPH
INDIGLO
NIGHT-MODE
Feature:
®
feature. PRESSING any pusher will cause the INDIGLO
®
feature will last for 8 hours.
®
feature.
®
WATER RESISTANCE
BRACELET ADJUSTMENT
SLIDE-RULE BEZEL FUNCTION
921-095019 EU3
TIME
CALENDAR
NIGHT-LIGHT
®
FEATURE
®
p.s.i.a. * Water Pressure Below Surface
BATTERY
WATCH.
®
PUSHER "A"
CHRONOGRAPH
1/20 SECOND
CROWN
POSITION
D A B
C
PUSHER "B"
DATE
60
86
160
OUTER RING
INNER RING
®
Advertisement
Table of Contents

Related Manuals for Timex W-91


Summary of Contents for Timex W-91
- Page 1 Turn screw clockwise until tight and flush with bracelet. BATTERY Timex strongly recommends that a retailer or jeweler replace battery. If applicable, push reset button when replacing battery. Battery type is indicated on caseback. Battery life estimates are based on certain assumptions regarding usage;...
- Page 2 și aliniat cu bră ara. BATERIE Timex recomandă insistent ca bateria să e schimbată de catre un distribuitor autorizat sau un bijutier. Unde este cazul, apăsa i butonul de resetare atunci când schimbaţi bateria. Tipul de baterie este indicat pe spatele carcasei.
Need help?
Do you have a question about the W-91 and is the answer not in the manual?
Questions and answers