
Related Manuals for Tri-Tronics Sport 50S


Summary of Contents for Tri-Tronics Sport 50S
- Page 1 Tri-Tronics Owner’s Guide TRI-TRONICS OWNER’S GUIDE Sport Series Remote Trainers ® Models covered: Sport ® Sport ® Sport 80C Sport ® ® Sport 65 BPR ® Multi•Sport ® Multi•Sport ®...
-
Page 2: Product Specifications
Product specification features may change without notice or obligation since Tri-Tronics is committed to a policy of continuous improvement. Certain Tri-Tronics products are covered by one or more of these U.S. patent numbers: 4794402, 4802482, 5054428, 5099797, 5193484, 5471954, D298872, 4947795, 4202293, 4335682, D410206, 6178439B1, D445706S, D446144S, 6549133, D445,707S and patents pending. -
Page 3: Table Of Contents
TABLE OF CONTENTS QUICK GUIDE ........1 FEATURE GUIDE . - Page 4 Notes:...
-
Page 5: Before Star
QUICK GUIDE Before You Start… Install the collar strap(s) (page 7). Install the transmitter antenna (page 9). Charge collar battery for 14 hours (page 16). The transmitter is shipped with a 9-volt battery already installed, and does not need to be charged. Select the correct length contact points for your dog’s coat. -
Page 6: Transmitter Overview
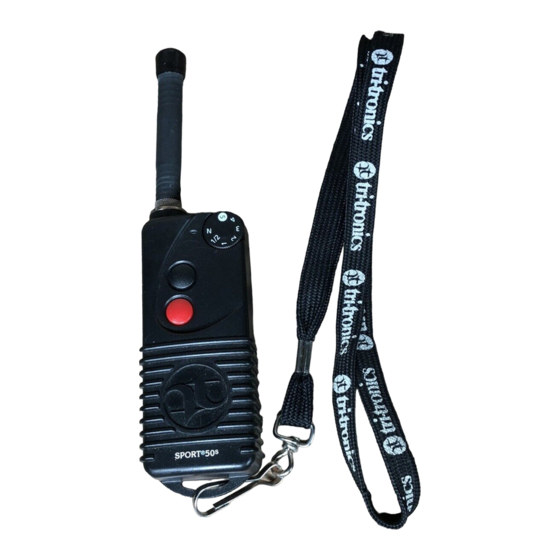
FEATURE GUIDE SPORT ® SERIES TRANSMITTER Antenna Intensity Dial (N or T, 1/2, 1, 2, 3, 4, 5) Transmitter Light Transmitter Buttons See Model Guide on pages 4-5 Lanyard Loop Page 2 Sport ® Series... - Page 7 SPORT ® SERIES COLLAR On/Off Switch Contact Points Long or short length. Select “long” for dogs with heavy coats. Collar Light Collar Charging Jack Feature Guide Page 3...
-
Page 8: Model Guide
MODEL GUIDE All models have an intensity dial with 6 intensity levels of stimulation, from mild 1/2 to strong 5. Total number of levels of each type of stimulation are given for each model. Black button – momentary stimulation Sport ®... - Page 9 Red button – continuous stimulation 6 continuous Orange button – turn beeper on/off* 6 momentary Buttons do not function when intensity dial is set on “N.” *Beeper operation is covered in the Tri-Tronics Beeper Owner’s Guide Model Guide Page 5...
- Page 10 Collar Light Action Collar Function Double flash Collar is turned on Glows steadily Collar is receiving signal from transmitter Single long flash Collar has just been turned off (3.5 seconds) Rapid flash * Low batteries. Recharge the collar soon Glows steadily Collar is charging while on charger * If the batteries are low at the time the collar is turned...
-
Page 11: Installing The Collar Strap
INSTALLING THE COLLAR STRAP Your Remote Trainer is shipped with the receiver separate from the collar strap. Install the strap as shown. On multi-dog units (the Multi•Sport ® Multi•Sport ® ), be sure to install the correct color strap on each receiver. Use the strap that matches the colored dot on the receiver. -
Page 12: Selecting Contact Point Length
SELECTING CONTACT POINT LENGTH Your Remote Trainer comes with two sets of contact points – long and short. The shorter points are installed in the unit at the factory and are suitable for most coat lengths. For dogs with especially long hair or thick undercoats, the long contact points will give the best possible contact. -
Page 13: Installing The Transmitter Antenna
INSTALLING THE TRANSMITTER ANTENNA Screw the transmitter antenna into the top of the transmitter. Hold the antenna near the base and tighten firmly by hand. Check the antenna regularly for tightness. MIGHTY MICRO ANTENNA ( S p o rt ® 80C and Sport ®... -
Page 14: Fitting The Collar On The Dog
FITTING THE COLLAR ON THE DOG Place the collar strap in the middle of the dog’s neck. The receiver should be on the underside of his neck. Place the receiver so the light is facing forw a rd (toward the dog’s nose). Tighten the buckle by holding it with two fingers as you pull the strap snug. -
Page 15: Setting The Intensity
SETTING THE INTENSITY Your Remote Trainer can give corrections at different intensity levels, so you can match the level of correction to both the training situation and your dog’s temperament. To adjust intensity level before or during training, use the intensity dial on the top of the transmitter. -
Page 16: Using The Stimulation Buttons
USING THE STIMULATION BUTTONS ® ® All Sport Series models other than the Multi•Sport ® Multi•Sport offer two types of stimulation, “continuous” and “momentary.” The black button(s) applies momentary stimulation. The red button(s) applies continuous stimulation. ® ® Multi•Sport and Multi•Sport models offer continuous stimulation only. -
Page 17: The "N" Setting
The intensity level when you correct each dog will be the one indicated by the intensity dial. Therefore, when training more than one dog using a Multi•Sport ® or Multi•Sport ® transmitter, you should check the intensity dial before correcting a different dog. By doing this, you can be sure that the intensity is what you want for that dog's correction. -
Page 18: Range
RADIO SIGNAL ISSUES Modern microprocessor technology virtually eliminates the possibility that your collar could be unintentionally set off by someone else with a Tri-Tronics product. Please contact our Customer Service Department at support@tritronics.com or 1-800-456-4343 with any questions. FCC COMPLIANCE... -
Page 19: Battery Care
BATTERY CARE ® The Sport Series Remote Trainers have rechargeable Nickel Metal Hydride (NiMH) batteries in the collar, and one replaceable 9-volt battery in the transmitter. The collar battery should be recharged periodically, as described below. The transmitter battery will last for many months, or even years, depending on usage. -
Page 20: Collar Batteries
You can also contact our Customer Service Department for additional protective covers. Use only the correct Tri-Tronics charger to charge your collar. Using the wrong type of charger may damage batteries or the collar itself. Do not charge batteries that are not installed in a collar. -
Page 21: Storing A Remote Trainer
When your collar batteries do need to be replaced, you can replace them yourself with parts obtained from Tri-Tronics. Follow the instructions that come with the replacement battery pack. Contact your local officials to find out whether any special disposal requirements applying to used NiMH batteries are in effect where you live. -
Page 22: Care And Cleaning
CARE AND CLEANING A little care can extend the life of your Remote Trainer and reduce service costs. Charging Jack Keep the protection flap secured over the battery charging jack. If the charging jack becomes dirty, flush thoroughly with clean tap water. If debris still remains, you can use the point of a toothpick to loosen remaining debris. -
Page 23: Service And Warranty
SERVICE AND WARRANTY Customer Service We hope that this manual has been helpful. If you have any questions, or you suspect your Remote Trainer is malfunctioning, please email our Customer Service Department at support@tritronics.com or call us at 1-800-456-4343. Before you call, please read the “Troubleshooting Guide” on page 21. -
Page 24: Product Safety
Tri-Tronics Remote Trainers have the added safety feature of the “N” (neutral) setting on the transmitter. At times when your transmitter might be accidentally bumped against objects during use, you can leave the intensity dial turned to “N”... -
Page 25: Troubleshooting Guide
TROUBLESHOOTING GUIDE SPECIAL NOTE: COLD WEATHER PERFORMANCE All batteries experience a normal drop in voltage during cold weather. As a battery powered device, your Remote Trainer can be affected by normal voltage drops during winter months and experience such things as: •... - Page 26 The collar batteries are not taking a charge. Either you need new batteries (page 16) or the battery charger is not working. See whether the collar light is glowing red while connected to the charger. The power may not be working. Try another wall outlet.
- Page 27 Try a different level. See the training manual and video that came with your Remote Trainer. Also note that in very cold weather, you may need to use a slightly higher setting to achieve the same level of intensity. Remember that the stimulation button must be released for the new setting to take effect.
- Page 28 You’re experiencing temporary radio interference. The light may illuminate when it receives any radio signal, even from other Tri-Tronics transmitters. This does not mean that stimulation is occurr i n g . PROBLEM #7. The collar light does not come on when the charger is plugged in.
Need help?
Do you have a question about the Sport 50S and is the answer not in the manual?
Questions and answers