
Related Manuals for Gene Cafe CBR-1200

Summary of Contents for Gene Cafe CBR-1200
- Page 1 Users Manual Rev. 2.0 Coffee Bean Roasting Machine Model : CBR-1200 Please read this user manual carefully before use. www.genecafe.com...
- Page 2 Index Descriptions of CBR 1200 Specification Safety Pre-Cautions Components Main Features Function Operational Manual Installation and Cautions Installation and Cautions Clean & Maintenance Additional Info Trouble Shooting Trouble Shooting Error Messages...
- Page 3 This visual roasting gives us regular performance and it helps balanced roasts even though you are not a professional coffee roaster. Specification Brand / Model - Gene Café / CBR-1200 Heating - Electrical Indirect Heated-Air Blow Roast Temp Range - 100℃ ~ 260℃...
-
Page 4: Safety Precautions
Safety Pre-Cautions Please read the following information carefully before use. Always follow safety precautions when operating your Gene Café roaster. Save these instructions. Incorrect use of an electrical roaster may result in risk of electric shock or serious injuries as well as damage to the roaster. - Page 5 Safety Pre-Cautions H. Be careful of your motion during chamber rotates. Hair, Fingers, Cloth and related fashion accessories may be caught and it causes safety accidents. I . The Gene Café body and roasting chamber may become very hot. Use oven mitts, or a potholder to handle the roasting chamber and do not touch it with bare hands.
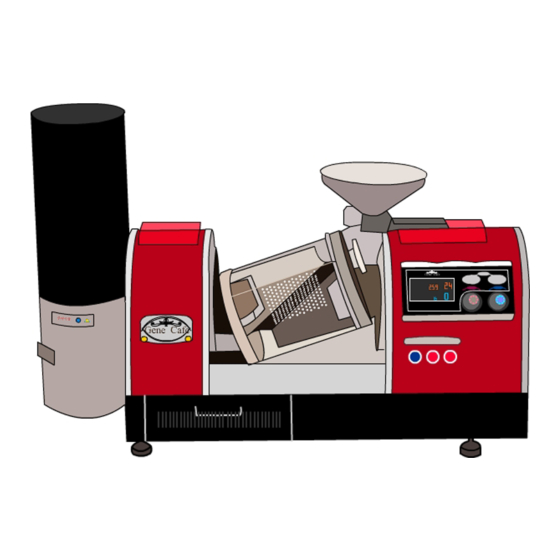
- Page 6 Components Stick Measuring Cup(100g) “T” Wrench (Hex #3) Cooling Flexible Duct (65Ø) Main Body Chaff Collector Cyclone Flexible Duct (50Ø) Users Manual Manual Main Drain Duct (75Ø) : Max 2~3m...
-
Page 7: Front View
Function Main Drain Duct Cyclone Flexible Duct Hopper knob Analogue Thermometer Temp Dial Time Dial Chaff Collector LCD Monitor Manual button Cooling tray (Front View) -
Page 8: Rear View
Function Cyclone Hopper Safety switch Chamber C ff Coffee bean outlet tl t Cooling Flexible Duct Connection Power switch (Rear View) - Page 9 Function 1. Power switch 2. Chamber 3. Coffee bean outlet 4 S f t 4. Safety switch it h 5. Hopper 6. Hopper knob 7. Cooling tray 8. Chaff Collector 9. Temp Dial 10 . Time Dial 11 Analogue Thermometer: 11.
-
Page 10: Main Features
Main Features Detachable Chamber Indirect Heated-Air Blow with chamber separator make even roasting possible. In Comparison with existing coffee roasters like Gas Drum types, they Enables you to clean are not possible to detach the chamber as well as clean is not roast drum inside. - Page 11 Coffee Roast Starts Monitor Display Temp Set : Max 260℃. Temp Adjustment is available during roasting e p djust e t s a a ab e du g oast g coffee. Current Temp : Outlet Temp sensor is placed on the left of the body and it indicates outlet th l ft f th b d d it i di t...
-
Page 12: Operational Manual
Operational Manual Coffee Roast Starts Step Main Power on and turn on the blue Main Power On dial(Right). Step Please turn on all of the buttons of Cooler, Turn On Cooler Heater#1, 2. /Heater #1, #2 Press Red Dial for preheating the Step Step chamber(Drum) (Caution : Be sure that you... - Page 13 Coffee Roast Starts Stand the hopper up. Step Insert green beans in the hopper. Insert Green Beans Max 1kg is available, but we recommend 900g for one batch of roast. Step Set and Adjust Time and Temp by dials. Set Temp/Time Step Press Red Dial again longer to see “Insert”.
- Page 14 Coffee Roast Starts Step You can hear another Beep sound 2minutes ago before roast end. Finish Roasting Automatically roasted beans go down to the arrow as the right photo to the cooling tray. Step If you want to stop roasting immediately, Cooling you can press Red dial longer to finish roasting.
- Page 15 Installation and Cautions 1. CBR 1200 power consumption is 3KW. Be sure that you should check power consumption of the place is going to be installed. (Ex : Two Group Coffee Machine is around 4KW). This unit is 220V(Korea, other countries) and optional 230V is for UK and other countries.
-
Page 16: Clean And Maintenance
Clean & Maintenance Clean Drum Clean Drum To detach the chamber drum out, unscrew two screws as right picture by fingers. How often clean drum ? In case of 10kg roast a day, we suggest you clean it 2~3times a year. Please use “T”... - Page 17 Clean & Maintenance Clean Coffee Chaff in the Chaff collector Recommend : 1time Clean on 5 batches of Periodical Clean is required. roasting coffee. If you do not clean often periodically, chaff will be stacked up in the chaff collector and it gives bad effects on coffee taste/Flavor also machine performance.
-
Page 18: Additional Info
Additional Info < Preheat> CBR 1200 needs just 2 ~4 minutes for preheat, on the contrary to CBR 1200 most roasting machine needs around 20~30 minutes for preheat. < Temperature Sensor > Monitor Temperature Sensor is mounted at the outlet(Left Side from the front view). You may check double between Monitor Temp and Actual Drum Analogue Temp sensor both. -
Page 19: Troubleshooting
Trouble Shooting Symptoms Causes Solution(Inspection/Change) Power Plug Connection Power Plug Connection Not available to be Power Source(Voltage) Power Source(Voltage) powered off. Power Switch Power Switch On or Change it Time is not set Time Set over 1 Min at least Roaster does not start. - Page 20 Trouble Shooting ERR “E6” Message Hopper Safety Switch fold down Lift Hopper Up Chamber Bean Gate is Position Sensor PCB Location Position Sensor PCB : correctly interlocked Troubles Adjustment /Arran gement with Hopper Chamber Shutter does Sh tt Solenoid Troubles id T Please contact A/S Center.
-
Page 21: Error Message
Error Message Error Messages & Description Error Message Temperature Over Heated Position Heater Drum Hopper Remarks Sensor Error Temperature Sensor Sensor Motor Safety Sensor Error Error Error Error Sensor Error When you find out Error Message “E1 to E5” , you should contact with the seller. If you see “E6”... - Page 22 Company Info Genesis Group Company < Coffee Roaster Division> < Coffee Roaster Division> ADD : ZIP(426-220), Ansan Tekom-Gil 43, Sasa-Dong, Sangnok-Gu Ansan Si, Gyeonggi-Do, Korea Tel: 82 (0)31 415 6191 / E-mail : sales@genecafe.co.kr - Prototype (Mock-up) Sample Division Web : www.i-grp.co.kr Established : 1984 - Office Furniture Division...
Need help?
Do you have a question about the CBR-1200 and is the answer not in the manual?
Questions and answers