Table of Contents
Advertisement
Advertisement
Table of Contents

Related Manuals for Jomox Xbase 09


Summary of Contents for Jomox Xbase 09
- Page 1 XBase 09 Operating Manual Software Version 2.09...
- Page 2 Page 2 XBase 09 Operating Manual...
-
Page 3: Table Of Contents
Step- / Pattern- / Function buttons 4.2.10 Instrument buttons 5. Perform Mode Perform Play Mode (pattern playback) Selecting Drum kits Creating and storing your custom Drum kits Recording Patterns in Perform-WriteMode 6. Pattern Mode Pattern Play Mode (pattern playback) XBase 09 Operating Manual Page 3... - Page 4 10. Synchronisation with other Devices 10.1 MIDI - Clock 10.2 DIN - Sync 11. MIDI Implementation 11.1 Sound parameters 11.2 Note messages 11.3 System Exclusive Data 11.4 Memory Clear / Reset 11.5 Software Version Display 12. Technical data Page 4 XBase 09 Operating Manual...
-
Page 5: Introduction
10 Songs can be stored. These can be comprised of 64 patterns and can repeat every pattern 255 times per song step. 100 song steps are allowed per song, each of which may run at its own tempo XBase 09 Operating Manual Page 5... - Page 6 MIDI controllers and note-on messages would produce. This is the reason why the Xbase09 grooves so tightly when running on its own, much tighter than if it played the same pattern in MIDI remote control mode. Page 6 XBase 09 Operating Manual...
-
Page 7: Connecting The Xbase09
2. CONNECTING THE XBASE 09 Before you connect the Xbase09 to any other device, you should always switch off all the involved devices. 2.1 Back Panel You will find the following connections on the Xbase09's Back Panel: 12V~AC IN ON/OFF MIDI IN... -
Page 8: Midi Connections
Clock Trigger with 24 Ticks/Quarter Note (Pin 3) Ground (Pin 2) Signal level is 5 volts Make sure that your cables actually connect the abovementioned pins. Some specialized MIDI cables don't, becaus these pins are not used for MIDI transmission. Page 8 XBase 09 Operating Manual... -
Page 9: Quick Start Guide
1 to 16. To switch „drum kits" while hearing this new pattern, simply hit the Up/Down keys. There are 100 ROM kits preprogrammed in the machine. They are stored in the memoryslots r00 to r99. XBase 09 Operating Manual Page 9... -
Page 10: To Programm Patterns
Hit it once again so the Write light is on, but not blinking. We do this so that we can now change the sound of INDIVIDUAL Bass Drum notes, as opposed to ALL of them. Page 10 XBase 09 Operating Manual... - Page 11 „HH sample select"). Using the Up/Down buttons, scroll to where the display says „CLP". now select Note buttons 9 and 10 and hit the „Enter" button. Those notes change to a 909 Rim sound. XBase 09 Operating Manual Page 11...
- Page 12 Hit the „Stop" button and then hit the „Write" button so that ist light goes out. Turn up the Bass Drum and Snare Drum levels..Now, kick back, hit „START" and listen to your creation ! Page 12 XBase 09 Operating Manual...
-
Page 13: Detailed Description
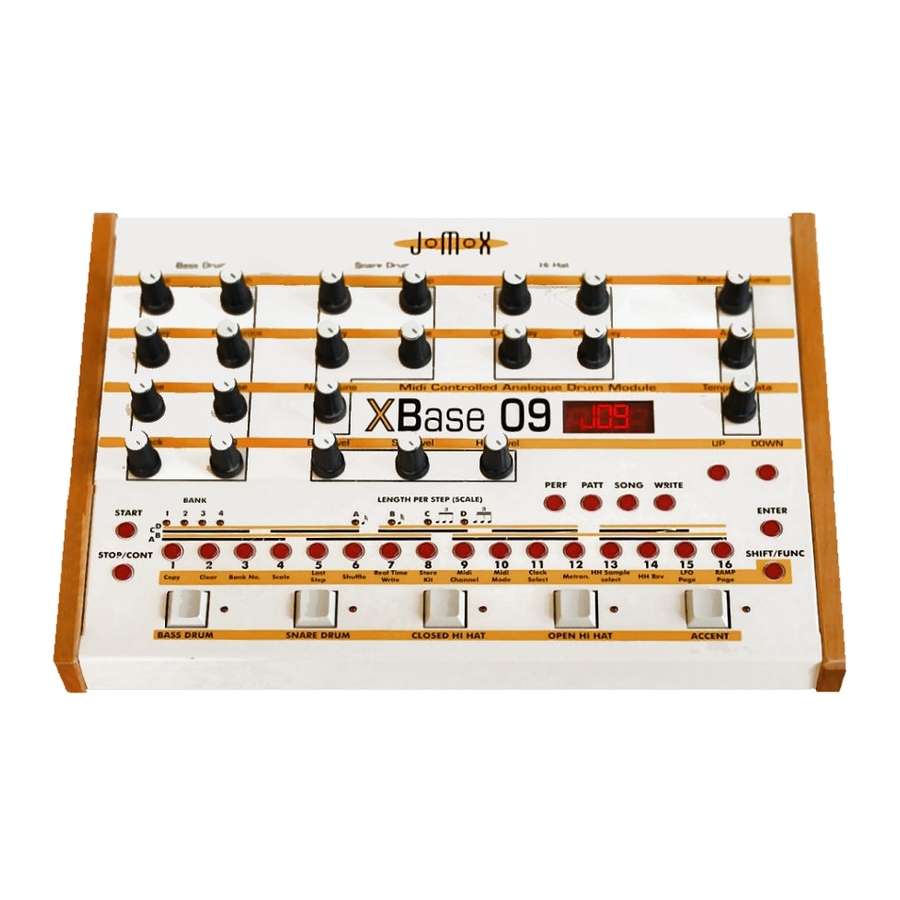
4.1 The Controls 4.1.1 Diagram Sound control knobs (light green) Global knobs (light beige) Up / Down (red) Mode select (red) Enter (red) Step buttons1..16 (red) Shift (red) Start / Stop (red) Instrument buttons (light grey) XBase 09 Operating Manual Page 13... -
Page 14: Functions Of Buttons And Knobs
ATTACK controls how much of the PULSE and NOISE mix is added to the bass drum sound, just as on the TR 909. PULSE is a square wave impulse, while NOISE generates a noisy clap-like Page 14 XBase 09 Operating Manual... -
Page 15: Base Drum Parameters
O H Reverse Open HH Rev Hand Clap Rev Crash long Rev The samples played by either CH or OH are processed by a VCA working as a dynamic expander that controls the volume envelope. XBase 09 Operating Manual Page 15... -
Page 16: Tempo/Data Control
Use this to set the volume of the MIX output. For best sound quality, keep this knob turned up all the way. 4.2.6 Accent Control Depending on the ACCENT mode selected, this knob serves to set the global maximum accent. Page 16 XBase 09 Operating Manual... -
Page 17: Write
The instrument buttons serve to select or to monitor the respective instrument. In Song mode, special SONG - WRITE functions are assigned to these buttons! The LED next to each button indicates the selected instrument depending on which mode is currently active. XBase 09 Operating Manual Page 17... - Page 18 The scale LED indicates the note length of a step (scale) of the current pattern. 4.2.10 Mode select buttons PERF, PATT, SONG, WRITE The mode buttons serve to select the Xbase09's various operating modes (see next chapter !). Page 18 XBase 09 Operating Manual...
-
Page 19: Perform Mode
ENTER to store the kit to that memory slot. Press SHIFT to abort. To edit ROM-kits you don`t like, you have to copy the kit you want to change into the RAM-section like described above. XBase 09 Operating Manual Page 19... -
Page 20: Recording Patterns In Perform-Writemode
The pattern sequencer serves only to trigger the selected Perform kits 0 - 99. The selection is displayed as “F xx” (xx = Perform Kit number). For further details see "Perform Mode" section Page 20 XBase 09 Operating Manual... -
Page 21: Pattern Mode
If you want to record continuous sound parameter changes, do the following: After completing a successful pass through the pattern, immediately press the WRITE button again to exit Track Record mode., because a renewed run through the pattern would overwrite the settings you just recorded.. XBase 09 Operating Manual Page 21... -
Page 22: Pattern Functions
Bank No. lets you switch between pattern banks. Activate the Bank No. function by pressing SHIFT and Bank No. Both buttons will start blinking. Use the UP/DOWN buttons to select one of the four banks. The respective Bank LED will light Page 22 XBase 09 Operating Manual... -
Page 23: Scale
If, for example, you set the last step for pattern 05 to 32, selecting pattern 05 in perform/pattern play mode will cause the step buttons 5 and 6 to light up together, These patterns will always be played back together, 05 after 06. XBase 09 Operating Manual Page 23... -
Page 24: Shuffle
Pressing a step button will cause that step to be shifted by the displayed amount. The steps shifted in this way will light up. Pressing ENTER programs the shift, SHIFT aborts the shuffle function. Page 24 XBase 09 Operating Manual... -
Page 25: Realtime Write
Select a sample and determine where it should sound in place of the hihat sample by pressing the appropriate step button. Confirm this selection by pressing ENTER. You can also select a new sample to assign and confirm all edits with ENTER later or you can abort by pressing SHIFT. XBase 09 Operating Manual Page 25... -
Page 26: Hh Reverse
The effect the LFO settings have on an instrument’s sound are only audible when the sequencer is running. The LFOs are inactive when the sequencer is stopped. Activate the LFO function by pressing SHIFT and LFO Page. Both buttons will satrt blinking. Page 26 XBase 09 Operating Manual... - Page 27 Furthermore, LFO 1 can modulate LFO 2's frequency. Modulation targets are displayed as: = Bass Drum Pitch = Snare Drum Tune = Snare Drum Xsnapp = Snare Drum Noise Tune = Hi Hat Tune = LFO 2 Frequency (LFO 1 only) XBase 09 Operating Manual Page 27...
- Page 28 “P xx” (pattern number 1-64) The instrument’s sound control knobs influence the sound of the individual steps indirectly in the various Pattern Edit modes. For further details, see "Perform Mode" section. Page 28 XBase 09 Operating Manual...
-
Page 29: Track Page
WRITE, then INSTRUMENTbutt. select next track move knob 3 select midichannel and so on... programm new track like above . Happy with all your tracks ??? hit ENTER button pattern is stored, RampPage left XBase 09 Operating Manual Page 29... -
Page 30: Song Mode
7.2.2 Pattern Nr. (SNARE DRUM button) Press the SNARE DRUM button. The display reads "PAt". Use the UP/DOWN arrows to choose the pattern you want to assign to the current song step. Press ENTER. Page 30 XBase 09 Operating Manual... -
Page 31: Repeat (Closed Hh Button)
In Song mode, the clear function deletes songs. Selct the song you wish to delete. Then press SHIFT and Clear. (Both SHIFT and Clear will start blinking). Confirm your action by pressing ENTER. Pressing SHIFT will abort the clear function. XBase 09 Operating Manual Page 31... -
Page 32: Saving And Loading Data Via Midi-Dump
Start data transmission on the external MIDI device (could also be another Xbase09...) The display will read "rCV" (receive) to indicate that it is receiving data. If MIDI data reception has been successful, the display will read "fin" (finished) after a few seconds. Page 32 XBase 09 Operating Manual... -
Page 33: Controlling The Xbase09 Via Midi
In this mode the Xbase09's three instruments are spread over the whole keyboard. In split mode 2, instrument pitch changes are determined by MIDI note number and not via MIDI controllers. See also the MIDI implementation chart XBase 09 Operating Manual Page 33... -
Page 34: Synchronisation With Other Devices
Synchronizing with the Xbase09 as master The other way to synchronize the Xbase 09 with an external device is to synchronize the external device to the MIDI clock signal always present at the Xbase09's MIDI out port. In this case, nothing needs to be set on the Xbase09. The other device must however be set to synchronize to MIDI clock. -
Page 35: Midi Implementation
0..127 Decay 0..127 Detune 0..127 Noise Tune 0..127 HI HAT Tune 0..127 HH Balance 0..127 CH Decay 0..127 OH Decay 0..127 BD Level 0..127 SD Level 0..127 HH Level 0..127 Midi Volume 0..127 (Global) XBase 09 Operating Manual Page 35... -
Page 36: Note Messages
MIDI control of sound parameters is achieved by MIDI controllers. The Sys-Ex format is as follows: $F0(SysEx Begin), $31(JoMoX-Manufacturer’s code), $7F(Command Sys Ex Dump), $55(Header), $00(Header),XX(Data0),XX(Data1),..., $F7(End of SysEx) The figures of the SysEx-Sequences are, as usual, presented in hexadecimal code. -
Page 37: Technical Data
We will then automatically inform customers as regards subsequently released updates, specific features, of tips and tricks, that are reported us from other users. We wish you lots of fun, creativity, and succes while working with the JoMoX XBase09, and thank you in advance for incomming feedback and messages.
Need help?
Do you have a question about the Xbase 09 and is the answer not in the manual?
Questions and answers