Advertisement
Quick Links
Installation and Setup Instruction
Keyboard 1500M, 1501M, 1502M & 1503M
DET
ADPRO
ON
F1
F2
7
8
4
5
1
2
0
ESC
UK OFFICE: ERNITEC UK, GERRARD HOUSE, WORTHING ROAD, EAST PRESTON, WEST SUSSEX BN16 1AW, ENGLAND
FRENCH OFFICE: ERNITEC FRANCE, PARC PEREIRE, 95 RUE PEREIRE, BAT. D, 78100 SAINT GERMAINE EN LAYE, FRANCE
JAPAN OFFICE: ERNITEC JAPAN LTD., 8-16 GAKUEN-HIGASHIMACHI, 1-CHOME KODAIRA-SHI, TOKYO 187-0043, JAPAN
DET
MODE
OFF
1/2
F3
F4
F5
F6
9
INS
6
MENU
DEL
3
SHIFT
CLR
HEAD OFFICE: HØRKÆR 24, P.O. BOX 720, DK-2730 HERLEV, DENMARK
TELEPHONE: +45 44 50 33 00, TELEFAX: +45 44 50 33 33
E-MAIL: ernitec@ernitec.dk, HOME PAGE: www.ernitec.dk
TELEPHONE: 01903 77 27 27, TELEFAX: 01903 77 27 07, E-MAIL: sally@ernitec-uk.co.uk
TELEPHONE: (1) 39 21 12 00, TELEFAX: (1) 39 21 12 95, E-MAIL: ernitec-fr@magic.fr
GERMAN OFFICE: ERNITEC GmbH., STORMARNRING 28, 22145 STAPELFELD, GERMANY
TELEPHONE: (040) 67 56 25 0, TELEFAX: (040) 67 56 25 25, E-MAIL: ernitec@aol.com
TELEPHONE: (0)423 46 6290, TELEFAX: (0)423 46 5646, E-MAIL: jdr0632@niftyserve.or.jp
for
F7
F8
F9
AUTO
AUX
VCR
1
AUX
VCR
?
2
ON
OFF
F10
F11
F12
Advertisement

Related Manuals for ERNITEC 1500M

Summary of Contents for ERNITEC 1500M
- Page 1 TELEPHONE: 01903 77 27 27, TELEFAX: 01903 77 27 07, E-MAIL: sally@ernitec-uk.co.uk FRENCH OFFICE: ERNITEC FRANCE, PARC PEREIRE, 95 RUE PEREIRE, BAT. D, 78100 SAINT GERMAINE EN LAYE, FRANCE TELEPHONE: (1) 39 21 12 00, TELEFAX: (1) 39 21 12 95, E-MAIL: ernitec-fr@magic.fr GERMAN OFFICE: ERNITEC GmbH., STORMARNRING 28, 22145 STAPELFELD, GERMANY...
- Page 2 Unpacking the keyboard After unpacking the keyboard, carefully check for any sign of damage. Any such damage should be reported to your supplier, or to Ernitec A/S directly, before installation. Check that the keyboard packing carton contains the following items: 1 Keyboard 1500M, 1501M, 1502M or 1503M.
-
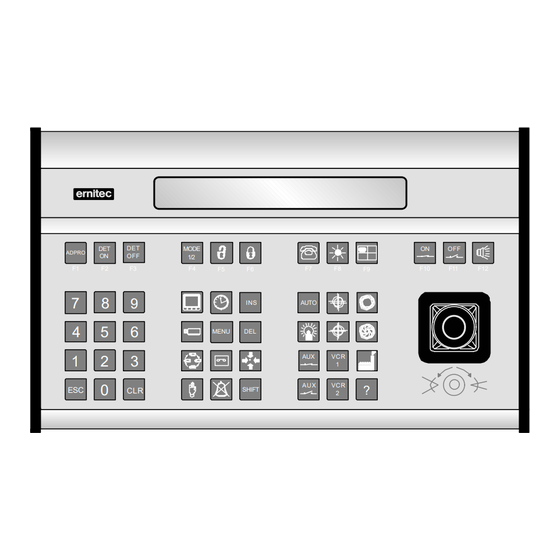
Page 3: Installation
Installation and Setup instruction for Keyboard Series 1500 Keyboard connections The keyboard connections are shown on figure 1. Description 1500M/1501M 1502M/1503M 1-10 Power supply connector for the supplied mains adaptor or for external voltage 9-18 VAC/VDC 2,7 VA 1-11 ARC-net connector used for interconnection of SYSTEM 1000M units and keyboards. - Page 4 Installation and Setup instruction for Keyboard Series 1500 RS-485 connection to SYSTEM 500M/1000M Connect the RS-485 cable to socket 1-13 (refer to figure 1): SYSTEM 500M/1000M Keyboard 580M/1801M/1802M Description Description 6 or 8 Positive signal 6 or 8 Positive signal 7 or 9 Negative signal 7 or 9 Negative signal 1, 4 or 5* GND (Connect to cable screen)
-
Page 5: Keyboard Setup
Various different beeps indicates valid or invalid selections. Keyboards 1500M and 1501M will indicate wrong entries during set-up by no key-beep at all and will await a valid selection - set-up is not left until a valid selection has been made. - Page 6 Invalid entries are not accepted, indicated by no key-beep. Quick set-up The basic settings of the keyboards 1500M/1501M can easily be set up, by pressing the following keys during power ON of the keyboard: ESC + 0: Direct Camera Control - RS485 - 2400 baud ESC + 2: System Keyboard - RS232 - 19200 baud - Keyboard no.
- Page 7 Installation and Setup instruction for Keyboard Series 1500 Press the key 9 to change the password, and enter the new password (4 digits). Re-enter the new password. Page 7...
- Page 8 Installation and Setup instruction for Keyboard Series 1500 Start programming of MENU keyboard. Enter Password (Default password is 0000). Set keyboard mode of Direct Camera control operation System keyboard * Keyboard No. 3 Set address. Keyboard No. 4 * Keyboard No. 5 Keyboard No.
- Page 9 Installation and Setup instruction for Keyboard Series 1500 Keyboard 1502M/1503M Set-up In order to start programming press the ESC and MENU keys at the same time and enter the password (4 digits). The default password is 0000. In order to exit programming press the ESC key, and the keyboard will automatically be re-booted in order to activate the new setting(s).
- Page 10 Installation and Setup instruction for Keyboard Series 1500 Start programming of FAULT MENU keyboard. Press ESC to leave set-up. Enter Password (Default password is Enter Password: XXXX 0000) F4:OpMode F6:Comm. F7:Baud Select Mode of operation, Baud rate XXXXXX XXXX XXXX More and communication interface.
- Page 11 If all cameras should be operated simulteneously, press: Broadcast commands Warning: When e.g. activating the pan functions all cameras will pan! The broadcast function should therefore be used with care! Zoom Change the focal length: 1500M/1502M 1501M/1503M 1500M/1502M 1501M/1503M Zoom wide Zoom narrow...
- Page 12 If the picture on the monitor is too dark or light, press: Iris open Iris close Note: Available only if supported by the connected equipment. Pan Camera If the camera should be panned left or right, press: 1500M/1502M 1501M/1503M 1500M/1502M 1501M/1503M Pan left Pan right JOYSTICK NOTE: When controlling a variable speed Pan/tilt, BDR-575 or ICU, pushing the joystick towards its extremes will increase speed.
- Page 13 Installation and Setup instruction for Keyboard Series 1500 Auto panning (BDR-575 and ICU only) To start auto panning, press: ð ð AUTO Start auto panning Call Preposition (not available on Series BDR-51X) To call preposition number 3, press: 3 ð ð Call preposition number 3 Note: Valid range BDR-55X and ICU: 1-30, BDR-575: 1-126.
- Page 14 1 ð ð ð ð 1 ð ð SHIFT 1500M/1502M 1501M/1503M Insert preposition number 1 in the sequence stack Delete a preposition from the sequence stack To delete preposition number 1 from the sequence stack stored in the telemetry receiver: 1 ð...
- Page 15 Installation and Setup instruction for Keyboard Series 1500 Set the pre-position sequence dwell time To set the dwell time for the telemetry receiver currently being controlled to 15 seconds, press: 1 ð ð 5 ð ð Set dwell time to 15 sec. The dwell time range is 0 to 255 sec.
Need help?
Do you have a question about the 1500M and is the answer not in the manual?
Questions and answers