Table of Contents
Advertisement
Advertisement
Table of Contents

Related Manuals for Hondex HE-7300

Summary of Contents for Hondex HE-7300
- Page 1 OPERATION MANUAL HE-7300 COLOR LCD ECHO SOUNDER...
- Page 2 INTRODUCTION We thank you very much for your purchasing our product HE-7300. Please be sure to read this operation manual carefully and understand what it describes before you operate this unit in order to keep your safety. After you read this manual, please keep it at the place where you will not lose or break so as to read soon when it is necessary.
-
Page 3: Table Of Contents
CONTENS CAUTION ON SAFETY (PLEASE MAKE SURE TO READ.) 1. HANDLING OF MAIN UNIT 2. HANDLING OF CABLES 3. HANDLING OF TRANSDUCER AND WATER TEMPERATURE SENSOR CAUTION ON OPERATION FEATURES DESCRIPTIONS 1. MAIN UNIT 2. MAIN UNIT (BOTTOM)/CONNECTIONS HOW TO OPERATE MENU BASIC OPERATION POWER ON/OFF TO CHANGE DISPLAY STYLE (PORTRAIT/LANDSCAPE) - Page 4 SETTING ON MENU 1. TO SET SWEEPING SPEED 2. TO SET CLUTTER 3. TO SET AUTO RANGE/SHIFT 4. TO SET AUTO RANGE MAX. DEPTH 5. TO SET EXPANSION RATE 6. TO SET AUTO GAIN 7. TO SET CLEAN ECHO 8. TO SET TRNASMITTING OUTPUT 9.
- Page 5 REFERENCE DIMENSIONAL DRAWING 1. DIMENSIONAL DRAWING OF MAIN UNIT 2. DRAWING OF HOLES FOR INSTALLING BRACKET CONNECTION WITH MAIN UNIT INSTALLATION OF MAIN UNIT 1. PROCEDURE OF INSTALLING MAIN UNIT INSTALLATION OF TRANSDUCER Installation of transducer (Thru-hull) INSTALLATION OF WATER TEMP. SENSOR STANDARD COMPOSITION OPTIONS GENERAL IMFORATION OF FISH FINDER...
-
Page 6: Caution On Safety (Please Make Sure To Read.)
CAUTION ON SAFETY (PLEASE MAKE SURE TO READ.) This section explains the important cautions in order to prevent the person who will use our product or other persons from human damage or damage to their property. 1. HANDLING OF MAIN UNIT ������... -
Page 7: Handling Of Cables
2. HANDLING OF CABLES ������� Be sure to use the specified power supply cable and fuse. It cause to heating or firing. Do not leave the power plug as it is while it is pulled out of the unit. If the plug gets wet, it causes to heating or firing due to short circuited. Be sure to wire in order to prevent the cables from interfering to operate boat. -
Page 8: Caution On Operation
CAUTION ON OPERATION 1. Power OFF when the engine starts to run! When the engine starts to run, voltage of battery varies heavily. It may influence to the unit. Be sure to put the power switch of the unit off when you start to run the engine. 2. -
Page 9: Descriptions
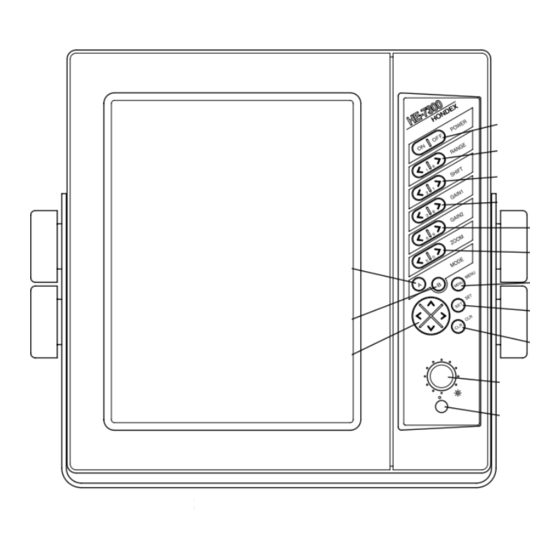
DESCRIPTIONS 1. MAIN UNIT Power ( page 6 ) MODE B ( page 12 ) Power ON/OFF Switch Normal mode, Bottom Lock mode, RANGE ( page 8 ) Auto Expansion or Manual Expansion. Set the displayed depth range. MENU ( page 5 ) SHIFT ( page 9 ) -
Page 10: How To Operate Menu
HOW TO OPERATE MENU How to operate menu You can change contents of item which you set by selecting menu item using [MENU] key, [DIRECTION]key, [SET] key or [CLR] key. [MENU] key ���������� ��������� Menu 1 is shown pressing MENU key. Menu 2 is shown pressing MENU key again. -
Page 11: Power On/Off
POWER ON/OFF Power ON/OFF By pressing [ON] key, alarm comes on and power turns [ON] key [OFF] key When power is ON, power lamp lights on and fish finder display is shown. By pressing [OFF] key, power turns OFF. Until fish finder display is shown after power turns ON, [OFF] key is not activated. -
Page 12: How To See The Display
HOW TO SEE THE DISPLAY ����������������� ��������� ������������������ ����������� ������ ��������� ������ �������� �������������� ������������������� ����� ���������� ����������� ����������� ������������������� As for frequency readout; In case main unit is single frequency: No indication In case main unit is dual frequencies: L: Low Frequency H: High Frequency However, in case of dual frequency parallel display, position of readout moves. -
Page 13: Operation On Front Panel
OPERATION ON FRONT PANEL 1. TO SET THE DEPTH (DISPLAY RANGE) Depth (Display Range) [Depth (Display Range)] This sets the depth (display range; how deep from the surface of water is displayed?). Depth range you can set differs depending on frequency. [To decrease the depth (display range)] Each time when you press RANGE key, the depth... -
Page 14: To Set Shift (Display Range Shift)
2. TO SET SHIFT (DISPLAY RANGE SHIFT) Shift (Shift of display range) [Shift (Shift of display range)] You can shift the initial displaying depth downward. For example, when you shift 10m downward at 0-8m depth range, initial display depth becomes to 10m and display range becomes to 10-18m. -
Page 15: To Adjust Sensitivity
3. TO ADJUST SENSITIVITY In case of single frequency display This describes operation for single frequency display. You can change sensitivity by GAIN1 key or GAIN2 key. Single frequency display or dual frequency display is selected on menu. ( page 20 ) When the unit is delivered from factory, dual frequency display mode is set. - Page 16 In case of dual frequency display In case of dual frequency display, you can change the sensitivity on right side of screen by GAIN1 key and the sensitivity on left side of screen by GAIN2 key. Adjust sensitivity on left side of screen by GAIN2 key Gain Readout [To decrease sensitivity] GAIN2...
-
Page 17: To Set A-Mode
4. TO SET A-MODE A-mode It is displayed on the right side of screen (between fish finder display and depth calibration) and it's width changes according to strength of reflected signal. Strong response is indicated thick and weak signal is indicated thin. MODE A key A-Mode is shown pressing MODE A key. -
Page 18: To Move Expanded Area
6. TO MOVE EXPANDED AREA To move expanded area You can move and see expanded area to top or bottom of display. You can not operate ZOOM key except for manual expansion mode. Expansion rate is selected among 2 times, 4 times and 8 times. (Expansion Rate page 15 ) It is set to 4 times expansion mode when it is delivered from factory. -
Page 19: Setting On Menu
SETTING ON MENU 1. TO SET SWEEPING SPEED Sweeping Speed [Sweeping Speed] On echo sounder/fish finder, the newest display (display just under the boat) is shown on the right edge of screen. At the same time previous display moves leftward. Display of echo sounder/fish finder is formed by repeating such movement. -
Page 20: To Set Auto Range Max. Depth
4. TO SET AUTO RANGE MAX. DEPTH Auto Range Max. Depth It sets Maximum Depth when Auto Range is operated. Set AUTO RNG MAX DEP. on menu 1. (30m, 100m, 200m, 300m, Max. Depth) 5. TO SET EXPANSION RATE Expansion Rate [Expansion Rate] Expansion rate for expanded area is set to 2 times/4 times/8 times. -
Page 21: To Set Clean Echo
7. TO SET CLEAN ECHO Clean Echo Non-synchronized noise like interference with other boat's fish finder, air bubbles, electric noise, mechanical noise, etc. is eliminated. Set C-ECHO on Menu 1. OFF: Canceled Weak noise rejection Strong noise rejection Note: Clean Echo eliminates noise but it sometimes eliminates response from small fish. -
Page 22: To Set Background Color
10. TO SET BACKGROUND COLOR Background Color Reflected echo is indicated in different color according to it's strength. Visual image of display differs from surrounding brightness. It becomes easy to see the display by selecting the background color among four colors. Set BACK GROUND on menu 2. -
Page 23: To Set Water Temp. Graph
13. TO SET WATER TEMP. GRAPH Water Temp. Graph Water temperature graph is shown on the screen. It enables you to know the variation of water temperature and recognize the turning of tide. It helps you to select the fishing point. Set TEMP GRAPH on menu 2. -
Page 24: To Set Depth Alarm
16. TO SET DEPTH ALARM Depth Alarm Alarm goes off within or out of two depths (DEPTH SET 1, DEPTH SET 2). Select DEPTH ALARM on menu 2. DEPTH ALARM SET mode is shown by pressing right key. ALARM SET is established. IN RANGE: Alarm goes off when it is within two depths. -
Page 25: To Set Pulse Length
19. TO SET PULSE LENGTH Pulse Length Normally Pulse Length is set to short automatically according to set displayed range. When "Long" is selected, twice pulse length as normally set can be set. However, the shortest pulse length is 50 S and the longest pulse length is 4mS. -
Page 26: To Set Correction Of Water Temp
22. TO SET CORRECTION OF WATER TEMP. Correction of Water Temp. When water temp. readout always differs from actual water temp. at constant value, it corrects error of water temp. Set TEMP CORRECT on menu 3. 23. TO SELECT SIZE OF DEPTH READOUT Depth Readout It selects size of depth meter. -
Page 27: To Change Display Style (Portrait/Landscape)
26. TO CHANGE DISPLAY STYLE (PORTRAIT/LANDSCAPE) Change Display Style You can change the display (landscape, portrait, landscape reverse and portrait reverse) according to the status of installing the unit. Set PICTURE STYLE on menu 3. ���������� ����������� ������������������ ������������������� Note: It is normally delivered in Portrait style from factory. When you want to change to Landscape or Landscape Reverse, you should disassemble and re-assemble the main unit. -
Page 28: Menu Contents And Factory Setting
MENU CONTENTS AND FACTORY SETTING MENU 1 Menu Item Set Value Factory Setting 1. SWEEP SPEED Freeze, 1, 2,3, 4 2. CLUTTER OFF, 1, 2, 3, 4, 5, 6, 7, 8, 9, 10, 11, 12 3. AUTO RNG/SFT OFF, RNG, SFT 4. -
Page 29: Dimensional Drawing
DIMENSIONAL DRAWING 1. DIMENSIONAL DRAWING OF MAIN UNIT ��� ��� �������� ��� ��� ��� 2. DRAWING OF HOLES FOR INSTALLING BRACKET �� ������ �� ������ �� ������� �� ���� �� �� ���� �� ��� SEC.A-A CONNECTION WITH MAIN UNIT ��������������� �����������������������... -
Page 30: Installation Of Main Unit
INSTALLATION OF MAIN UNIT ������� Please install correctly according to INSTALLATION OF MAIN UNIT . 1. PROCEDURE OF INSTALLING MAIN UNIT <Installation of main unit> Install main unit into four holes of bracket with supplied screws referring to below figure. Note: It is normally delivered in Portrait style from factory. -
Page 31: Installation Of Transducer
INSTALLATION OF TRANSDUCER ������ Work on the board is too unstable and risky. Installation and maintenance of transducer should be done after you land and fix the boat. Unless you keep it, human damage resulting in death or serious wound will occur. �������... -
Page 32: Installation Of Water Temp. Sensor
INSTALLATION OF WATER TEMP. SENSOR Water temperature sensor is option. ������ Work on the boat is too unstable and risky. Installation and maintenance of the water temperature sensor should be done after you land and fix the boat. Unless you keep it, human damage resulting in death or serious wound will occur. When you work using electric tools, please keep your hands dry. -
Page 33: Standard Composition
STANDARD COMPOSITION Main Unit (with Bracket) Power Supply Cable Operation Manual Screw for installing bracket M6X20 OPTIONS Thru-hull Mount Water Temp. Extension Cable for Water Sensor (TC02CS+TCK01) Temp. Sensor (EK11) (8P 15m) (8P-8P 3m) -
Page 34: General Imforation Of Fish Finder
GENERAL IMFORATION OF FISH FINDER 1. THEORY OF ECHO FISH FINDER Theory of fish finder is same as echo. Ultrasonic pulses transmitted from the transducer into the water are reflected from fish school or the sea bottom and then they are received by transducer. Fish finder converts round-trip time between the time and the ultrasonic wave is transmitted and the time the reflected wave is received into distance and measures the depth It displays size or density of fish school, the outline of bottom or nature of bottom on the screen in different colors. -
Page 35: How To Distinguish The Fish School
2. HOW TO DISTINGUISH THE FISH SCHOOL Important is comparison between display of fish school and catch It is possible to distinguish the fish sort by display of fish school to some extent. But even if fish sort is same, it's form making school is different according to difference of fishing ground and difference of time (day and night, four seasons, variation of current). -
Page 36: Trouble Shooting
TROUBLE SHOOTING When the condition of this unit is bad, please check the following points before asking to repair. Symptoms Causes Remedy Power can not be Voltage of battery is lower than Recharge the battery. turned on. standard value (11V). Contact of power connector is Tighten firmly. - Page 37 Symptoms Causes Remedy Image does not Transducer is not immersed Install the transducer where it is always sometimes appear. into water well. immersed under the waterline. When installation of transducer Check the installation of transducer. is bad, air bubbles wind easily at high speed sailing.
-
Page 38: Specifications
SPECIFICATIONS Display 10.4 inch TFT color LCD Display Style Portrait/Landscape Number of pixel 640 x 480 Operating Voltage 11~35VDC Frequency (kHz) 28, 32-40, 36-65, 40-75, 50, 50-55, 85-90, 50&200, 200 Power Output (W) 600, 1200, 2500, 3000 (depends on freq.) Depth Range 0~2,000 m (depends on freq.) Auto Range... - Page 39 20 Oyamazuka, Oiwa-cho, Toyohashi, Aichi, Japan, PC 441-3193 Tel : 81-532-41-2512, Fax : 81-532-41-4441...
- Page 40 Procedure of changing to Landscape display Remove main unit from bracket. Take off ten screws (mushroom-head screw M4x6) from main unit cover. Remove the main unit cover. ������������������� ������������������� ��������������� ������������������� Open main unit slowly and disconnect internal wires (1 pce. white flat cable, 1 pce. 3 pins connector and 1 pce.
- Page 41 Fix the front unit with eight screws (screw with captive washer M4x8). ������������������������� ������������������������� ���������� Connect cables with main unit. Fit the main unit into front unit. Main unit Connect cables with main unit. Put the main unit cover on and fix main unit cover with ten screws (mushroom head screw M4x6).
Need help?
Do you have a question about the HE-7300 and is the answer not in the manual?
Questions and answers
Fish finder
The Hondex HE-7300 fish finder has the following features:
1. Color Configuration: 15 color ranks indicate the strength of response. There are 7 color configuration patterns (0–6) that can be selected in menu 2.
2. Water Temperature Graph: Displays changes in water temperature to help identify tide changes and select fishing points. Can be turned ON or OFF in menu 2.
3. Fish Alarm: Sounds an alarm when a fish school is detected. Settings include:
- S: Detects both large and small fish schools.
- L: Detects only large fish schools.
- OFF: No alarm.
4. Thru-hull Water Temperature Sensor: Optional sensor installation for FRP boats to monitor water temperature.
5. Echo Sounding: Uses ultrasonic pulses to detect fish and measure depth by calculating the time it takes for reflected waves to return. Displays size or density of fish schools.
This answer is automatically generated