Table of Contents
Advertisement
Advertisement
Table of Contents

Related Manuals for China Fun Sports Treadmill


Summary of Contents for China Fun Sports Treadmill
- Page 1 Treadmill Manual 07/ 06 /20...
-
Page 2: Table Of Contents
Contents Page Implied Warranty General Safety Instructions Special Safety Precautions Assembly Unpacking & Assembly Assembly Diagram (1) Parts List (1) Assembly Diagram (2) Assembly Instructions Initial Use Training Monitor Maintenance Important Notes Trouble Shooting General Fitness Tips Warm Up / Stretching exercises... -
Page 3: Implied Warranty
Thank you for purchasing this product. The product will help you exercise your muscles in the correct way and to improve your fitness – and all this in a familiar environment. Implied Warranty The importer of this machine assures that this device is manufactured with high quality materials. -
Page 4: General Safety Instructions
General safety instructions A great deal of emphasis was placed on safety in the design and manufacture of this fitness device. Still, it is very important that you strictly adhere to the following safety instructions. We cannot be held liable for accidents that were caused due to disregard. -
Page 5: Special Safety Precautions
• Inspect the treadmill before every use to make sure that every part is operational. • Do not use the treadmill outdoors, in a garage or under any kind of canopy. Do not expose the treadmill to high humidity or direct sunlight. -
Page 6: Assembly
Assembly • Before starting with the assembly of this fitness device, carefully read through the set up steps as of page 9, We also recommend that you view the assembly drawing prior to assembly (page 6). • Remove all packaging material and place the individual parts on a free surface. This will provide you with an overview and will simplify assembly. -
Page 7: Hardware Kit
Unpacking & Assembly WARNING!: Use extreme caution when assembling this treadmill. Failure to do so could result in injury. NOTE: Each step number in the assembly instructions tells you what you will be doing. Read and understand all instructions thoroughly before assembling the treadmill. -
Page 8: Assembly Diagram
Assembly Diagram (1) Most of the displayed parts in this diagram are shipped pre-assembled. For spare parts, please do always specify parts numbers used on this diagram or in the following parts list. -
Page 9: Parts List
Parts List (1) DESCRIPTION DESCRIPTION Base Frame Safety Key Main Frame Pulse Set Motor Base Speed Sensor Localizer Localizer Speed Sensor Base Clip Baffle Plate Deck Front Roller Shaft Plastic Washer Rear Roller Shaft Cylinder Plug Manual Inclination Frame Plat Washer Right Side Post Spring Washer Left Side Post... -
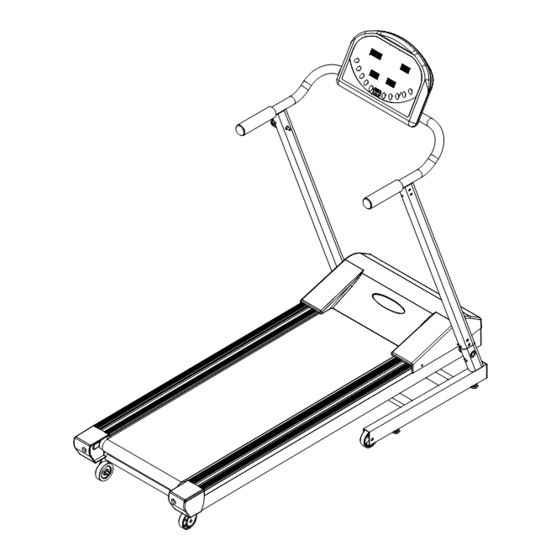
Page 10: Assembly Diagram
Assembly Diagram (2) Console Hand pulse Spring pin Console mast Main body Base frame Rear roller Moving wheel... -
Page 11: Assembly Instructions
Assembly Instructions Step 1: Attach the spring ping to the left console mast. Spring pin Left console mast A) Attach by screwing the spring pin into the thread on the outside left console mast. Step 2: Attach the left & right console masts to the base frame. Lock washer screw wrench... -
Page 12: Initial Use
Turn the appliance off and pull out the plug. To fold the treadmill, lift the plate up and pull the locking bolt .lock it at the provided hold on the side of the treadmill. - Page 13 The angle of the treadmill is adjustable so that the difficulty of the training can be changed. The angle of the treadmill can be adjusted on the bottom side of the treadmill, as shown in the picture. CAUTION: TO AVOID THE DANGER OF INJURY, ALWAYS TURN OFF THE STRIDING BELT BEFORE ADJUSTING THE ANGLE.
-
Page 14: Training Monitor
Training Monitor TIME CALORIES QUICK START: Select a program with the UP and DOWN buttons Press START to start exercising at initial speed Change the speed by pressing UP and DOWN or a SPEED KEY button PROGRAM1 PROGRAM2 PROGRAM3 PROGRAM4 MANUAL INTERVAL ROLLING... - Page 15 Computer Functions SELECT Use the UP/DOWN keys to choose a preset training programme (P2-P4), Then you can use SELECT-KEY and UP/DOWN to select training level and training time. Press the start button to begin training. Also you can using the SELECT-KEY and UP/DOWN keys to select training speed and training time (only fit to P1).
- Page 16 Computer Display TIME Shows minutes and seconds of the elapsed or remaining time. 10 :0 0 T im e PROGRAMME Shows the selected training programme. DISTANCE Shows the completed or remaining distance in kilometres. LAPS P r o g r a m m e / d ista n ce la p s Shows the number of laps reached based on 400 metres laps.
- Page 17 Computer Operations CHOOSING A PROGRAMME (P2-P4) Power on, turn on the SAFETY SWITCH press UP/DOWN to select programme p2-p4 press SELECT to enter levels setting press UP/DOWN to select levels L1-L10 press SELECT to enter time setting press UP/DOWN to set time Pre-set time: 15 minutes Pre-set level: L1, Segment : 30 segments PROGRAM setting...
- Page 18 Computer Operations Speed...
-
Page 19: Maintenance
Proper maintenance is very important to ensure a faultless and operational condition of the treadmill. Improper maintenance can cause damage to the treadmill or shorten the life of the product. All parts of the treadmill must be checked and tightened regularly. Worn out parts must be replaced immediately. BELT ADJUSTMENT You may need to adjust the running belt during the first few weeks of use. - Page 20 The treadmill is factory-lubricated. However, it is recommended to check the lubrication of the treadmill regularly, to ensure an optimal operation of the treadmill. It is usually not necessary to lubricate the treadmill in the first year or the first 500 hours of operation.
-
Page 21: Important Notes
Weekly: To make the cleaning easier it is recommended to use a mat for the treadmill. Shoes can leave dirt on the striding belt that can fall beneath the treadmill. Clean the mat under the treadmill once a week. -
Page 22: Trouble Shooting
The error of Speed over limit contact special service TROUBLESHOOTING YOU TREADMILL: This treadmill is designed to be reliable and easy to use. However, if you experience a problem, please reference the trouble shooting guide listed below: PROBLEM: The console does not light up. -
Page 23: General Fitness Tips
General fitness tips Start your exercise programme slowly, i.e. one exercise unit every 2 days. Increase your exercise session week by week. Begin with short periods per exercise and then increase these continually. Start slowly with the exercise sessions and don’t set yourself impossible targets. -
Page 24: Warm Up / Stretching Exercises
The first step in checking your heart rate is knowing how to measure it. Place your index and middle finger on the carotid artery, between the muscles and the respiratory tracts. Count the number of beats during a 10-second period and multiply this figure by 6. - Page 25 Stretch the left and right arms alternately towards the ceiling. Feel the tension in your left and right side. Repeat this exercise several times. EXERCISES FOR THE UPPER THIGH Support yourself by placing your hand on the wall, then reach down behind you and lift up your right or left foot as close to your buttocks as possible.
- Page 26 TOUCH TOES Bend your trunk slowly forwards and try to touch your feet with your hands. Reach down as far as possible to your toes. Maintain this position for 20-30 seconds if possible. EXERCISES FOR THE KNEES Sit on the floor and stretch out your right leg. Bend your left leg and place your foot on your right upper thigh.