
Subscribe to Our Youtube Channel
Related Manuals for Observer TSTAT0101SC


Summary of Contents for Observer TSTAT0101SC
- Page 1 C O M M U N I C A T I N G S Y S T E M Communicating Wall Control Owner’s Manual TSTAT0101SC U.S. Patent No. 7,243,004 U.S. Patent No. 7,775,452 616 02 1018 00 02/28/14...
-
Page 2: Table Of Contents
Table of Contents Introduction ......... Home Screen . -
Page 3: Introduction
Your new Observer Control offers high quality comfort technology. Please take a few moments to review this manual. Set up a comfort schedule that makes sense for your lifestyle;... -
Page 4: Set Day And Time
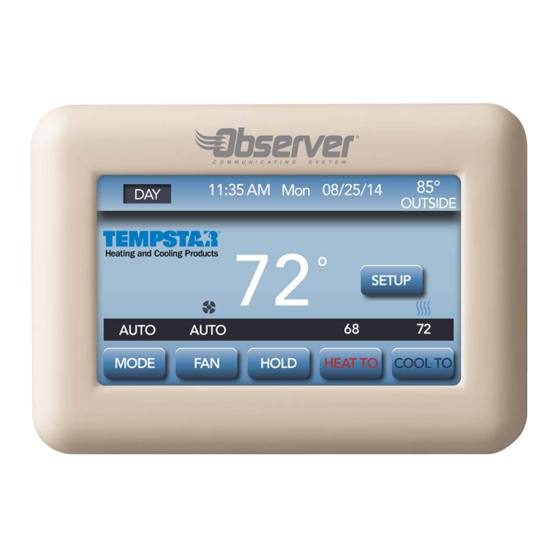
Current schedule period: WAKE, DAY, EVE, or SLEEP Date and time Room temperature (Zone specific if applicable) Actual Outdoor temperature System mode: OFF, HEAT, COOL, AUTO or EMHT (if applicable) Fan mode: AUTO, LOW, MED or HIGH Heat To setting (Zone specific if applicable) Cool To settings (Zone specific if applicable) Set Day and Time 616 02 1018 00... - Page 5 To set the current time and date, press SETUP from the HOME Screen; then press TIME/DATE. Under date, you can select the month, day, or year buttons; then use the ▲ and ▼ to select the appropriate date. Under time, you can select the hour, minute, and am/pm; then use the ▲...
-
Page 6: System Mode
System Mode Press MODE to select the desired system mode. 616 02 1018 00... -
Page 7: Fan Setting
Cool: Observer Control operates only the cooling system Emergency Heat: Only electric heat will be used for heating (only for heat pump with auxiliary heat) Fan Setting The Observer Control allows you to adjust the fan speed during continuous fan operation. 616 02 1018 00... -
Page 8: Hold Current Temperature
Fan Airflow is not selectable by zone. When continuous fan is used, all zones will be open. Hold Current Temperature The Observer Control allows you to maintain your current temperature by overriding the program schedule. Press the HOLD button to override the program and maintain your current indoor temperate setting indefinitely. - Page 9 To go back to your programmed schedule, simply press the RESUME button. 616 02 1018 00...
-
Page 10: Adjusting Temperature (Temporay Hold)
The HOLD / RESUME override prgogram schedule can be independently selected for each zone. Adjusting Temperature (Temporary Hold) The Observer Control allows you to adjust the indoor temperature at any time, overriding the programmed schedule Heating To change the heating set point, press HEAT TO; then use the ▲... - Page 11 An override time will be displayed on the right side of the screen. You can change the override time in 15minute increments by pressing the arrows below the time. When you have completed your changes, press DONE. Cooling To change the cooling set point, press COOL TO; then use the arrow buttons to set the desired temperature.
- Page 12 An override time will be displayed on the right side of the screen. You can change the override time in 15minute 616 02 1018 00...
-
Page 13: Setup
increments by pressing the arrows below the time. When you have completed your changes, press DONE. NOTE: For Zoning, temporarily overriding the program schedule can be done for each individual zone by pressing the Zone name button. The HEAT TO / COOL TO override feature can be independently selected for each zone. - Page 14 Screen/Zones From the BASIC SETUP screen; press SCREEN/ZONES. From this screen, you will have the option to adjust the screen brightness by pressing the ADJUST BRIGHTNESS button. 616 02 1018 00...
- Page 15 Use the ▲ and ▼ buttons to select your desired screen brightness. Press DONE to return to normal operation. To clean your screen, press the CLEAN SCREEN button. The screen will remain locked for 30 seconds to allow you to clean the display without changing settings.
-
Page 16: Zone Status
In addition, the current temperature from the Leaving Air Sensor will also be displayed on this screen. NOTE: Please see the Zoning section for more information regarding the features available with Observer Zoning System. Zone Names Press Zone Names to customize the descriptions for each of your installed zones. - Page 17 Note: In order to activate the Key Board, press each individual Zone name. Zone names can be up to eight characters in length. Press Done to save your changes. 616 02 1018 00...
-
Page 18: Sounds
Sounds Press Sounds from the Basic Setup screen to adjust the Volume and Sound Type heard from your Observer control. Volume options include: OFF, LOW, MED or HIGH Sound Types include: Beep, Click and Click 2 (Double Click) NOTE: When OFF is selected, the sound features of the... -
Page 19: Schedule
RESET, press DONE to return to normal operation. Schedule Determine Your Comfort Schedule Before you program your Observer Control, take a moment to plan your comfort schedule. Each day is divided into four time periods: WAKE, DAY, EVE, and SLEEP. You can select a different heating and cooling temperature for each time period, based on your daily or weekly schedule. -
Page 20: Programming Your Comfort Schedule
Programming Your Comfort Schedule The Observer Control gives you flexibility in how to create your comfort schedule. You can choose one schedule for all days; create a schedule for your work week and the weekend; or you can make every day different. - Page 21 2. Press ▲ under “All Days”, then press EDIT. 616 02 1018 00...
- Page 22 3. Press PERIOD; then use the ▲ or ▼ to select the period to change. 616 02 1018 00...
- Page 23 4. Press START; then use the ▲ or ▼ to change the time the corresponding period starts. 5. Press HEAT TO; then use the ▲ or ▼ to change the desired heating temperature for that period. 6. Press COOL TO; then use the ▲ or ▼ to change the desired heating temperature for that period.
- Page 24 Follow Steps 1 – 7 for each individual Zone using the ▲ / ▼ arrows to select the desired zone. Weekday/Weekend You can create a schedule for your work week and a separate schedule for the weekend. 1. Press SETUP, then SCHEDULE 2.
- Page 25 616 02 1018 00...
- Page 26 3. Press PERIOD; then use the ▲ or ▼ to select the period to change. 4. Press START; then use the ▲ or ▼ to change the time the corresponding period starts. 5. Press HEAT TO; then use the ▲ or ▼ to change the desired heating temperature for that period.
- Page 27 Note: For Zoning Follow Steps 1 – 7 for each individual Zone using the ▲ / ▼ arrows to select the desired zone. 616 02 1018 00...
- Page 28 Each Day You can create a different schedule for each day of the week. 1. Press SETUP, then SCHEDULE 2. Press ▲ under “Each Day”; then press EDIT to modify the schedule for that day. To modify a different day, press one of the day buttons on the bottom to scroll through the week to find the day you wish to change.
- Page 29 616 02 1018 00...
- Page 30 3. Press PERIOD; then use the ▲ or ▼ to select the period to change. 4. Press START; then use the ▲ or ▼ to change the time the corresponding period starts. 5. Press HEAT TO; then use the ▲ or ▼ to change the desired heating temperature for that period.
- Page 31 616 02 1018 00...
-
Page 32: Humidity Settings
Humidity Settings The Observer Control allows you to manually set your humidity set points to me your comfort levels. If you have a humidifier installed, press SETUP; then press HUMIDITY. Under HUMIDIFICATION, use the ▲ and ▼ buttons to select your desired humidity level during heating mode. -
Page 33: Dealer Info
Dealer Info Upon installation of your Observer Control, your Servicing Dealer has the option of uploading their contact information to the wall control for your convenience. This information can include the Servicing Dealers name, phone number and website (if applicable). Press Dealer Info from the Basic Setup screen to view the contact information for your Servicing Dealer. -
Page 34: Keypad Lock
Keypad Lock You can lock the Observer Control to help avoid inadvertent changes to your settings. Press SETUP; then press LOCKOUT. To enable the lockout feature, press the ON button. 616 02 1018 00... - Page 35 After you have enabled the lockout feature, please select a 4digit code to be used to unlock the Observer Control. Press DONE to return to normal operation. Once the lockout feature is active, to unlock the screen press anywhere on the screen to be prompted to enter your 4digit code.
-
Page 36: Model Number, Serial Number, & Software Version
Model Number, Serial Number, and Software Version Press “Version” on The Basic Setup screen. Screen will display the Model Number, Serial Number, and Software version. 616 02 1018 00... -
Page 37: Zoning Features
Zoning Features When installed as a complete Observer Zoning System, the Observer Control can be installed as a Master Control with up to five additional sensors. Sensor options can include any combination of the following: Room Sensor Zone Sensor When installed as a complete Zoning System, the Master Zone Control will serve as the central location for controlling the temperature and schedule for each individual zone. - Page 38 NOTE: See Adjusting Temperature (Temporary Hold) and Hold Current Temperature sections for complete details. From the Setup menu, you can program a comfort schedule for each individual zone by using the ▲/ ▼ button to select the corresponding zone. 616 02 1018 00...
- Page 39 NOTE: See the Schedule section for complete details. 616 02 1018 00...
- Page 40 When the Observer Control is installed as a Zone Sensor, the overall functionality of the control and screens available will be different from those found on the Master Zone Control. From each individual Zone Sensor, you can override the program schedule by using the Hold, Heat To or Cool To...
- Page 41 Note: Use the Master Control to setup Schedules for each individual Zone ·Date and time Note: Date and Time information is supplied to the Zone Senor from the Master Control ·Room temperature (Zone specific) ·Actual Outdoor temperature (System specific) ·System Mode: OFF, HEAT, COOL, AUTO or EMHT (if applicable) Note: Any changes to the System Mode from the Zone Sensor are global in nature and will impact...
- Page 42 Setup options available for the Zone Sensor consist of the following: Screen/Zones: Under this Basic Setup Screen, you will have the option to Adjust Brightness, Clean Screen or change the Zone Name. 616 02 1018 00...
-
Page 43: Sounds
Sounds: Under this menu selection, you will have the option to adjust the Volume and Sound Type heard from the individual Zone Sensor. 616 02 1018 00... -
Page 44: Humidity
Humidity: From this menu selection, you will have the option to adjust the Humidity settings for the entire system. Note: Any changes to the Humidity settings from the Zone Sensor are system specific and will be applied to all zones. Note: The main wall control has the only humidity sensor in the system. -
Page 45: Current Software Version
Version Selecting this menu option will display the Model Number, Serial Number, and Software version for the individual Zone Sensor. Copyright 2014, International Comfort Products Lewisburg, TN 37091 USA 616 02 1018 00...
Need help?
Do you have a question about the TSTAT0101SC and is the answer not in the manual?
Questions and answers