Advertisement
Quick Links
User Manual
SpitJack P80 Rotisserie
7/17/09 (Note: for updates or to get another copy of this manual:
http://www.spitjack.com/Merchant2/merchant.mvc?Store_Code=SJ&Screen=MANUAL
Thank you for purchasing the SpitJack P80 Rotisserie. All of our products are designed and
constructed to give you years of reliable service if used properly and kept adequately maintained.
Please read over the material below before assembling or using the product. There are some
notes, tips
important
and
effectively.
1. List of Parts
2. Assembly and usage
3. Operation
4. Prepping
5. Rigging
6. The pit
7. Maintenance
8. Safety precautions
9. Hardware and motor specs
10. Limited warranty
11. Rigging a hog (illustrated)
12. Firepit Layout
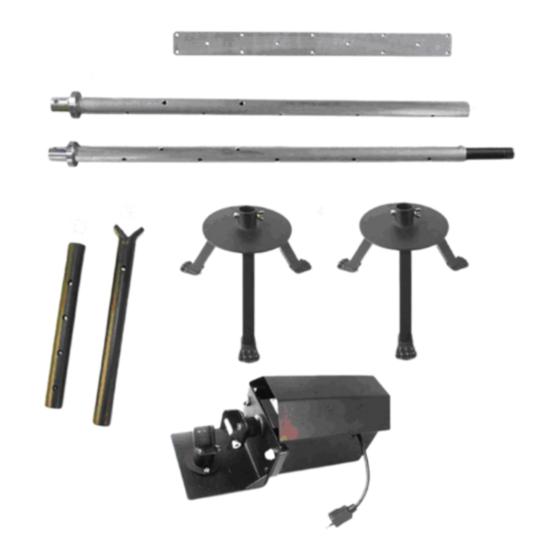
List of parts
The P80 is packed in a single box.
the parts listed below are accounted for.
Spit parts and hardware
1. Hardware package (Note: you may receive extra hardware for replacement)
a. Spit assembly hardware (4 socket head bolts and 4 wing nuts)
b. 2 sizes of small socket head screws
c. 3 sizes of hex wrenches
2. Spit plate (1)
3A. Spit - section A (with bearing ring attached)
3B. Spit - section B (with connector pipe and bearing ring attached)
3C. 2 bearing rings (attached to the spit) with set screws
Tripod stand parts and hardware
4. Tripod stands (2)
5. Spit support assembly A (pipe and spit support welded together)
6. Spit support pipe B (for attaching to the motor assembly)
Motor and motor mount with hardware
8. Motor (with housing and power cord attached), motor mount (attached to motor)
a. Spit support already mounted
b. Spit coupler parts with setscrew (attached to drive shaft)
safety cautions
mixed in that will help you in using the P80 safely and
Please check that the box has not been damaged and that all
1
Advertisement

Related Manuals for SpitJack P80 Rotisserie

Summary of Contents for SpitJack P80 Rotisserie
- Page 1 7/17/09 (Note: for updates or to get another copy of this manual: http://www.spitjack.com/Merchant2/merchant.mvc?Store_Code=SJ&Screen=MANUAL Thank you for purchasing the SpitJack P80 Rotisserie. All of our products are designed and constructed to give you years of reliable service if used properly and kept adequately maintained.
- Page 2 For hardware specifications, below. Accessories and other components There are many accessories that you can order separately for your P80. If you have ordered them with the P80, they may be included in one of the boxes (but not pictured below) or come in a separate package.
-
Page 3: Rotisserie Assembly
Rotisserie Assembly The P80 requires some minor assembly before its first use. Before you begin the assembly procedure, check to make sure you have all the parts, tools, and necessary hardware at hand. Spit assembly procedure: 1. Slide spit section A into spit section B 2. - Page 4 Base and pipe assembly B (Ready to accept the motor mount assembly) Support pipe A fastened into tripod base 2. Place the motor mount assembly in the spit support pipe assembly B (above). Note that there is a notch in the motor mount base connector pipe that must be aligned properly with the cross screw in the support pipe that it sits in (below).
- Page 5 Spit attachment to spit coupler detail (side view) Spit attachment detail (top view) 3. Check to make sure all connections are tight and secure. Attaching the Manual Operation Wheel (an optional accessory not included in the standard package) 1. Attach the handle to the wheel by fastening it through the wheel plate with the screw and bolt provided.
- Page 6 Operating the Rotisserie Once the rotisserie has been fully assembled, all the screws and bolts are checked for tightness and proper adjustment, the loaded spit has been attached as instructed above, the drip pan is in place, the fire pit has been constructed and the fire is underway, simply attach a (connected) properly rated and sized extension cord to the power cord of the motor and the motor will automatically start.
-
Page 7: Maintenance
Using these guidelines, we have cooked a hog in 40 degree (F) ambient temperature on a windy day to 195 degrees in normal cooking time. Maintenance Care of the SpitJack P80 is simple and inexpensive but should be done regularly to insure maximizing the product life. Cleaning Before the first use and after extended storage: 1. -
Page 8: Hardware Specifications
1. Clean the entire spit assembly (inside and out) with warm soapy water, rinse and dry thoroughly. Coat the spit bearing rings and spit connector pipe lightly with vegetable or other food-safe oil. 2. Wipe down or wash other parts as needed. Dry and touch up with heat safe paint if needed. Store in a dry place until nest use. -
Page 9: Safety Precautions
Safety precautions: The SpitJack P80 is a powerful machine with electrical components that will be used outdoors in conjunction with live fire and high heat and safety awareness and proper safety procedures should be followed at all times while in use. - Page 10 (365 days) from the date of receipt. Some jurisdictions do not allow such limitations on duration of an implied warranty, so the above limitation may not apply to you. . This warranty is valid only for Product (s) purchased directly from SpitJack or from one of its authorized dealers.
- Page 11 Rigging the hog to the spit: (These pictures reprinted with permission form Richard Sarich, creator of the BBQ1 Whole Hog Rotisserie system) Step 1: Support your spit on both ends, about sixteen inches off of a clean work surface. This will give you enough room to work on both sides of the spit. Slide/lay your choice of meat across the spit.
- Page 12 Step 3: Continue by bringing the trussing needle and twine back up through the other side of the spit, ending up with both ends of the butcher twine on top and looped around the spit. Step 4: Pull both ends tight while tying a triple knot, securing the meat tightly to the spit. Cut any excess twine leaving about an inch from the knot.
- Page 13 Step 5: Repeat these steps every six inches, from one end of the meat to the other, until you have fully secured the meat to the spit. Step 6: Give special attention to the head and legs making sure all parts are secured. Make sure to pull both ends tight, allowing for the shrinkage that will occur during cooking.
- Page 14 Step 7: When you have fully secured the meat to the spit, rotate the spit one half of a turn, revealing the open cavity toward you. Now is the time you can add any seasonings to the inside of the cavity. When all seasonings and fillings are in place, using the trussing needle and a long piece of twine you can start sewing up the cavity.
- Page 15 Firepit Layout Below are illustrations of how a firepit can be constructed from simple building materials. The green area is the ground, the gray is a sheet metal panel and the red is standard bricks and border edging available at Home Depot. The drip pan directly under the spit is not yet in production.
- Page 16 Material List and Instructions for a Brick Pit for the P150 Rotisserie From The Home Depot (similar products are available through other sources) you will need: 60 of these concrete pavers (bricks) in either style: 1.75 In. x 4 In. Holland 45MM Paver - Red Model 22051EA http://www.homedepot.com/webapp/wcs/stores/servlet/ProductDisplay?storeI d=10051&langId=-...
- Page 17 2 Tablespoons powdered (in a coffee grinder) rub (of your choice) or 2 more tablespoons salt Optional: hot sauce (e.g. Frank’s) Heat the apple juice and add the salt, rub and sugar. When dissolved, add the remaining ingredients. Cool. © SpitJack 2006-2009. All rights reserved...
- Page 18 Securing a Whole Animal to the SpitJack 150 or P80 Spit A user’s instruction sheet for trussing hardware and equipment This document is updated periodically. For the latest version go to web address: http://www.spitjack.com/Merchant2/merchant.mvc?Store_Code=SJ&Screen=MANUAL Securing the animal to the spit is a critical part of the rotisserie cooking process. If not done properly and sufficiently, your entire event may be susceptible to failure.
- Page 19 uniform size meat that are cooked more quickly. When used on a whole animal, it may be hard to engage the tines effectively and if you are able to, they may start to loosen (and are not able to be adjusted or tightened) as the meat softens toward the end of cooking. Method 4: Spit pins (see photo illustrations below) This method uses a specialized spit pin made of stainless threaded rod (long bolt actually) with washers and wing nuts at each end.
- Page 20 Spit Pin instructions: Set up the spit pin as illustrated above 2. Make sure you have the spit oriented so that the hole is facing the proper direction to receive the pin. Push pin through one side of the meat, through the hole in the spit, and then out the other side of the meat.
- Page 21 Internal Fork (I-fork) Instructions 1. Disassemble the I-fork so it appears as in the 2. Make sure the spit and meat are oriented properly photo above. Note: you may have a different “center to receive the I-fork correctly. The hole in the spit bolt”...
- Page 22 6. Turn the spit over 180 degrees so the pins are 7. Place the top plate over the pins and screw on the wings exposed as above. nuts. 8. Tighten the wing nuts down to the plate and adjust as needed throughout cooking. © SpitJack 2004-2009. All rights reserved.
Need help?
Do you have a question about the P80 Rotisserie and is the answer not in the manual?
Questions and answers