Table of Contents
Advertisement
Advertisement
Table of Contents

Related Manuals for DeLonghi DBM450


Summary of Contents for DeLonghi DBM450
- Page 1 40873 /06.11...
-
Page 2: Instrucciones Para El Uso
Enregistrez ce produit en ligne et recevez un numéro gratuit de Cook's Illustrated. Visitez www.delonghiregistration.com. Visitez www.delonghi.com pour y voir une liste des centres de réparation proches de chez vous. Registre este producto en línea y reciba un ejemplar gratis de Cook's Illustrated. - Page 6 1.5lb...
-
Page 7: Important Safeguards
• Do not place the Bread Maker in direct sun light, near IMPORTANT SAFEGUARDS hot appliances or in a draft. All these things can af- fect the internal temperature of the oven, which • Read these instructions carefully and retain for fu- could spoil the results. -
Page 8: Electrical Cord
Electrical cord a) A short power-supply cord (or detachable power- supply cord) should be used to reduce the risk re- sulting from becoming entangled in or tripping over a longer cord. b) Longer detachable power-supply cords or extension cords are available and may be used if care is exer- cised in their use. -
Page 9: How To Measure Ingredients
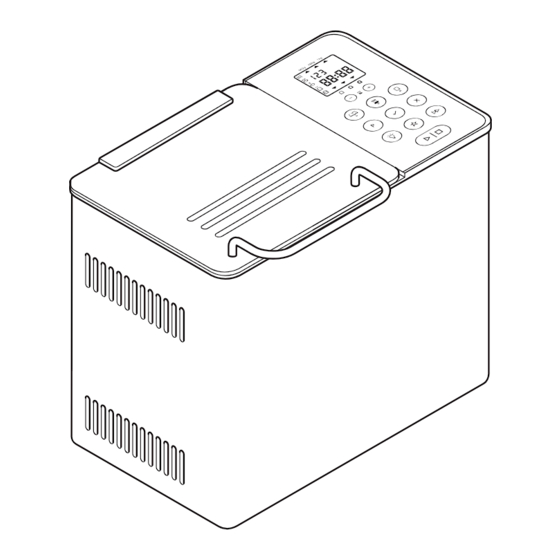
pear in the display window. • Always switch off and unplug your breadmaker after use. lid handle viewing window (N) PROGRAM STATUS INDICATOR automatic dispenser heating element The program status indicator is situated in the display window bread pan handle and the indicator arrow will point to the stage of the cycle the kneader breadmaker has reached as follows:... -
Page 10: Using Your Bread Maker
(C) AUTOMATIC DISPENSER the bread pan at an angle towards the back of the unit. Then Your DBM450 breadmaker is fitted with an automatic dis- lock the pan by turning it towards the front. penser for releasing additional ingredients directly into the Lower the handle and close the lid. -
Page 11: Automatic Dispenser Usage Chart
AUTOMATIC DISPENSER USAGE CHART ingredients suitable for use with comments the automatic dispenser Dried Fruit i.e Sultanas, Raisins, Roughly chop and do not chop too small. Mixed Peel & Glace Cherries Do not use fruit soaked in syrup or alcohol. Lightly dust with flour to stop fruit from sticking. - Page 13 (P) DELAY TIMER The Delay timer allows you to delay the bread making process up to 15 hours. The delayed start cannot be used with the “RAPID BAKE” program or programs (7) to (13). IMPORTANT: When using this delayed start function you must not use perishable ingredients –...
-
Page 14: Favorite Program
required. The program status indicator shows what stage of (22) FAVORITE PROGRAM the program you have reached. The Favorite program allows you to create and store up to 5 of 7 When the CONFIRM button is pressed for the last time after your own programs. -
Page 15: Power Interruption Protection
POWER INTERRUPTION PROTECTION Your Bread Maker has an 8 minute power interruption protection in case the unit is accidentally unplugged during operation. The unit will continue the program if plugged back in straight away. CARE AND CLEANING • Unplug the bread maker and allow to cool completely before cleaning. -
Page 16: Basic White Bread
RECIPES (add the ingredients to the pan in the order listed in the recipes) Basic White Bread Program 1 Ingredients 1.5lb Water 8 oz 10 oz 13 oz Vegetable oil 1tbsp ⁄ tbsp ⁄ tbsp Unbleached white bread flour 12 oz 1 lb 1.3 lb Skimmed milk powder... -
Page 17: Bread Rolls
Rapid White Bread Rapid Bake Button Ingredients 2 lb Water, lukewarm (32-35°C) (89-95°F) 11.5 oz Vegetable oil 1tbsp Unbleached white bread flour 1.3lb Skimmed milk powder 2tbsp Salt 1tsp Sugar 4tsp Easy blend dried yeast 4tsp 1 Press the RAPID BAKE button and the program will start automatically. Bread rolls Program 10 Ingredients... - Page 18 INGREDIENTS bread. Adding even a small amount adds a distinctive tang. Do not use on its own, as it will produce a sticky dough, which will pro- The major ingredient in bread making is flour, so selecting the right duce a dense heavy loaf. Other grains such as millet, barley, buck- one is the key to a successful loaf.
- Page 19 Liquid recommended. Some form of liquid is essential; usually water or milk is used. Water produces a crisper crust than milk. Water is often combined with skimmed milk powder. This is essential if using the time delay as fresh milk will deteriorate. For most programs water straight from the tap is fine, however, on the rapid one-hour cycle it needs to be lukewarm.
-
Page 20: Adapting Your Own Recipes
ADAPTING YOUR OWN RECIPES REMOVING, SLICING AND STORING BREAD • After you have baked some of the recipes supplied, you may wish to For best results, once your loaf is baked, remove it from the ma- adapt a few of your own favorites, which previously have been chine and turn out of the bread pan immediately, although your mixed and kneaded by hand. -
Page 21: General Hints And Tips
GENERAL HINTS AND TIPS ing. Hard water can also have this effect. • It is worth checking the dough after about 5 minutes of contin- The results of your bread making are dependent on a number of different factors, such as the quality of ingredients, careful meas- uous kneading. -
Page 22: Troubleshooting Guide
TROUBLESHOOTING GUIDE Following are some typical problems that can occur when making bread in your bread maker. Please review the problems, their possi- ble cause and the corrective action that should be taken to ensure successful bread making. PROBLEM POSSIBLE CAUSE SOLUTION LOAF SIZE AND SHAPE 1. - Page 23 TROUBLESHOOTING GUIDE (continued) PROBLEM POSSIBLE CAUSE SOLUTION LOAF SIZE AND SHAPE 6. Collapsed • Machine was placed in a draft or • Reposition bread maker. while baking. may have been knocked or jolted during rising. • Exceeding capacity of bread pan. •...
- Page 24 TROUBLESHOOTING GUIDE (continued) PROBLEM POSSIBLE CAUSE SOLUTION PAN PROBLEMS 15. Kneader cannot • You must add water to bread pan and • Follow cleaning instructions after use. be removed. allow kneader to soak before it can You may need to twist kneader slightly be removed.
-
Page 25: Limited Warranty
If repairs become necessary, see contact information below: U.S. Residents: Please contact our toll free hotline at 01-800-322-3848 or log onto our website at www.delonghi.com. Residents of Canada: Please contact our toll free hotline at 01-888-335-6644 or log onto our website at www.delonghi.com.
Need help?
Do you have a question about the DBM450 and is the answer not in the manual?
Questions and answers