
Related Manuals for Duplo DFC-12


Summary of Contents for Duplo DFC-12
- Page 1 COLLATOR DFC-12/DFC-10 Instruction Manual [220-240V] ILLUSTRATION : DFC-12 DUPLO CORPORATION...
- Page 2 • Name of product : Collator • Models : DFC-12 and DFC-12B, 100-240V 50/60Hz DFC-10 and DFC-10B, 100-240V 50/60Hz complies with the provisions defined by the regulations listed below. • Regulation : Machinery Directive 98/37/EC under EN292-1(1991), EN292-2(1991), prEN1010-1(2002), prEN1010-4(2001), EN60204-1(1997).
-
Page 3: Table Of Contents
1. INTRODUCTION Thank you for your purchase. To ensure correct usage, please read this instruction manual thoroughly, especially the section Safety Precautions. After reading, please store this instruction manual in a safe place for future reference. 2. TABLE OF CONTENTS INTRODUCTION .......... -
Page 4: Safety Precautions
3. SAFETY PRECAUTIONS Always observe the cautions and warnings given below to prevent personal injury or property damage. The degree of danger and damage that could occur is indicated on two levels by the following marks. WARNING: Ignoring this mark could result in the possibility of serious injury or even death. - Page 5 3. SAFETY PRECAUTIONS Make sure that the combined power consumption of the appliances to be connected does not exceed the capacity rating of the power outlets or plug receptacles. Exceeding the capacity rating could cause the power outlets, plug receptacles, or power extension cords to overheat and catch fire.
- Page 6 3. SAFETY PRECAUTIONS CAUTION: Always disconnect the power plug from the power outlet when the unit is not to be used for an extended period. Failure to do so could result in fire due to leakage current if the insulation should deteriorate. Install this unit on a level, stable stand or floor, with sufficient space around it.
-
Page 7: Usage Precautions
• When you power other appliances from the same AC outlet, make sure that the combined power consumption does not exceed the power supply capacity. Rated power of this equipment : 2.8-1.2A(DFC-12) / 2.0-0.8A(DFC-10) Operating environment Operate this unit in the following environment: •... -
Page 8: Features Of This Machine
○ ○ ○ ○ ○ ○ ○ ○ ○ ○ By connecting two DFC-12 (DFC-10) machines, up to 24 (20) sheets can be collated. The following four collation methods are available. ○ ○ ○ ○ ○ ○ ○ ○ ○... -
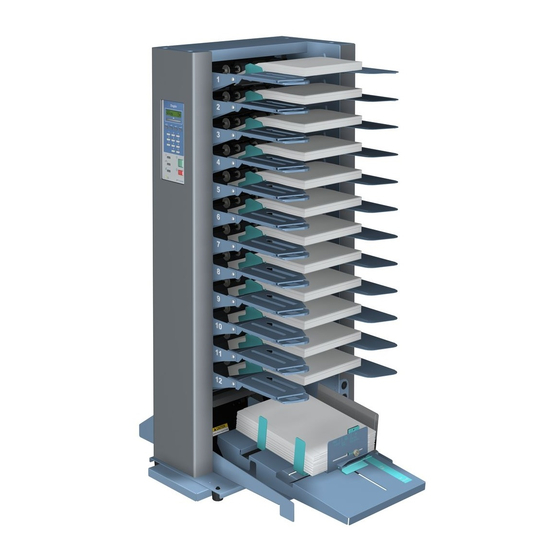
Page 9: Names Of Parts
6. NAMES OF PARTS (The illustration shows the DFC-12) Paper feed ring Control panel Fixed guide Movable guide Auxiliary paper feed bin Sliding plate Paper feed pressure adjusting knob (on every bin) Vertical conveyance cover Back jogger Paper receiving stopper 2... -
Page 10: Names And Functions Of Control Panel Parts
7. NAMES AND FUNCTIONS OF CONTROL PANEL PARTS (The panel is the DFC-12) Name Function Start key Press this key to start operating the unit. ( Page 14) Stop key Press this key to stop the unit. ( Page 14) Preset key Press this key before starting the first collation job. -
Page 11: Precautions On Loading Paper
8. PRECAUTIONS ON LOADING PAPER Fan paper sufficiently before loading on the bin. • If the paper is not separated well, mis-feed, double-feed or paper jam may occur. • Flatten folded or curled paper before stacking. Align the lead edge of the paper stock, and place it on the bin. -
Page 12: Operations
9. OPERATIONS Flowchart of operations The following shows the flowchart of the basic operations. For details, refer to the text and corresponding pages. Start Page11) 1. Turn ON the power switch • Set the paper feed pressure adjusting knob to the 2. - Page 13 Pressing "O" turns OFF the power supply. When the downstream unit is connected, turning ON the power switch of the DFC-12/10 will auto- matically turn ON the power of the downstream unit as well by the remote function. Be sure to wait for more than 10 seconds when switching ON again after having switched OFF.
- Page 14 9. OPERATIONS Fixed guide Load the paper on the bins. Paper feed gate Paper Insert the paper along the fixed guide until it touches the guide of the paper feed gate lightly. • The maximum height of paper which can be stacked is 28 mm.
- Page 15 9. OPERATIONS Adjust the side guide F to the paper size. Side guide F 11x17 LGL. LTR IV B4. B5 A4. A5 Paper size scale Side guide F When set to the STRAIGHT mode, move the side guide B until it touches the pa- Side frame per receiving table.
- Page 16 9. OPERATIONS Press the Preset key. One set of paper is sent from the bin. Note If the set is not aligned properly, finely adjust the paper receiving stoppers 1 and 2, and side guide F. ( Refer to pages 12, 13.) •...
-
Page 17: Loading Paper According To Collation Mode
10. LOADING PAPER ACCORDING TO COLLATION MODE Determine how to load paper according to the operation to be carried out after collation. See the figures below for the order of loading paper on the bins and collation pages. Note If using the downstream unit, whether to face the printed side up or down differs according to the process- ing method. -
Page 18: Loading Paper For Interleaving Mode
Page 6 Page 7 Load the interleaves at the bottommost Page 8 bin. Page 9 Load in bin 12 for the DFC-12 and in bin Intercalado Páginas para 10 for the DFC-10. See the right figure for intercalado Intercalado details. -
Page 19: Loading Paper For Block Mode
15). 10-5. How to load paper when downstream unit is connected • Paper ejected from the DFC-12/10 is punched, stapled, folded, and trimmed as shown below by a downstream units. • The interleaving mode cannot be set if a downstream unit is connected. -
Page 20: Loading Paper According To Paper Size
10. LOADING PAPER ACCORDING TO COLLATION MODE 10-6. Loading paper according to paper size The direction differs according to paper size. Paper loading direction available Paper size Direction A3SR ⇑ ⇑ ? : Available % : Available when DBM-120 and DBM-120T are connected X : Not available •... -
Page 21: Using The Control Panel
11. USING THE CONTROL PANEL This section describes the contents of the LCD and how to set the collation mode, paper receiving mode, and count display method. 11-1. LCD window Collation mode menu Paper size No. of interleaves No. of processing sets Operating state G Paper size •... -
Page 22: Setting The Collation Mode
11-2. Setting the collation mode Select the collation mode from NORMAL, INTERLEAVING, BLOCK, and ALTERNATIVE. • The "Block 4"cannot be selected when using the DFC-12/10 separately. • The interleaving mode cannot be selected when paper is ejected to a downstream unit. -
Page 23: Setting The Number Of Interleaves
11. USING THE CONTROL PANEL 11-3. Setting the number of interleaves When the interleaving mode is selected, interleaves will be inserted after every speci- fied number of sets have been collated. Enter the number of interleaves at the "Sheet Quantity" screen. Up to 200 sets can be specified to insert interleaves. -
Page 24: Setting The Count Display Method
11. USING THE CONTROL PANEL 11-4. Setting the count display method Select the count display method from the count up display and count down display. Count up display method LCD window The NO. OF SETS window counts up the number of collated sets during opera- tions. -
Page 25: Setting The Paper Receiving Method
11. USING THE CONTROL PANEL 11-5. Setting the paper receiving method • Paper can be ejected to the paper receiving table in two ways; the Straight mode Offset mode OFFSET mode which sorts paper ejected onto the table into sets and the STRAIGHT mode which stacks sets into one pile. -
Page 26: Other Settings
11. USING THE CONTROL PANEL 11-6. Other settings If the paper ejected to the downstream unit or paper receiving table is not aligned prop- erly, or the same collation operation is repeated, perform the "Overlap", "Speed", and "Processed set repeat" settings at the "Other Settings" screen on the control panel. 5mm (0.2") Setting overlap Overlap : Small... - Page 27 11. USING THE CONTROL PANEL Setting speed For auto, the speed is adjusted automatically according to the paper size, number of sheets, overlap, paper receiving mode, and whether the downstream unit is connected or not. Delay the processing speed if the paper ejected to the downstream unit is not aligned properly or if errors occur frequently when the downstream unit is connected.
- Page 28 11. USING THE CONTROL PANEL Setting processed set repeat Set the "Initial Qty Rpt" screen to ON to repeat the same collation operation with the count down display method. The number of sets entered will be memorized and the same collation will be carried out continu- ously.
-
Page 29: Connecting The Downstream Unit
12. CONNECTING THE DOWNSTREAM UNIT 12-1. Connecting the DBM-120 and DBM-120T Downstream units (DBM-120, DBM-120T) can be connected to the DFC-12/10 to staple, fold, and trim collated paper. Set the "Binding", "Paper size", "Custom size","Trimmer", and "After clearing paper feed errors"... - Page 30 12. CONNECTING THE DOWNSTREAM UNIT Press the key and save the pa- Setting paper size per size selected at step 2. Paper size can be selected from A3, A4, A5, B4, B5, LGR, LGL, LTR, INV, A3SR, custom 1, cus- tom 2, and custom 3.
- Page 31 12. CONNECTING THE DOWNSTREAM UNIT Select the screen of the custom Setting custom size number to be registered, and press When using paper other than those specified, reg- key. The screen for setting ister the length and width of the paper. Three pa- the length (L) and width (W) is dis- per sizes can be registered (custom 1, custom 2, played.
- Page 32 12. CONNECTING THE DOWNSTREAM UNIT Enter the length or width using the Press the key to return to the numerical keys. standby screen. If any previously registered size of paper length or width is remaining, press the key to clear to " 0 " first before entering the new num- Press the key until the standby screen...
- Page 33 12. CONNECTING THE DOWNSTREAM UNIT Setting trimmer Set whether or not to use the trimmer (DBM-120T) connected to DBM-120 using the following procedure.(For details on the trimmer, refer to the instruction manual for DBM-120T.) At shipment, “Trimmer” is set to “ON”. Press the key and display Press the...
- Page 34 Paper conveyed to the downstream unit when paper feed error occurs (no paper, mis feed, double-feed, etc.) will be ejected without binding. In this case, operations of the DFC-12/10 can be stopped or contin- ued according to preference. At shipment, “Error paper ejection” is set to “Stoppage”.
-
Page 35: Connecting Dc-S And Dc-S4
It can be purchased from the nearest Duplo dealer. • When connecting DC-S or DC-S4, press the Select key on the control panel of the DFC-12/10 and select "Option". For details, refer to "11-5. Setting the paper receiving method" (... -
Page 36: Double-Feed Detection Function
13.DOUBLE-FEED DETECTION FUNCTION Using the sensor for measuring paper thickness, the thickness of paper fed by preset settings is read as the reference data, and compared with the data of the paper collated. When the difference between those data is large, it determines that a double-feed has occurred. - Page 37 13.DOUBLE-FEED DETECTION FUNCTION Switching the double-feed detection sensor between ON/OFF Press the key to save the sen- Press the key and display sor state. "Double detect Set". To redo the setting, press the key an- other time to return to step 4. Press the key and display the ON/OFF state of the sensor.
-
Page 38: When Bin Error Lamps Light/Blink
14. WHEN BIN ERROR LAMPS LIGHT/BLINK When paper feed errors occur during op- Error lamp Cause of error erations, the warning alarm sounds, and the bin error lamps on the control panel light up or blink. Refer to the solutions provided below and clear the error. -
Page 39: When An Error Lamp Blinks In Green
14. WHEN BIN ERROR LAMPS LIGHT/BLINK 14-3. When an error lamp blinks in green No paper has been fed from the bin. (=Empty feed) • Fan the paper and restack again, and Strong Normal then press the Start key to restart operations. -
Page 40: When Error Messages Are Displayed
15. WHEN ERROR MESSAGES ARE DISPLAYED When errors occur, a warning alarm sounds, and an error message will be displayed on the LCD. 15-1. When "No Paper" is displayed There is no more paper in the bin. • Load paper in the bin where the error lamp is lit in green. -
Page 41: When "Feed Error" Is Displayed
15. WHEN ERROR MESSAGES ARE DISPLAYED 15-3. When "Feed error" is displayed Paper has jammed at the double-feed sensor or paper feed gate. Check the bin where the error lamp is lit in red. • When paper has jammed at the paper feed ring Pull out the jammed paper to the front, and remove. -
Page 42: When "Mis-Feed" Is Displayed
15. WHEN ERROR MESSAGES ARE DISPLAYED 15-5. When "Mis-Feed" is displayed No paper has been fed. Error lamp Error • Check the bin where the error lamp is blinking in green. • Refer to "14. WHEN BIN ERROR LAMPS LIGHT/BLINK" ( page 36). -
Page 43: When "Paper Jam" Is Displayed
15. WHEN ERROR MESSAGES ARE DISPLAYED 15-7. When "Paper Jam" is displayed Paper has jammed in the conveyance route or paper ejection gate. • Press the Eject key to eject the jammed paper. • If paper does not come out even when the Eject key is pressed, open the vertical conveyance cover and remove the jammed paper. -
Page 44: When "Feed Cov. Open" Is Displayed
15. WHEN ERROR MESSAGES ARE DISPLAYED 15-9. When "Feed Cov. Open" is displayed The vertical conveyance cover is not com- pletely closed or when it has been opened by mistake during operations. • Close the vertical conveyance cover prop- erly. •... -
Page 45: 15-11.When "On-Line Err" Is Displayed
15. WHEN ERROR MESSAGES ARE DISPLAYED 15-11. When “On-line err" is displayed An error has occurred in the downstream unit. • Check the error on the control panel of the downstream unit. For details on clearing the error, refer to the instruction manual of the downstream unit. Press the Start key to restart operations. -
Page 46: Troubleshooting
16. TROUBLESHOOTING • When paper does not jam even though "Paper Jam" is shown in the control panel of DBM-120T • When paper is ejected without being trimmed even though "Trimming" is ON Decrease the processing speed of the collator in such cases. This can be improved by setting a slow collator speed. -
Page 47: Troubleshooting Guide
17. TROUBLESHOOTING GUIDE Symptoms Solution Cause Is the vertical conveyance cover Unit does not start even when • Close the cover to start operations. Start key is pressed open? Is the paper receiving table fully • Remove the paper. stacked with paper? Have problems occurred in the down- •... - Page 48 17. TROUBLESHOOTING GUIDE Symptoms Solution Cause Cannot set on control panel Have fine adjustments been per- Clear the fine adjustment setting. formed on the DBM-120? (Enter key is ineffective) (For details, refer to the DBM-120 instruction manual.) Symptoms Cause Solution The following are displayed on the Malfunction to be investigated by ser- •...
-
Page 49: Lcd Menu
18. LCD MENU (Size cannot be changed if a downstream unit (DBM-120) is not connected.) (Page 48) (Page 48) (Page 48) (Page 49) (Page 50) (Page 50) (XX page) Proceed to the corresponding page. (Indicates blinking display) - Page 50 18. LCD MENU (Indicates blinking display)
- Page 51 18. LCD MENU (Indicates blinking display)
- Page 52 18. LCD MENU (Indicates blinking display)
-
Page 53: Cleaning The Unit And Replacing Expendable Parts
19. CLEANING THE UNIT AND REPLACING EXPENDABLE PARTS Cleaning the unit Ink or paper dust adheres to the paper feed ring or paper separator which feeds paper. Running the unit in this state will cause paper feed problems. Therefore clean periodically. Press the paper feed shaft in the ar- row direction, and remove the end of the paper feed shaft at the joint. -
Page 54: Specifications
20. SPECIFICATIONS Name DFC-12 DFC-10 Model Friction feed vertical collator No. of bins Paper feeding 3-ring friction feed method Paper feed bin 28 mm equivalent to Fine quality paper: 64g/m , 330 sheets capacity Paper receiving 70 mm equivalent to Fine quality paper: 64g/m... - Page 55 This page is a blank page.
- Page 56 11T-90047-02120001S-0...
Need help?
Do you have a question about the DFC-12 and is the answer not in the manual?
Questions and answers