Table of Contents
Advertisement
Quick Links
Advertisement
Table of Contents

Related Manuals for Signet QV-3030

Summary of Contents for Signet QV-3030
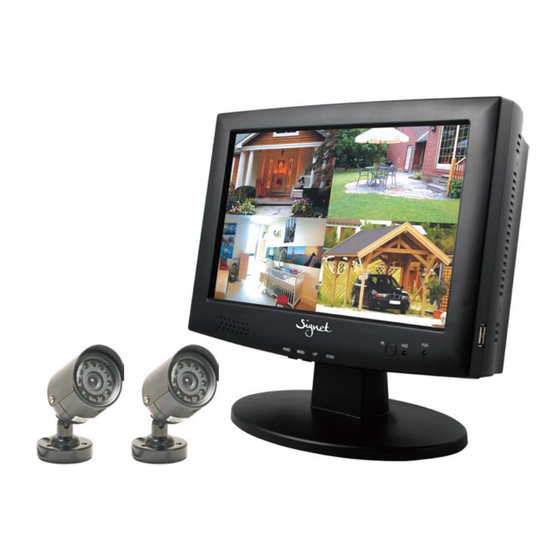
- Page 1 4 Channel 10" LCD DVR Camera Kit -3030 Model No QV USER’S MANUAL...
-
Page 2: Table Of Contents
INDEX SAFETY INSTRUCTIONS ............................ 3 CHAPTER 1: DVR FEATURES ............................ 4 CHAPTER 2:LAYOUT .............................. 5 .................................. 5 RONT ANEL .................................. 6 EAR ANEL .................................. 7 EMOTE ONTROL CHAPTER 3: DVR INSTALLATION .......................... 8 .............................. 8 ... - Page 3 5.2.7.1 Time Set .................................... 22 5.2.7.2 Password .................................... 22 5.2.7.3 Video Setup .................................. 23 5.2.7.4 Language .................................... 23 5.2.7.5 Info. ....................................... 24 5.2.7.6 System Maintenance ................................ 24 CHAPTER 6: NET-VIEWER PROGRAM ........................ 24 ............................... 24 & ETVIEWER CCESS .............................. 25 ‐ & ...
-
Page 4: Safety Instructions
Safety Instructions Use proper power source. Do not use this product with a power source that applies more than specified voltage (100-240V AC). Never insert anything metallic into the DVR case. Putting something into the DVR case can be a source of dangerous electric shock. Do not operate in wet &... -
Page 5: Chapter 1: Dvr Features
Chapter 1: DVR Features Real time monitoring Supports real time surveillance via Monitor Saves Recordings DVR saves real-time recording image to HDD Backup Recordings Supports DVR backup via USB flash drive and hard drive. 4CH Supports DVR single CH and multiple CH playback of recorded files Playback Recordings Network operation Supports remote surveillance by multiple users simultaneously... -
Page 6: Chapter 2:Layout
Chapter 2:Layout 2.1 Front Panel Item Button Function Number Name / Symbol On: The LCD screen is displayed in a basic activation status; POWER Off: The LCD screen enters into sleep mode. MENU Press once to display LCD main menu. Press again to exit LCD main menu. When pressed while the Main Menu is not displayed, the UP arrow button allows you to scroll through the video feeds transmitted from each camera hooked up to your system. -
Page 7: Rear Panel
2.2 Rear Panel Item Name / Symbol Description Function Number Ch1-4 (4 Pin Din) Connection CH1-CH4 VIDEO INPUT VIDEO OUTPUT VIDEO OUTPUT Connect Monitor Output (BNC) AUDIO INPUT Audio Input Audio Signal Input (RCA Interface) Connection AUDIO OUTPUT Audio Output Audio Signal Output (RCA Interface) Connection USB Port USB Mouse Connection... -
Page 8: Remote Control
2.3 Remote Control Channel Select 1-8 ; Numeric key 9、0 Numeric Key Preview all Channel Enter/Exit Main Menu Menu ▲ Up Key ▼ Down Key ◄ / Left / Right Key Select Key/ Edit Key Rewind key Play Key, Enter to recording search menu Forward Key ●... -
Page 9: Chapter 3: Dvr Installation
Chapter 3: DVR Installation 3.1 Hard Drive Installation Caution: NEVER Install or remove the hard drive while the DVR is running! The model has a Hard Disk Drive (HDD) drawer. Please use key provided to open the drawer and insert the HDD as follows: (1) Remove screws and open DVR upper cover carefully;... -
Page 10: Chapter 4: Dvr Boot Up
Chapter 4: DVR Boot up 4.1 System Initialization After connecting the power adapter,the system will boot-up and start initializing。 Picture 4-1 4.2 Main Interface After finishing system initialization, the system will enter into main interface. Picture 4-2 is the main interface displayed by system, which is showing no video input status. -
Page 11: Main Menu Preview
the channel (details please refer to Picture 5-1). Picture 5-2 Picture 5-3 5.1 Main Menu Preview Color set Camera Dwell time display Recording Network Search Playback Rec. Search Detail List File Backup HDD Management Main Menu E-mail setting Alarm Setting PTZ Setting Device Management Mobile... -
Page 12: Main Menu
5.2 Main Menu After clicking right button of mouse, pop-up menu will be displayed on the screen. You can click [main menu] button on pop-up menu to enter into Main menu interface (Shown as Picture 5-4). You can also use the Menu button on the front panel to bring up the window, when using the front panel buttons use the FWD and REW button to move in the menu, and the SEL button to select the icon. -
Page 13: Autoseq Setup
2. Press SETUP button to adjust the position of the privacy zones 3. After finishing the position adjustment, press ESC key on front panel or click right button of mouse to exit and return to PRIVACY ZONE page. 4. Press [APPLY] button to save you settings. Picture 5-8 5.2.1.3. -
Page 14: Record Mode
length for every single continuous recording file (15, 30, 45, 60 minutes). 5.2.2.1. Record Mode There are 2 record modes: ALWAYS & TIME SCHEDULE RECORD. When you select ALWAYS record mode, DVR will execute continuous recording without stop. When you select TIME SCHEDULE RECORD mode, DVR will execute recording according to your schedule. -
Page 15: Network Set
5.2.3 Network Set Enter into [Main Menu Network Set] to proceed network set (Shown as picture 5-15): After selecting network mode - such as DHCP、PPPOE and static allocation and setup web port, you could visit DVR remotely via network. Picture 5-15 When selecting DHCP, DHCP server will allocate DVR IP address automatically. -
Page 16: Recording Search
5.2.4 Recording Search You can enter search & playback interface by pop-up menu bar or main menu. 5.2.4.1. Search Click [Main menu search] to enter into [Video Search] menu (shown as the below picture 5-20). Play back by exact date & time: Modify the date &... -
Page 17: Video Backup
5.2.4.3. Video Backup 1. Insert your USB device (USB hard disk, USB thumb drive) into the bottom USB port on the rear panel. 2. Select one or more files. 3. Press BACKUP button on the menu. NOTE: Do not remove your USB device during making backup. Note: Backup files will be in H.264 format;... - Page 18 the backup file will be played on the according channel. (3) 、The Menu brief on the bottom of multimedia player: Date: recording date for the current backup file shown as right corner; 24H recording time: lie under [Date] menu. Black number button stands for current recording playback is normal recording for the time line.
-
Page 19: Device Management
After successfully setting the above, when you playback the current channel, you can open the channel’s audio function at the same time as the video 5.2.6 Device Management Options in device management include Hard drive, External Alarm, PTZ control, Mobile Phone Monitoring, and Motion Detection. -
Page 20: Email Alarm Notification
not external sensors to record on motion detection. BUZZER: Option to turn off the built-in buzzer alarm, or set the buzzer alarm time. OUTPUT: Option to turn on/off external sensor. MD ALARM: Option for buzzer to alarm or not when the motion detection happens I/O ALARM: Option for buzzer to alarm or not when the I/O is tripped happens HDD LOSS: Option for buzzer to alarm or not when there is no HDD installed in the DVR, or the HDD is in abnormal working condition. -
Page 21: Ptz Setup
SMTP Port: indicates sender port of SMTP server. Generally the SMTP port value is 25, SMTP port of G-mail server is 465. SMTP: indicates server address you use. Sender email: indicates sender’s email address. The email address should be consistent with the server you use. -
Page 22: 4. Ptz Control
5.2.6.4. PTZ Control You can find the PTZ control menu on the pop-up menu bar and open the PTZ control interface. You can click Z+ & Z- keys to zoom In or out, click F+ & F- keys to control camera focus and click I+ & I- to adjust the focus point. -
Page 23: Motion Detect
5.2.6.6 Motion Detect Click [Main Device Motion] to enter into the [Motion Detection] menu to setup motion detection recording. The [Motion detection] Menu has three sections, including Channel Status, Sensitivity and Motion area. Channel STATUS: This option allow you enable motion detection on any channel. -
Page 24: Language
Difference of USER PASSWORD and ADMIN PASSWORD: Login with USER PASSWORD, you can only operate Search & Playback function, and view the live images. You’re limited to check & change any system settings. Login with ADMIN PASSWORD, you will have the authority to operate all menus. -
Page 25: Info
5.2.7.5 Info. Click [Main Menu System Info] to enter into [System Information] menu to view system info, including Device type, Software (firmware) version and MAC address etc. Picture 5-56 5.2.7.6 System Maintenance This option allows you reset the DVR to default settings, update system software (firmware), and config system auto-maintenance. -
Page 26: Ie Plug-In & Netviewer
Warning! It is strongly recommended to return all Internet Explorer Security to its default settings after the ActiveX Control has been installed. Enabling all ActiveX controls put your computer at risk of being attacked by computer virus. 6.1.2. Connect to DVR To connect to the DVR from a remote computer, you would then open an Internet Explorer browser window and enter the Internet IP of your router that you received by going to www.myipaddress.com. -
Page 27: Main Interface Of Net-Viewer And Ie
6.3 Main Interface of Net-viewer and IE Picture 6-3 Log in Net-viewer and show the interface as follows 6.3.1 Menu column (Section 1 on Picture 6-3) 6.3.2 PTZ Control (Numbers 2, 3, 4 on Picture 6-3) 6.3.3 Live Play Control (Numbers 6 through 10 on Picture 6-3) 6.3.1 Menu column (Section 1 on Picture 6-3) Menu column include [Live] menu, [Replay] menu and [Setup] menu and [Logout] menu. -
Page 28: 3. Setup
F.F. button: fast forward playback recording Slow button: slow playback recording. Next Frame: play frame by frame. 264 TO AVI button: convert file from H.264 format to AVI format The native format of the backup files is H.264, you can convert H.264 format into more familiar AVI format by clicking the key of 264 to AVI. - Page 29 recording parameters (resolution, quality, audio, REC mode and Schedule) remotely via Net-viewer. Picture 6-5 Click the [Schedule] menu to enter into its sub menu (shown as Picture 6-6). Remote setup methods are the same as local DVR setup. Please refer to Section 5.2.2 Record Setup ②...
- Page 30 System allows you setup motion detection settings for each channel of DVR remotely (shown as Picture 6-8) Picture 6-8 ③ PTZ Control Click [PTZ control] to setup PTZ cameras. Remote setup methods are the same as local DVR setup. Please refer to Section 5.2.5.3 (shown as Picture 6-9). Picture 6-9 ④...
-
Page 31: Log Out
turn daylight saving time on/off, etc. Picture 6-11 ⑥ Host Info Click [Host Info.] to enter into the sub menu (shown as Picture 6-12). Here you can check Usage rate of HDD, available recording time, software version and MAC address. Picture 6-12 6.3.1.4 Log out Log out of the system. -
Page 32: 1. Playback Local File With Netviewer
⑥.Capture [ ]:Capture Screen image and save to PC as *bmp image. ⑦.Recording [ ]:Operate DVR recording remotely ⑧Channel display [ ]: The icons stand for Single Channel display, Quad Channel display, 3x3 Channel display and 4x4 Channel display respectively. ⑨.Volume control [ ] Click or slide the control bar to adjust sound volume. -
Page 33: Chapter 7: Specifications
Chapter Specifications Model Video System NTSC / PAL Compression Format Video:H.264 / Audio:8kHz*16bit ADPCM 4-CH 4 Pin Din Input/ 1-CH BNC Output Video Output Audio I/O 1-CH RCA audio input/ 1-CH RCA audio output Display Resolution D1:704×576(PAL) 704×480 (NTSC) Single CH PAL:25 fps ,NTSC:30 fps Frame rate PAL: CIF(352*288), HD1(704*288) D1 (704*576)... -
Page 34: Chapter 8: Windows Vista User
Chapter 8: Windows Vista User 1、Open IE browse firstly, then enter into Tool bar- and select appear the below picture: 2、Second, select icon tick the settings of “ActiveX controls and plug-ins”to Enable, details as follows: Lastly after tick all the “Enable”, please click to exit. - Page 35 Open IE browser and input IP address and web port of DVR…computer will auto downloadand install the widget. We suggest Visita user set user access authority in order to make your PC safer. Setting processing as follows: Click [Start Set Control panel User account] to set user access authority shown as below picture. Remind: If the widgets ar e not downl oaded succes sfully, ple ase check if you r br owser’s safety l evel or firewall setting is too advanced.
-
Page 36: Chapter 9: Appendix
Chapter Appendix 9.1 Operation Function Table Type Title Description Page Time setting Setting system date, time and format and day-light saving time setting Language Select Setting system language Setting CH title and position; adjusting image color parameter value; setting CH display to ON / Off CH Setting and time display/recording time overlaying to On/Off. -
Page 37: Troubleshooting
Recording Mode Timing recording Recording alarm setting Alarm icon Recording after Manuel Recording AMR NLR NOR power on ⊥ MD alarm AMR NLR Alarm ⊥ ⊥ ⊥ ⊥ ⊥ HDD loss, HDD space full mode ⊥ ⊥ ⊥ ⊥ ⊥ Video Loss Video Loss List 9-2... -
Page 38: System Connection Configuration
9.5 System connection Configuration (Diagram is for reference only to show where to attach various devices to the DVR, the cameras, external alarms, USB flash drives, monitors and computers are not included with the standard DVR package)
Need help?
Do you have a question about the QV-3030 and is the answer not in the manual?
Questions and answers