
Subscribe to Our Youtube Channel
Related Manuals for Raymarine T303


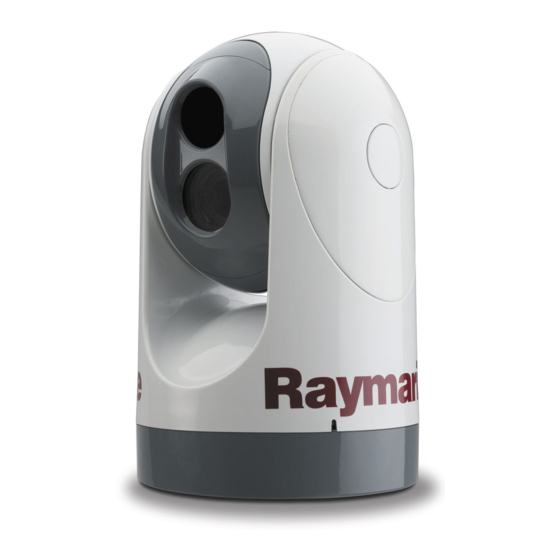
Summary of Contents for Raymarine T303
- Page 1 Ins ta lla tion a nd ope ra tion ins tructions Da te : 08-2012 Docume nt numbe r: 81338-3-EN © 2012 Ra yma rine UK Limite d...
- Page 3 Export Administration Regulations (EAR) This document is controlled to Raymarine Technology Level 1. The information contained in this document pertains to a dual use product controlled for export by the Export Administration Regulations (EAR). Raymarine trade secrets contained herein are subject to disclosure restrictions as a matter of law.
-
Page 5: Table Of Contents
6.5 Image adjustments............ 33 6.6 System reset ............34 6.7 Setup menus ............35 Chapter 7 Troubleshooting and support ....37 7.1 Thermal camera troubleshooting ........ 38 7.2 Raymarine customer support ........39 Chapter 8 Technical specification......41 8.1 Technical specification..........42... - Page 6 T-Series...
-
Page 7: Chapter 1 Important Information
(as applicable). fuse or automatic circuit breaker. Raymarine does not warrant that this product is error-free or that it is compatible with products manufactured by any person or entity other than Raymarine. -
Page 8: Emc Installation Guidelines
Directive requires the recycling of waste electrical and electronic supplied by third parties. equipment. Whilst the WEEE Directive does not apply to some Raymarine products, we support its policy and ask you to be aware of how to dispose of this product. EMC installation guidelines... -
Page 9: Chapter 2 Handbook Information
Chapter 2: Handbook information Chapter contents • 2.1 Handbook information on page 10 • 2.2 T-Series thermal imaging cameras on page 10 Handbook information... -
Page 10: Handbook Information
This handbook covers models: T300, T303, T350, T353, T400, T403, T450, T453, T460, T463, T470SC and T473SC. It includes information to help you: • plan your thermal imaging system and ensure you have all the necessary equipment, •... -
Page 11: Chapter 3 Planning The Installation
Chapter 3: Planning the installation Chapter contents • 3.1 Thermal camera system on page 12 • 3.2 Installation checklist on page 13 • 3.3 Typical systems with thermal cameras on page 14 • 3.4 Thermal camera parts supplied on page 16 •... -
Page 12: Thermal Camera System
Raymarine equipment. • GVM video module – Used to distribute the video signal around a Raymarine G-Series system. Compatible displays and controllers The following Raymarine displays and systems are compatible with the T-Series range of thermal cameras. Integrated Multifunction display... -
Page 13: Installation Checklist
3.2 Installation checklist Installation includes the following activities: Installation Task Plan your system. Obtain all required equipment and tools. Site all equipment. Route all cables. Drill cable and mounting holes. Make all connections into equipment. Secure all equipment in place. Power on and test the system. -
Page 14: Typical Systems With Thermal Cameras
– Includes the camera control communications. e/c-series display PoE injector (Required if JCU is included in the system.) Thermal camera JCU (optional) Raymarine network switch SeaTalk to other digital devices: Additional displays / controllers, Radar, etc. G-Series system P AG... - Page 15 System with basic / classic display(s) This arrangement is applicable for displays which do not have the thermal camera application and integrated camera controls. D11978-2 Video cable – Carries the thermal / visible light video image. Ethernet – Includes the camera control Thermal camera JCU (required) Monitor / Display...
-
Page 16: Thermal Camera Parts Supplied
3.4 Thermal camera parts supplied 3.5 JCU — Parts supplied T-Series thermal cameras with JCU included are supplied with the following additional parts: 72.4 mm (2.9 in) optional drill guide D11968-2 78.74 ±1.25 mm (3.1 ±0.049 in) cutout 6.4 mm (0.25 in) 1. -
Page 17: Tools Required
3.6 Tools required The following tools are required for installation. D12333-1 Item Description Drill 6mm spanner 6.4mm drill bit Jigsaw (only required for JCU installation) Pozi-drive screwdriver (only required for JCU installation) Thread-lock Planning the installation... - Page 18 T-Series...
-
Page 19: Chapter 4 Cables And Connections
Chapter 4: Cables and connections Chapter contents • 4.1 General cabling guidance on page 20 • 4.2 Connection overview on page 20 • 4.3 Power connection on page 21 • 4.4 JCU Connection on page 22 Cables and connections... -
Page 20: General Cabling Guidance
• Unless otherwise stated use only standard cables of the correct type, supplied by Raymarine. • Ensure that any non-Raymarine cables are of the correct quality and gauge. For example, longer power cable runs may require larger wire gauges to minimize voltage drop along the run. -
Page 21: Power Connection
5.5 mm (10 AWG) 24 V 0.8 mm (18 AWG) Breakers, fuses and circuit protection Raymarine recommends that you fit a thermal breaker or fuse for the camera at the distribution panel. Camera Recommended fuse All models 5 Amp. Sharing a breaker Where more than 1 piece of equipment shares a breaker you must provide protection for the individual circuits. -
Page 22: Jcu Connection
Warning: Positive ground systems Do not connect this unit to a system which has positive grounding. D11980-2 1. Thermal camera 2. Raymarine network switch 3. Ethernet coupler 4. JCU 5. PoE injector 6. SeaTalk to other devices (e.g. multifunction display, digital radar...). - Page 23 D11979-1 1. Thermal camera 2. JCU 3. Ethernet coupler, supplied with camera Cables Camera to Ethernet coupler Use the 450 mm (18 ”) tail hard wired from the camera. Should you need to extend this use a SeaTalk patch cable and additional coupler available from your dealer.
- Page 24 T-Series...
-
Page 25: Chapter 5 Installation
Chapter 5: Installation Chapter contents • 5.1 Camera mounting on page 26 • 5.2 JCU Mounting on page 27 Installation... -
Page 26: Camera Mounting
5.1 Camera mounting Mounting the camera Use these instructions to mount the camera unit in position. Location requirement When planning the installation location, consider the following points: • The camera is waterproof, and appropriate for above decks mounting. • The underside (inside) of the compartment or deck onto which the camera is mounted must be weathertight. -
Page 27: Jcu Mounting
5.2 JCU Mounting 2. Fasten the camera unit to the riser using the 6x threaded bolts and a suitable thread-locking compound. Location requirements When planning the installation location, consider the following points: • Select a position on your vessel that is close to the monitor that displays the T-Series camera video output. - Page 28 Thin panel mounting Thick panel mounting T-Series...
-
Page 29: Chapter 6 System Operation And Setup
Chapter 6: System operation and setup Chapter contents • 6.1 Thermal camera image on page 30 • 6.2 Operation and features overview on page 31 • 6.3 Power up and standby on page 32 • 6.4 Camera control on page 32 •... -
Page 30: Thermal Camera Image
6.1 Thermal camera image Icon Description The thermal camera provides a video image which is shown on Rear-view mode — image is flipped horizontally. your display. Zoom setting: 2x zoom. Zoom setting: 4x zoom. Single active controller on network. Multiple active controllers on network. PC / laptop detected on network. -
Page 31: Operation And Features Overview
• Press and hold – “Wake” the camera from standby mode or The camera features can be accessed using the thermal camera access the power menu. application of a compatible Raymarine multifunction display, or from a dedicated JCU (Joystick control unit). • Momentary press – Change JCU display brightness (3 different levels). -
Page 32: Power Up And Standby
6.3 Power up and standby 6.4 Camera control When the breaker connecting power to the camera is switched on, Pan, tilt and zoom the camera will run a boot up sequence lasting for about 1 minute, after which the camera will be in Standby mode. The camera controls allow for pan and tilt (elevation) of the camera, as well as zoom (magnification) of the thermal image. -
Page 33: Image Adjustments
The 4 modes are: Night Running — scene preset mode for night conditions. Thermal camera stabilization The Raymarine T470SC and T473SC thermal cameras includes a mechanical stabilization feature. Day Running — scene preset mode for daytime The mechanical stabilization feature improves image stability by conditions. -
Page 34: System Reset
6.6 System reset You may find it useful to experiment with this option to find the best setting to suit your needs. Resetting the JCU Reversing the video polarity Occasionally it may be necessary to reset the JCU, to do this you To reverse the polarity of the video image follow the steps below. -
Page 35: Setup Menus
6.7 Setup menus Menu item / Description Settings / Operation Hide All Icons Selecting this option hides all icons except for: The setup menus provide a range of tools and settings to configure the thermal camera. • Position indicator The menus can be accessed from any controller on the system. The •... - Page 36 • High Power Mode 22 W 17.4 W • MAC address, and • Software information. • High Torque Mode This option displays Raymarine contact details. Contact Raymarine • High Power Mode 7.4 W Standby Restore Factory Use this option to restore the camera settings to Defaults their factory default value.
-
Page 37: Chapter 7 Troubleshooting And Support
Chapter 7: Troubleshooting and support Chapter contents • 7.1 Thermal camera troubleshooting on page 38 • 7.2 Raymarine customer support on page 39 Troubleshooting and support... -
Page 38: Thermal Camera Troubleshooting
Erratic or unresponsive controls. Network problem. Check that the controller and thermal camera are correctly connected to the network. (Note: This may be a direct connection or via a Raymarine network switch.) Check the status of the Raymarine network switch. -
Page 39: Raymarine Customer Support
7.2 Raymarine customer support Raymarine provides a comprehensive customer support service. You can contact customer support through the Raymarine website, telephone and email. If you are unable to resolve a problem, please use any of these facilities to obtain additional help. - Page 40 T-Series...
-
Page 41: Chapter 8 Technical Specification
Chapter 8: Technical specification Chapter contents • 8.1 Technical specification on page 42 Technical specification... -
Page 42: Technical Specification
8.1 Technical specification Nominal supply voltage 12 or 24 V dc Operating voltage range -10% to +30% of nominal supply range Current • Peak 3.8 A @ 12 V • Peak 1.9 A @24 V Power consumption 25 W typical, 50 W Max Environmental Installation environment •... - Page 44 www.ra ym a rin e .c o m...
Need help?
Do you have a question about the T303 and is the answer not in the manual?
Questions and answers