Table of Contents
Advertisement
Advertisement
Table of Contents

Related Manuals for Diamond Multimedia WR300N


Summary of Contents for Diamond Multimedia WR300N
- Page 1 WR300N Portable Wireless-N Repeater Quick Start Guide...
-
Page 2: Table Of Contents
Use the Device as a Wireless Repeater ............12 Use the Device as a Wireless Bridge ............12 Configure the WR300N as a Wireless AP ........... 13 Changing the Wireless Settings ..............15 Changing the Wireless Security Settings ........... 15 WPS ...................... -
Page 3: About The Device
Diamond Multimedia WR300N Portable Wireless-N Repeater supports wireless 802.11b/g/n standards with one 10/100Base-T Ethernet port. WR300N is designed with MIMO technology to extend the reach of any existing wireless router/AP to maximize the coverage in your home or office. It basically receives the signal from your wireless router/AP and repeats it to extend the range to farther locations that are previously unreachable. -
Page 4: Minimum System Requirements
Your computer must meet the following minimum requirements. Any operating system can be used Web Browser 233MHz processor Ethernet network adapter Or Wireless network adapter Package Contents Package contents are listed below. WR300N Ethernet cable Easy Start Guide Resource CD Page 4 of 40... -
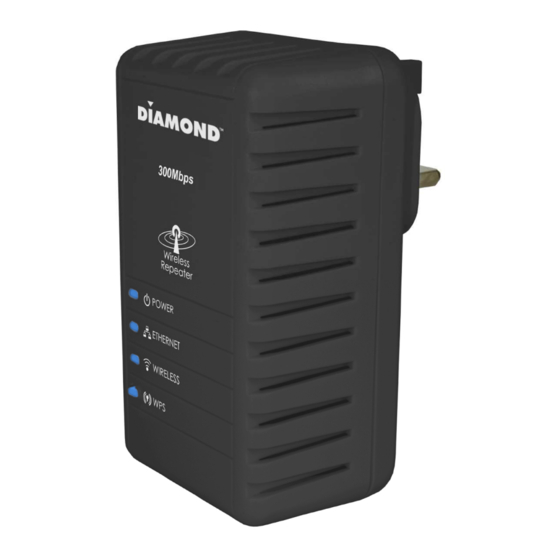
Page 5: Device Overview
User Manual Device Overview Front Panel LABEL STATE DESCRIPTION On – Solid Green Device is powered ON POWER LED Device is powered OFF On – Solid Green Ethernet device is connected ETHERNET LED On – Blinking Green Indicates LAN activity No Ethernet device connected On –... -
Page 6: Bottom Panel
User Manual Bottom Panel LABEL DESCRIPTION Press the Reset button for 5 seconds to restore the device to RESET default factory settings ETHERNET PORT Connect to computers/Ethernet devices Page 6 of 40... -
Page 7: Tips For Placing The Repeater
User Manual Tips for placing the Repeater Before proceeding to configure your WR300N, it is often a good idea to identify the areas where you have good wireless reception and weak or no wireless signal at all. Based from this assessment you may place the wireless repeater in between a location where you have good wireless reception and where you have poor wireless coverage. -
Page 8: Configuring The Repeater
Setting up the device is easy. Follow the steps below to configure the device for your current wireless router/AP. Ensure to disable the wireless connection on the PC or laptop used for configuring the WR300N. Please note that the main router/AP and Wireless Repeater must be on the same wireless channel. - Page 9 User Manual 5. Input admin for username and input admin for password. Click the OK button. 6. Click on the Auto Setup button. This will show the available wireless networks that are in range of the WR300N. Page 9 of 40...
- Page 10 User Manual NOTE: If you are connecting to a hidden wireless network, you need to go through the Manual Setup and key-in the information from your existing wireless router/AP manually. Also un-tick the Broadcast SSID option so your wireless network can remain hidden. 7.
- Page 11 8. Input the current wireless network key/passphrase. Click the Apply button to commit the changes. 9. Close the web browser and power down the WR300N by unplugging the device from the wall plug. Now, Plug the WR300N back to a power outlet at the identified location.
-
Page 12: Use The Device As A Wireless Repeater
User Manual Use the Device as a Wireless Repeater Once the wireless connection from the WR300N to the main AP/router is established you can connect your wireless devices like laptops and smart phones through the wireless repeater. These devices will obtain an IP address from the main AP/router and should be able to access the Internet from farther locations previously unreachable by your wireless signal. -
Page 13: Configure The Wr300N As A Wireless Ap
User Manual Setup Diagram Configure the WR300N as a Wireless AP Use the WR300N as a Wireless Access Point to turn a regular modem-router into a wireless capable networking device to connect wireless-enabled devices such as laptops and smart phones. - Page 14 Setup Diagram NOTE: To change any wireless settings on the WR300N, you would need to set a static IP address on your wireless network card to be able to access the web GUI before you can configure the settings. Please refer to the steps on how to set a static IP on your PC also included in this manual.
-
Page 15: Changing The Wireless Settings
User Manual Changing the Wireless Settings Modify the default Wireless Settings to suit your own preference. To change the Wireless settings via the Web GUI: 1. Open your browser 2. Type 10.0.10.254 on the address bar 3. Input admin for both username and password fields and click on OK 4. -
Page 16: Wps
User Manual To change the Wireless security settings via the Web GUI: 1. Open your browser 2. Type 10.0.10.254 on the address bar 3. Input admin for both username and password fields and click on OK 4. Click the Wireless button, and click the Security menu. You can change the wireless security settings as preferred from this page 5. -
Page 17: Configuring Wireless Mac Filtering
User Manual Configuring Wireless MAC Filtering Wireless MAC Filtering allows you to select which wireless clients to allow or deny access to the Wireless Repeater. Page 17 of 40... -
Page 18: Viewing The Home Page
User Manual To configure Wireless MAC Filtering via the Web GUI: 1. Open your browser 2. Type 10.0.10.254 on the address bar 3. Input admin for both username and password fields and click on OK 4. Click the Wireless button, and click MAC filter menu. You can select Allow or Deny from the Policy drop down box and enter the MAC address of the wireless client you wish to allow/deny access to the wireless repeater... - Page 19 User Manual 4. AP Client Connection Status displays the Connection status and SSID of the Access Point being extended. 5. Wireless Client List displays the current list of wireless clients connected to the repeater. Page 19 of 40...
-
Page 20: System Management
User Manual System Management The System Management menu is used for device settings administration. Accessing System Management To access the Web User Interface: 1. Open your browser. 2. Type-in 10.0.10.254 on the address bar and then press Enter. 3. Input admin for both username and password fields and click on OK What’s on System Management System Management includes the following options: Information... -
Page 21: Information
User Manual Password Information This page shows the device information. Below is the list of information shown in this menu. Firmware Version – Shows the current firmware version of the device Build Date – Shows the firmware release date Serial Number – Shows the serial number of the device ETH MAC Address –... - Page 22 User Manual Local Local section allows you to see the current default IP address of the device. This device IP address can be changed if required. Page 22 of 40...
-
Page 23: Firmware
User Manual Firmware Firmware menu allows you to see the current firmware version and build date as well as upgrade the firmware of the device. Firmware Information – Shows the current firmware’s version and build date Firmware Upgrade – Load a new firmware upgrade file to the device NOTE: Make sure you connect to the device via Ethernet cable when upgrading the firmware to avoid corruption during the firmware upgrade procedure. - Page 24 User Manual Settings Settings page allows you to back up the system configuration settings on the device, restore the system configuration settings from an existing file and also allows you to reset the device to factory defaults. Backup Click the ‘Backup’ button to save the current settings of your device. If you will change the current configuration of your device, it is recommended that you back up the device’s current settings first before making any changes.
-
Page 25: Reboot
User Manual Reboot Reboot allows you to reboot the device for new settings to take effect. Reboot – Allows you to reboot the device Page 25 of 40... -
Page 26: Password
User Manual Password Password menu allows you to change the device’s password to access the Graphical User Interface (GUI). Password – Allows you to change the router’s password Page 26 of 40... -
Page 27: Setting A Static Ip On Your Pc
Router/AP, you will no longer have access to the device’s web GUI. If you wish to change any settings on the WR300N, you need to set a Static IP address on your PC. Just remember to set it back to “Obtain and IP address automatically”... - Page 28 User Manual 4. Right-Click on the Network Adapter you will use to configure the wireless repeater and click Properties 5. Click to select Internet Protocol (TCP/IP) and click Properties Page 28 of 40...
- Page 29 User Manual 6. Select “Use the following IP address:” and key in 10.0.10.1 as the IP address and 255.255.255.0 for the Subnet mask. Leave the other fields blank. 7. Click OK to commit the settings. To set a static IP address on your PC using Windows Vista: 1.
- Page 30 User Manual 2. Double-Click Network and Sharing Center 3. Click Manage network connections 4. Right-Click on the Network Adapter you will use to configure the wireless repeater and click Properties Page 30 of 40...
- Page 31 User Manual 5. Click to select Internet Protocol Version 4 (TCP/Ipv4) and click Properties 6. Select “Use the following IP address:” and key in 10.0.10.1 as the IP address and 255.255.255.0 for the Subnet mask. Leave the other fields blank. Page 31 of 40...
- Page 32 User Manual 7. Click OK to commit the settings. To set a static IP address on your PC using Windows 7: 1. Click Start > Control Panel 2. Click View network status and tasks 3. Click Change adapter settings Page 32 of 40...
- Page 33 User Manual 4. Right-Click on the Network Adapter you will use to configure the wireless repeater and click Properties 5. Click to select Internet Protocol Version 4 (TCP/Ipv4) and click Properties 6. Select “Use the following IP address:” and key in 10.0.10.1 as the IP address and 255.255.255.0 for the Subnet mask.
- Page 34 User Manual 7. Click OK to commit the settings Page 34 of 40...
-
Page 35: Safety Precautions
User Manual Safety Precautions Do not open, service, or change any component. Only qualified technical specialists are allowed to service the equipment. Observe safety precautions to avoid electric shock Check voltage before connecting to the power supply. Connecting to the wrong voltage will damage the equipment. Page 35 of 40... - Page 36 User Manual Technical Support Diamond Technical Support staff is here to help resolve any issues that you may be experiencing. Prior to contacting technical support please make sure you have the following information available. 1. Model #: (Printed on the bar code, located on the box) 2.
- Page 37 User Manual SHIPPING Starting June 1st 2009 Diamond Multimedia will pay for shipping cost from Diamond back to US and Canadian customers provided the product is indeed under warranty and there is no damage caused by improper installation or modification of the merchandise. Customers located outside of the United States and Canada or using military addresses (APO,etc) will be required to pay for return shipping.
- Page 38 User Manual TO PRODUCTS USED FOR NUCLEAR RELATED, WEAPONS RELATED, MEDICAL OR LIFE SAVING PURPOSES. TO THE FULLEST EXTENT ALLOWED BY LAW, DIAMOND ALSO EXCLUDES FOR ITSELF AND ITS SUPPLIERS ANY LIABILITY, WHETHER BASED IN CONTRACT OR TORT (INCLUDING NEGLIGENCE), FOR INCIDENTAL, CONSEQUENTIAL, INDIRECT, SPECIAL OR PUNITIVE DAMAGES OF ANY KIND, OR FOR LOSS OF REVENUE OR PROFITS, LOSS OF BUSINESS, LOSS OF INFORMATION OR DATA, OR OTHER FINANCIAL LOSS ARISING OUT OF OR IN CONNECTION WITH THE SALE, INSTALLATION,...
-
Page 39: Fcc Notice
The FCC requires the user to be notified that any changes or modifications made to this device that are not expressly approved by Diamond Multimedia could void the user’s authority to operate the equipment. This device complies with Part 15 of the FCC rules. - Page 40 User Manual © Copyright 2010 All rights reserved. No part of this document may be reproduced, republished, or retransmitted in any form or by any means whatsoever, whether electronically or mechanically, including, but not limited to, by way of photocopying, recording, information recording, or through retrieval systems without the express written permission.
Need help?
Do you have a question about the WR300N and is the answer not in the manual?
Questions and answers