JVC KD-G111 Instructions Manual
Cd receiver
Hide thumbs
Also See for KD-G111:
- Service manual (153 pages) ,
- Instructions manual (56 pages) ,
- Installation & connection manual (2 pages)
Table of Contents
Advertisement
Available languages
Available languages
CD RECEIVER
RECEPTEUR CD
KD-G111
For canceling the display demonstration, see page 7.
Pour annuler la démonstration des affichages, référez-vous à la page 7.
For installation and connections, refer to the separate manual.
Pour l'installation et les raccordements, se référer au manuel séparé.
INSTRUCTIONS
MANUEL D'INSTRUCTIONS
GET0253-003A
[EX/EU]
Advertisement
Chapters
Table of Contents

Related Manuals for JVC KD-G111


Summary of Contents for JVC KD-G111
- Page 1 CD RECEIVER RECEPTEUR CD KD-G111 For canceling the display demonstration, see page 7. Pour annuler la démonstration des affichages, référez-vous à la page 7. For installation and connections, refer to the separate manual. Pour l’installation et les raccordements, se référer au manuel séparé.
-
Page 2: How To Reset Your Unit
Keep the card in a safe place, as it will help the authorities to identify your unit if stolen. Thank you for purchasing a JVC product. How to forcibly eject a disc If a disc cannot be recognized by the receiver or cannot be ejected, ejects the disc as follows. -
Page 3: Table Of Contents
How to reset your unit ... How to forcibly eject a disc... How to read this manual... How to use the MODE button ... Control panel — KD-G111 Parts identification... Getting started... 6 Basic operations ... Canceling the display demonstrations ... -
Page 4: How To Read This Manual
How to read this manual The following methods are used to made the explanations simple and easy-to-understand: • Some related tips and notes are explained in “More about this receiver” (see page 17). • Button operations are mainly explained with the illustrations as follows: Press briefly. -
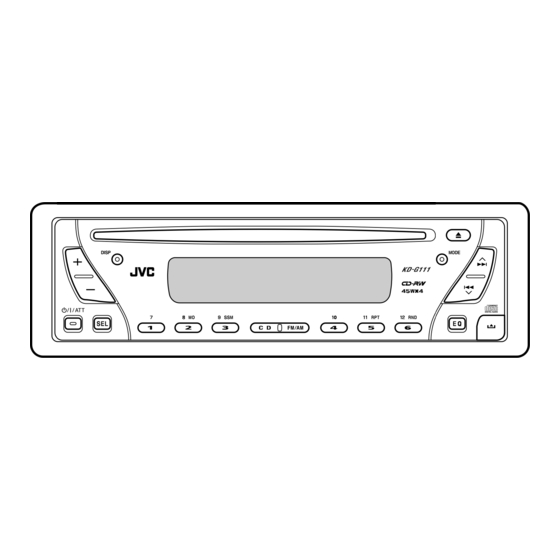
Page 5: Control Panel
FM/AM button r RPT (repeat) button t RND (random) button y EQ (equalizer) button (control panel release) button i Number buttons KD-G111 Parts identification Display window o Tuner reception indicators MO (monaural), ST (stereo) ; CD indicator a RND... -
Page 6: Getting Started
Getting started Ÿ You cannot select “CD” as the playback source if there is no disc in the loading slot. Volume level appears. Volume level indicator ⁄ Adjust the sound as you want. (See pages 12 and 13.) Basic operations To drop the volume in a moment (ATT) To turn off the power Caution on volume setting:... -
Page 7: Canceling The Display Demonstrations
Canceling the display demonstrations If no operations are done for about 20 seconds, display demonstration starts. [Initial: DEMO ON]—see page 14. Finish the procedure. To activate the display demonstration In step 3 above... Setting the clock Set the hour and minute. 1 Select “CLOCK H”... -
Page 8: Radio Operations
Radio operations Lights up when receiving an FM stereo broadcast with sufficient signal strength. Selected band appears. Ÿ Start searching for a station. When a station is received, searching stops. To stop searching, press the same button again. To tune in to a station manually In step Ÿ... -
Page 9: Storing Stations In Memory
Storing stations in memory You can preset six stations for each band. FM station automatic presetting — SSM (Strong-station Sequential Memory) Select the FM band (FM1 – FM3) you want to store into. “SSM” flashes, then disappears when automatic presetting is over. Local FM stations with the strongest signals are searched and stored automatically in the FM band. -
Page 10: Disc Operations
Disc operations All tracks will be played repeatedly until you stop playback. Total playing time of the inserted disc Elapsed playing Current track time number To stop play and eject the disc Playing a disc To fast-forward or reverse the track To go to the next or previous tracks Total track number of the inserted disc... -
Page 11: Selecting The Playback Modes
Prohibiting disc ejection You can lock a disc in the loading slot. To cancel the prohibition, repeat the same procedure. Selecting the playback modes You can use only one of the following playback modes at a time. Select your desired playback mode. Repeat play Ex.: When “TRK RPT”... -
Page 12: Sound Adjustments
Sound adjustments Selecting preset sound modes You can select a preset sound mode suitable to the music genre. Ex.: When “ROCK” is selected Indication pattern for each sound mode: (C-EQ: custom equalizer) Preset values Indication For: BAS * USER (Flat sound) ROCK Rock or disco music... -
Page 13: Adjusting The Sound
Adjusting the sound You can adjust the sound characteristics to your preference. Ex.: When “TRE” is selected Indication pattern changes as you adjust the level. Indication To do: BAS* Adjust the bass. (bass) TRE* Adjust the treble. (treble) FAD* Adjust the front (fader) and rear speaker balance. -
Page 14: General Settings - Psm
General settings — PSM Basic procedure You can change PSM (Preferred Setting Mode) items listed on the table that follows. Select a PSM item. Ex.: When you select “AMP GAIN” Indications DEMO Display demonstration CLOCK H Hour adjustment CLOCK M Minute adjustment AMP GAIN Amplifier gain control... -
Page 15: Detaching The Control Panel
Detaching the control panel Attaching the control panel When detaching or attaching the control panel, be careful not to damage the connectors on the back of the control panel and on the panel holder. Detaching the control panel Before detaching the control panel, be sure to turn off the power. -
Page 16: Maintenance
• After starting the heater in the car. • If it becomes very humid inside the car. Should this occur, the CD player may malfunction. In this case, eject the disc and leave the receiver turned on for a few hours until the moisture evaporates. -
Page 17: Additional Functions
More about this receiver Basic operations Turning off the power • If you turn off the power while listening to a disc, disc play will start from where playback has been stopped previously, next time you turn on the power. Tuner operations Storing stations in memory •... -
Page 18: Troubleshooting
The aerial is not connected firmly. Disc is inserted upside down. CD-R/CD-RW is not finalized. Disc is locked. The CD player may have functioned incorrectly. You are driving on rough roads. Disc is scratched. Connections are incorrect. No disc in the loading slot. -
Page 19: Specifications
Capture Ratio: 1.5 dB [MW Tuner] Sensitivity: 20 µV Selectivity: 35 dB [LW Tuner] Sensitivity: 50 µV CD PLAYER SECTION Type: Compact disc player Signal Detection System: Non-contact optical pickup (semiconductor laser) Number of channels: 2 channels (stereo) Frequency Response: 5 Hz to 20 000 Hz... - Page 20 Conserver cette carte dans un endroit sûr, elle pourra aider les autorités pour identifier votre appareil en cas de vol. Merci pour avoir acheté un produit JVC. Comment forcer l’éjection d’un disque...
- Page 21 ... Comment lire ce manuel... Comment utiliser la touche MODE ... Panneau de commande — ... 5 KD-G111 Identification des parties... Pour commencer ... 6 Opérations de base ... Annulation de la démonstration des affichages ... Réglage de l’horloge...
-
Page 22: Comment Utiliser La Touche Mode
Comment lire ce manuel Les méthodes suivantes sont utilisées pour rendre les explications simples et faciles à comprendre. • Certains conseils et remarques sont donnés dans la section “Pour en savoir plus à propos de cet autoradio” (voir page 17). •... -
Page 23: Panneau De Commande
Touche RND (aléatoire) y Touche EQ (égaliseur) u Touche (libération du panneau de commande) i Touches numériques KD-G111 Identification des parties Fenêtre d’affichage o Indicateurs de réception du tuner MO (monophonique), ST (stéréo) ; Indicateur CD a Indicateur RND disque) s Indicateur RPT (répétition) -
Page 24: Pour Commencer
Pour commencer Ÿ Vous ne pouvez pas choisir “CD” comme source de lecture si aucun disque ne se trouve dans la fente d’insertion. Le niveau de volume apparaît. Indicateur de niveau de volume ⁄ Ajustez le son comme vous le souhaitez. -
Page 25: Annulation De La Démonstration Des Affichages
Annulation de la démonstration des affichages Si aucune opération n’est effectuée pendant environ 20 secondes, la démonstration des affichages démarre. [Réglage initial: DEMO ON]—voir page 14. Terminez la procédure. Pour mettre en service la démonstration des affichages À l’étape 3 ci-dessus... Réglage de l’horloge Réglez les heures et les minutes. -
Page 26: Fonctionnement De La Radio
Fonctionnement de la radio S’allume lors de la réception d’une émission FM stereo avec un signal suffisamment fort. La bande choisie apparaît. Ÿ Démarrez la recherche d’une station. Quand une station est reçue, la recherche s’arrête. Pour arrêter la recherche, appuyez de nouveau sur la même touche. -
Page 27: Mémorisation Des Stations
Mémorisation des stations Vous pouvez prérégler six stations pour chaque bande. Préréglage automatique des stations FM —SSM (mémorisation automatique séquentielle des stations puissantes) Choisissez la bande FM (FM1 – FM3) pour laquelle vous souhaitez mémoriser les stations. “SSM” clignote, puis disparaît quand le préréglage automatique est terminé. -
Page 28: Opérations Des Disques
Opérations des disques Toutes les plages sont reproduites répétitivement jusqu’à ce que vous arrêtiez la lecture. Durée de lecture totale du disque inséré Durée de lecture écoulée Pour arrêter la lecture et éjecter le disque Lecture d’un disque Pour faire avancer ou reculer rapidement la plage Pour aller aux plages suivantes ou précédentes... -
Page 29: Sélection Des Modes De Lecture
Interdiction de l’éjection du disque Vous pouvez verrouiller un disque dans la fente d’insertion. Pour annuler l’interdiction, répétez la même procédure. Sélection des modes de lecture Vous pouvez utiliser un des modes de lecture suivants à la fois. Choisissez le mode de lecture souhaité. Lecture répétée Ex.: Quand “TRK RPT”... -
Page 30: Ajustements Sonores
Ajustements sonores Sélection des modes sonores préréglés Vous pouvez sélectionner un mode sonore préréglé adapté à votre genre de musique. Ex.: Quand “ROCK” est choisi Modèle d’affichage pour chaque mode sonore: (C-EQ: égaliseur personnalisé) Valeurs préréglées Indication Pour: BAS * USER (Pas d’effet) ROCK... -
Page 31: Ajustement Du Son
Ajustement du son Vous pouvez ajuster les caractéristiques du son comme vous le souhaitez. Ex.: Quand “TRE” est choisi La courbe graphique change quand vous ajustez le niveau. Indication Pour: BAS* Ajuste les graves. (graves) TRE* Ajuste les aigus. (aigus) FAD* Ajustez la balance (fader) -
Page 32: Réglages Généraux - Psm
Réglages généraux — PSM Procédure de base Vous pouvez changer les options PSM (mode des réglages préférés) de la table suivante. Choisissez une option PSM. Ex.: Quand vous choisissez “AMP GAIN” Indications DEMO Démonstration des affichages CLOCK H Ajustement des heures CLOCK M Ajustement des minutes AMP GAIN... -
Page 33: Retrait Du Panneau De Commande
Retrait du panneau de commande Fixation du panneau de commande Lors du retrait ou de la fixation du panneau de commande, assurez-vous de ne pas endommager les connexion à l’arrière du panneau de commande et sur le porte-panneau. Retrait du panneau de commande Avant de retirer le panneau de commande, assurez-vous de mettre l’appareil hors tension. -
Page 34: Entretien
Entretien Comment nettoyer les connecteurs Un détachement fréquent détériorera les connecteurs. Pour minimiser ce problème, frottez périodiquement les connecteurs avec un coton tige ou un chiffon imprégné d’alcool, en faisant attention de ne pas endommager les connecteurs. Connecteur Condensation d’humidité De la condensation peut se produire sur la lentille à... -
Page 35: Pour En Savoir Plus À Propos De Cet Autoradio
Pour en savoir plus à propos de cet autoradio Opérations de base Mise hors tension de l’appareil • Si vous mettez l’appareil hors tension pendant l’écoute d’un disque, la lecture du disque reprendra à partir du point où la lecture a été interrompue la prochaine fois que vous mettez l’appareil sous tension. -
Page 36: Guide De Dépannage
Guide de dépannage Ce qui apparaît être un problème n’est pas toujours sérieux. Vérifiez les points suivants avant d’appeler un centre de service. Symptôme • Aucun son n’est entendu des enceintes. • Cet autoradio ne fonctionne pas du tout. • Le préréglage automatique SSM ne fonctionne pas. -
Page 37: Spécifications
Spécifications SECTION DE L’AMPLIFICATEUR AUDIO Puissance de sortie maximum: Avant: 45 W par canal Arrière: 45 W par canal Puissance de sortie en mode continu (RMS): Avant: 17 W par canal pour 4 Ω, 40 Hz à 20 000 Hz avec moins de 0,8% de distorsion harmonique totale. - Page 38 Having TROUBLE with operation? Please reset your unit Refer to page of How to reset your unit Vous avez des PROBLÈMES de fonctionnement? Réinitialisez votre appareil Référez-vous à la page intitulée Comment réinitialiser votre appareil EN, FR © 2004 Victor Company of Japan, Limited 1004DTSMDTJEIN...
Need help?
Do you have a question about the KD-G111 and is the answer not in the manual?
Questions and answers