Advertisement
Quick Links
Advertisement

Related Manuals for Ceriatone 50W Overtone Special


Summary of Contents for Ceriatone 50W Overtone Special
- Page 1 Ceriatone Overtone Special Bluesmaster Edition 50W and 100W amplifiers...
-
Page 2: Table Of Contents
User’s Manual Thank you for the purchase of your Ceriatone Overtone Special guitar amplifier! Here, we hope to explain how best to use your new amp. Table of Contents 1) About the Bluesmaster Overtone Special………..……………………..…………………………………………page 2 2) Quick setup……………………………………………………………………………………………………………page 3 3) Front Panel controls………………………………………………………………………………………………….page 4... -
Page 3: Quick Setup
While our work could not have been possible without the gracious information shared over the last decade in the public domain, we hope you appreciate our modifications, component selection, and construction techniques. Most of all, we hope the OTS becomes an integral part of your tone equation to exhilarate your playing and music. Rock on! - Nik Azam 2) QUICK SETUP (for instant gratification) -
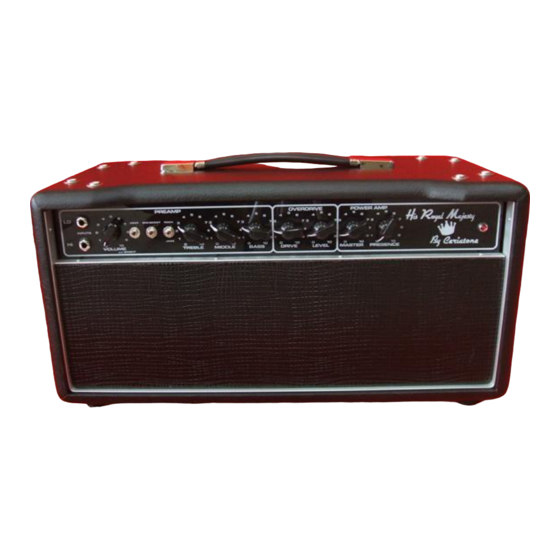
Page 4: Front Panel Controls
10) Push VOLUME control in to disengage BRIGHT switch 11) Set front panel DEEP and MID BOOST switches in the down position 12) Set front panel ROCK / JAZZ switch in the up position (ROCK) 13) Set rear panel MAINS switch in the ON position (with adjacent switch to STANDBY) for 30 seconds to allow tube filaments to warm up 14) Set rear panel OPERATE / STANDBY switch to OPERATE 15) ROCK!!!!!! - Page 5 8) MIDDLE control 9) BASS control 10) DRIVE (OVERDRIVE) control 11) LEVEL (OVERDRIVE) control 12) MASTER (POWER AMP) control 13) PRESENCE (POWER AMP) control 14) INDICATOR LED INPUT jacks provide two tonal options, and are taken from the Fender Tweed and „60s Marshall amplifier designs. The LO input provides a slight reduction in your guitar signal to prevent overloading the amplifier circuitry.
- Page 6 ROCK / JAZZ adjusts the overall frequency response and voicing of the amplifier. ROCK has a fatter midrange and a deeper, spongier bottom end. You might find ROCK more familiar territory. JAZZ tightens up the bottom end and adjusts the contour of the midrange, giving the amplifier more of a hi-fi response.
-
Page 7: Rear Panel Controls
4) REAR PANEL CONTROLS On the rear panel of the Bluesmaster Overtone Special, you can see twelve items of interest. 1) MAINS IEC cable inlet 2) 3 AMP / 2 AMP slow-blow fuse (depending on your country‟s voltage) 3) MAINS power two-way toggle switch 4) OPERATE / STANDBY two-way toggle switch 5) OD TRIM control 6) SPEAKER OUTPUT ¼”... - Page 8 MAINS IEC cable inlet – plug a suitable IEC power cable into this inlet to power your amplifier 3 AMP / 2 AMP slow-blow fuse – used to protect your amplifier from voltage spikes or excessive current draw. Replace only when necessary.
- Page 9 NOTE – if you are using two speaker cabinets in parallel (ex – two 16 Ohm cabinets), set the impedance selector to half that of a single cabinet (in this case, 8 Ohms). EFFECTS LOOP RETURN ¼” instrument jack can be used to directly interface the power amp of the OTS, thereby bypassing the preamp and using the amplifier as a power amplifier.
-
Page 10: Tube Compliment And External Bias Jacks And Adjustment
5) TUBE COMPLIMENT AND EXTERNAL BIAS JACKS AND ADJUSTMENT 50W Overtone Special 100W Overtone Special From left to right: V1 – 12AX7/ECC83 (clean and overdrive stages 1 and 2) V2 – 12AX7/ECC83 (overdrive stages 3 and 4) V3 – 12AX7/ECC83 (phase inverter for power amplifier) V4 –... - Page 11 In this diagram, we have color coded three features for simplicity 1) Green arrows = red probe jacks 2) Yellow arrow = black probe jack 3) Blue arrow = bias adjustment potentiometer shaft To measure your power tube bias, carefully follow these steps with the amplifier in OPERATE and connected to a speaker load (not doing so may damage your amplifier!): 1) Turn on a digital multimeter (DMM), and set it to read millivolts (mV) in the 100mV range (this will vary from DMM to DMM)
- Page 12 Okay, now I‟ve measured my bias. Now what? To calculate bias, there are two pieces of information you need to know: your amplifier‟s power tube plate voltage, and the published value for maximum plate dissipation for the power tubes used in your amplifier. To save you some time and energy, here are those two values: - Approximate plate voltage for OTS series amplifiers = 440-450VDC...
- Page 13 Even though the bias test points and adjustment is external to reduce risk of electrical shock, all precautions must be taken while biasing. Again, bias at your own risk. Ceriatone Amplification is not responsible for any damages or injuries resulting from user biasing.
-
Page 14: Frequently Asked Questions
- Although you can try 12AT7s, 12AU7s, 5751s without any harm, the design is optimized for 12AX7s, and are therefore the only recommended tube in the preamp positions. Usage of other power tubes (ex – modern 6V6s like Electro-Harmonix, JJ) may be possible, but please first consult Ceriatone Amplification or your local competent amplifier technician. - Page 15 What settings do you recommend? - Try setting all controls at 12:00, and adjust MASTER to a suitable volume. Set the front toggles to their “off” position, and engage ROCK setting. On the rear of the amplifier, try the OD Trim at about 10-11 o‟clock. Be sure to experiment with the OD trim control, as this has dramatic effects on the feel of the overdrive channel.
- Page 16 Internal view of Bluesmaster 100W illustrating post-overdrive tonestack. ORANGE arrow is MIDRANGE GREEN arrow is BASS BLUE arrow is TREBLE I’ve read about something called a PI trimmer inside of the amp. Does the OTS have it, and what does it do? - Yes, the OTS amplifier has a PI (short for phase inverter) trimmer.
- Page 17 - We highly recommend the use of a non-conductive rubber screwdriver, and only adjust the trimpot when the amplifier is not powered and disconnected from the wall outlet. DO NOT ADJUST THE PI TRIMMER WHILE THE AMPLIFIER IS ON! Note that the power supply capacitors in the amplifier can/will still store charge, and you can still be bitten by 450VDC even though the amp isn‟t connected to the wall! Adjust the PI TRIMMER only at your own risk! - On the next page, there are three arrows.
- Page 18 Inside chassis view of Bluesmaster 100W. Orange arrow indicates PI trimmer. Blue arrow indicates V3B test point Green arrow indicates V3A test point. Adjusting those trimmers sounds intimidating. Am I missing anything if I don’t experiment with them? - Absolutely not. We adjust each trimmer to ensure the best results for each amplifier leaving our shop. How am I supposed to monitor changes in tone after adjusting internal trimmers while the amplifier is off? - If you find yourself in this position and unwilling to follow recommended safety guidelines, please follow these warnings and recommendations:...
- Page 19 measure from above, holding the probe at an angle can cause arcing and shorts KEEP PROBE CLEAR OF ALL POINTS YOU DO NOT WANT TO MEASURE - Again, Ceriatone is not responsible for any damages or injuries resulting from user adjustments! Do I need to use matched power tubes? - Although not necessary, matched power tube sets are recommended for best results.
- Page 20 I like to use rack-mounted multieffects units. What is the output level straight from the EFFECTS LOOP SEND jack, -10dB or +4dB? - While not exact, -10dB is a better approximation than +4dB. The actual output level will depend on your settings, particularly the volume controls.
Need help?
Do you have a question about the 50W Overtone Special and is the answer not in the manual?
Questions and answers