Table of Contents
Advertisement
Available languages
Available languages
CD RECEIVER
RECEPTOR CON CD
RECEPTEUR CD
For canceling the display demonstration, see page 7.
Para cancelar la demostración en pantalla, consulte la página 7.
Pour annuler la démonstration des affichages, référez-vous à la page 7.
For installation and connections, refer to the separate manual.
Para la instalación y las conexiones, refiérase al manual separado.
Pour l'installation et les raccordements, se référer au manuel séparé.
INSTRUCTIONS
MANUAL DE INSTRUCCIONES
MANUEL D'INSTRUCTIONS
KD-HDW10
KD-HDW10
KD-HDW10
For customer Use:
Enter below the Model
No. and Serial No. which
are located on the top or
bottom of the cabinet.
Retain this information
for future reference.
Model No.
Serial No.
LVT1706-001A
[J]
Advertisement
Table of Contents

Related Manuals for JVC KD-HDW10J


Summary of Contents for JVC KD-HDW10J
- Page 1 CD RECEIVER RECEPTOR CON CD RECEPTEUR CD For canceling the display demonstration, see page 7. Para cancelar la demostración en pantalla, consulte la página 7. Pour annuler la démonstration des affichages, référez-vous à la page 7. For installation and connections, refer to the separate manual. Para la instalación y las conexiones, refiérase al manual separado.
-
Page 2: To Reset
– Consult the dealer or an experienced radio/TV technician for help. Caution: Changes or modifications not approved by JVC could void the user’s authority to operate the equipment. [European Union only] IMPORTANT FOR LASER PRODUCTS 1. CLASS 1 LASER PRODUCT CAUTION: Do not open the top cover. -
Page 3: Table Of Contents
How to read this manual • Button operations are mainly explained with the illustrations in the table below. • Some related tips and notes are explained in “More about this unit” (see pages 24 – 26). Press briefly. Press repeatedly. Press and hold until your desired response begins. -
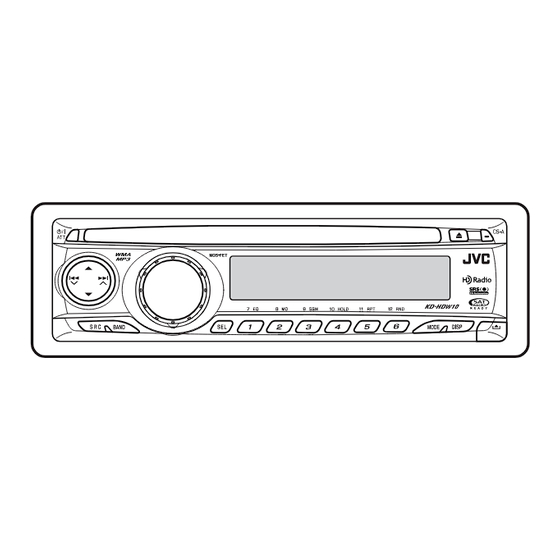
Page 4: Control Panel
Control panel — Control panel Display window /¢ buttons (standby/on attenuator) button 3 5 (up) / ∞ (down) buttons 4 Loading slot 5 Display window 6 0 (eject) button 7 CS-A (SRS Circle Surround Auto 8 Remote sensor DO NOT expose the remote sensor to strong light (direct sunlight or artificial lighting). -
Page 5: Main Elements And Features
• While listening to the satellite (SIRIUS or XM) radio: – Changes the categories. • While listening to an Apple iPod JVC D. player: – Pauses/stops or resumes playback with D ∞. – Enters the main menu with 5 U. -
Page 6: Getting Started
4 SOUND button • Selects the sound mode (EQ mode.) 5 SOURCE button • Selects the source. 6 2 R (reverse) / F (forward) 3 buttons • Searches for stations if pressed briefly. • Searches for HD Radio stations if pressed and held. - Page 7 ⁄ Adjust the volume. Volume level appears. Volume level indicator Adjust the sound as you want. (See pages 14 – 16.) To drop the volume in a moment (ATT) To restore the sound, press it again. To turn off the power Caution on volume setting: Discs produce very little noise compared with other sources.
-
Page 8: Radio Operations
Radio operations You can tune in to both conventional stations and HD Radio stations. • If you want to search for HD Radio stations only, see “To search for HD Radio stations only—HD Search” on page 9. What is HD Radio This unit is equipped with an HD Radio receiver. - Page 9 To tune in to a station manually— Manual Search Before starting Manual Search, select “MANUAL” for “S MODE”. (See page 18.) In step ! on page 8... 2 Select the desired station frequencies. • The unit starts HD Search when you press MODE, then press 4 /¢...
- Page 10 Storing stations in memory You can preset six stations for each band. Station automatic presetting —SSM (Strong-station Sequential Memory) Select the band you want to store into. “SSM” flashes, then disappears when automatic presetting is over. Local stations with the strongest signals are searched and stored automatically in the selected band.
-
Page 11: Disc Operations
• You cannot use the KD-MK series CD changers with this unit. • Disc text information recorded in the CD Text can be displayed when a JVC CD Text compatible CD changer is connected. • For connection, see Installation/Connection Manual (separate volume). -
Page 12: Other Main Functions
(for MP3 or WMA discs): Other main functions Skipping tracks quickly during play Only possible on JVC MP3-compatible CD changer • For MP3 or WMA discs, you can skip tracks within the same folder. Ex.: To select track 32 while playing a track whose number is a single digit (1 to 9). - Page 13 Changing the display information While playing an audio CD or a CD Text While playing an MP3 or a WMA • When “TAG DISP” is set to “TAG ON” (see page 18) • When “TAG DISP” is set to “TAG OFF” : Clock with the current track number : Elapsed playing time with the current track number...
-
Page 14: Sound Adjustments
Sound adjustments Using EQ mode You can select and customize a preset sound mode suitable to the music source using the 7-band equalizer. To select a preset EQ mode USER : Flat sound. ROCK : For rock or disco music. CLASSIC : For classical music. -
Page 15: Adjusting The Sound Balance
Adjusting the sound balance Indication [Range] FAD* (fader) Adjust the front and rear speaker balance. [R06 to F06] BAL* (balance) Adjust the left and right speaker balance. [L06 to R06] SUB.W* (subwoofer) Adjust the subwoofer output level. [00 to 08] VOL (volume) Adjust the volume. - Page 16 To adjust a preset mode of SRS Circle Surround Auto You can adjust the SRS FOCUS® and the SRS TruBass® of each preset CS-A mode. Select your desired CS-A mode to adjust, referring “To select a preset mode of SRS Circle Surround Auto then...
-
Page 17: General Settings - Psm
General settings — PSM You can change PSM (Preferred Setting Mode) items (except “SID”) listed in the table that follows. Select a PSM item. Ex.: When “DIMMER” is selected Indications Selectable settings, [reference page] DEMO DEMO ON : [Initial]; Display demonstration will be activated Display demonstration DEMO OFF : Cancels. - Page 18 HIGH : Frequencies lower than 180 Hz are sent to the subwoofer. CHANGER : [Initial]; To use a JVC CD changer, [11], a JVC compatible satellite (SIRIUS/XM) tuner, [19], an Apple iPod or a JVC D. player, [22]. EXT IN : To use any other external component than the above, [24].
-
Page 19: Satellite Radio Operations
Activate your SIRIUS subscription after connection: JVC DLP starts updating all the SIRIUS channels. Once completed, JVC DLP tunes in to the preset channel, CH184. Check your SIRIUS ID, see page 17. Contact SIRIUS on the internet at <http://activate.siriusradio.com/> to... -
Page 20: Listening To The Xm Satellite Radio
Contact XM Satellite radio on the internet at <http://xmradio. com/activation/> to activate your subscription, or you can call 1-800- XM-RADIO (1-800-967-2346). Once completed, the unit tunes in to one of the available channels (Channel 4 or higher). Listening to the SIRIUS Satellite radio Select a category. -
Page 21: Storing Channels In Memory
Select a channel for listening. Current channel number Ex.: When you select “COUNTRY” for Category Search If no operation is done for about 15 seconds, Category Search is canceled. In Channel Search, channel name and channel number appear on the display during search. -
Page 22: Ipod®/D. Player Operations
This unit is ready for operating an Apple iPod or a JVC D. player from the control panel. Before operating your iPod or D. player: Connect either one of the following (separately purchased) to the CD changer jack on the rear of this unit. - Page 23 Selecting a track from the menu Enter the main menu. Now the 5/∞/4 /¢ work as the menu selecting buttons* Select the desired menu. For iPod: PLAYLISTS Ô ARTISTS Ô ALBUMS Ô SONGS Ô GENRES Ô COMPOSERS Ô (back to the beginning) For D.
-
Page 24: Other External Component Operations
Other external component operations You can connect an external component to the CD changer jack on the rear using the Line Input Adapter—KS-U57 (not supplied) or AUX Input Adapter—KS-U58 (not supplied). • For connection, see Installation/Connection Manual (separate volume). For listening to the satellite radio, iPod, or D. - Page 25 Inserting a disc • When a disc is inserted upside down, the disc automatically ejects. • Do not insert 8 cm (3-3/16 ") and unusual shape discs (heart, flower, etc.) into the loading slot. Playing a disc • While fast-forwarding or reversing an MP3 or WMA disc, you can only hear intermittent sounds.
- Page 26 “VOL 30.” Satellite radio operations • You can also connect the JVC SIRIUS radio PnP (Plug and Play), using the JVC SIRIUS radio adapter, KS-U100K (not supplied) to the CD changer jack on the rear.
-
Page 27: Maintenance
Maintenance How to clean the connectors Frequent detachment will deteriorate the connectors. To minimize this possibility, periodically wipe the connectors with a cotton swab or cloth moistened with alcohol, being careful not to damage the connectors. Connector Moisture condensation Moisture may condense on the lens inside the CD player in the following cases: •... -
Page 28: Troubleshooting
Troubleshooting What appears to be trouble is not always serious. Check the following points before calling a service center. Symptoms • Sound cannot be heard from the speakers. • The unit does not work at all. • SSM automatic presetting does not work. - Page 29 Symptoms • A longer readout time is required (“CHECK” keeps flashing on the display). • Tracks do not play back in the order you have intended them to play. • Elapsed playing time is not correct. • “NO FILES” appears on the display. •...
- Page 30 Symptoms • “CH---” appears on the display for about 2 seconds, then returns to the previous channel while listening to the XM Satellite radio. • “OFF AIR” appears on the display while listening to the XM Satellite radio. • “LOADING” appears on the display while listening to the XM Satellite radio.
-
Page 31: Specifications
Specifications AUDIO AMPLIFIER SECTION Power Output: 20 W RMS × 4 Channels at 4 Ω and ≤ 1% THD+N Signal to Noise Ratio: 80 dBA (reference: 1 W into 4 Ω) SRS Circle Surround Auto Compatible Load Impedance: 4 Ω (4 Ω to 8 Ω allowance) Equalizer Control Range: 60 Hz, 150 Hz, 400 Hz, 1 kHz, 2.4 kHz, 6 kHz, 15 kHz... - Page 32 Muchas gracias por la compra de un producto JVC. Como primer paso, por favor lea detenidamente este manual para comprender a fondo todas las instrucciones y obtener un máximo disfrute de esta unidad. IMPORTANTE (EE.UU.) Este equipo se ha sometido a todo tipo de...
- Page 33 Desmontando... Montando... CONTENIDO Operaciones básicas ... 6 Para reproducir un disco en el receptor ... 11 Para reproducir discos en el cambiador de CD ... 11...
-
Page 34: Panel De Control
Panel de control Ventanilla de visualización ¢ ∞ NO exponga el sensor remoto a una luz potente (luz solar directa o iluminación artificial). Identificación de las partes Ventanilla de visualización Se enciende sólo cuando se selecciona CD-CH is como fuente de reproducción. -
Page 35: Control Remoto
• Mientras escucha la radio satelital (SIRIUS o XM): – Cambia las categorías. • Mientras escucha un Apple iPod reproductor D. JVC: – Pone en pausa/detiene o reanuda la reproducción mediante D ∞. – Acceda al menú principal mediante 5 U. -
Page 36: Procedimientos Iniciales
Procedimientos iniciales Operaciones básicas Encienda la unidad. Ÿ ∞ * No podrá seleccionar estas fuentes si no están preparadas o conectadas. Para emisoras FM/AM convencionales y emisoras HD Radio Para la radio SIRIUS Para la radio XM... - Page 37 ⁄...
-
Page 38: Operaciones De La Radio
Operaciones de la radio ¿Qué es HD Radio Ÿ Comience la búsqueda de la emisora. Cuando se sintoniza una emisora HD Radio... Ej.: Cuando se recibe una emisora FM convencional Selecciona la banda Frecuencia seleccionada Ej.: Cuando se recibe una emisora HD Radio Distintivo de llamada Este indicador se enciende cuando se reproduce audio digital, y parpadea cuando se reproduce... - Page 39 Para sintonizar manualmente una emisora— Búsqueda manual Antes de iniciar la búsqueda manual, 2 Seleccione las frecuencias de las emisoras deseadas. • ¢ Para buscar sólo emisoras HD Radio— Búsqueda HD Antes de iniciar la búsqueda HD • ¢ Cuando una radiodifusión en FM estéreo sea difícil de recibir Se enciende cuando se activa el modo monaural.
- Page 40 Cómo almacenar emisoras en la memoria Preajuste automático de emisoras — SSM (Memoria secuencial de las emisoras más fuertes) Seleccione la banda que desea memorizar. Preajuste manual El número de preajuste parpadea durante unos momentos. Cómo escuchar una emisora preajustada Seleccione la emisora preajustada (1 –...
-
Page 41: Operaciones De Los Discos
Operaciones de los discos Ÿ... -
Page 44: Ajustes Del Sonido
Ajustes del sonido Seleccione el modo preajustado que desea personalizar, refiriéndose a “Para seleccionar un modo EQ preajustado” más arriba y, a continuación... Ej.: Cuando se selecciona FREQ 60 de JAZZ. Ajustes iniciales del modo EQ preajustado Seleccione la frecuencia deseada. FREQ 60 FREQ 15K FREQ 6K... - Page 45 TYPE A TYPE B TYPE C USER...
- Page 46 Ajustes iniciales del modo CS-A preajustado FOCUS F FOCUS R TBASS F TBASS W TBASS R...
-
Page 47: Configuraciones Generales
Configuraciones generales — PSM Seleccione una opción de PSM. Ej.: Cuando se selecciona “DIMMER” Indicaciones Configuraciones seleccionables, [página de referencia] DEMO DEMO ON : DEMO OFF : CLOCK H CLOCK M CLK ADJ* AUTO T-ZONE* * EASTERN PACIFIC “ MOUNTAIN “ CENTRAL “ DST* * SID* DIMMER... - Page 48 Indicaciones SCROLL* WOOFER EXT IN* TAG DISP BEEP AMP GAIN AREA S MODE IF BAND CS ON HD Algunos caracteres o símbolos no serán mostrados correctamente (o aparecerán en blanco) sobre la pantalla. Se visualiza sólo cuando se selecciona una de las siguientes fuentes—FM, AM, o DISC. Configuraciones seleccionables, [página de referencia] ONCE : [Inicial];...
- Page 49 Operaciones de la radio satelital • “SIRIUS” y el logo del perro de SIRIUS son marcas comerciales registradas de SIRIUS Satellite Radio Inc. • XM y los logos correspondientes son marcas comerciales registradas de XM Satellite Radio Inc. • “SAT Radio”, el logo de SAT Radio y todos las demás marcas relacionadas son marcas comerciales de SIRIUS Satellite Radio Inc.
- Page 50 Para escuchar la radio SIRIUS Satellite Para escuchar la radio satelital XM Búsqueda de categoría/canal...
-
Page 51: Cómo Almacenar Canales En La Memoria
Número de canal actual Ej.: Cuando seleccione ”COUNTRY” para la búsqueda de categoría Para consultar el número de identificación de la radio satelital XM Cómo almacenar canales en la memoria El número de preajuste parpadea durante unos momentos. Cómo escuchar un canal preajustado Para cambiar la información en pantalla mientras escucha un canal Reloj = Nombre de la categoría = Nombre... -
Page 52: Operaciones Del Ipod®/ Reproductor D
Operaciones del iPod®/ reproductor D. Adaptador de interfaz para iPod Adaptador de interfaz del reproductor D. Precaución: Preparativos: Ÿ ⁄ ® Para poner en pausa* detener* reproducción Para el avance rápido o el retroceso de la pista Para ir a las pistas siguientes o anteriores * Para iPod... - Page 53 Seleccionar una pista en el menú Ingrese al menú principal. 5 ∞ 4 Seleccione el menú deseado. Para iPod: PLAYLISTS Ô ARTISTS Ô ALBUMS Ô SONGS Ô GENRES Ô COMPOSERS Ô Para el reproductor D.: PLAYLIST Ô ARTIST Ô ALBUM Ô GENRE Ô...
-
Page 54: Operaciones Del Otro Componente Externo
Operaciones del otro componente externo Ÿ Encienda el componente conectado y comience a reproducir la fuente. Ajuste el volumen. ⁄ Ajuste el sonido según se desee. (Consulte las páginas 14 a 16.) Para comprobar la hora del reloj mientras escucha un componente externo Más sobre este receptor Operaciones básicas Conexión de la alimentación... - Page 55 Continúa...
- Page 56 CD, situada en la parte trasera. Al apagar o encender el receptor, también se apaga o enciende la radio PnP de JVC. Sin embargo, no podrá controlarse desde este receptor. • Para obtener más información sobre la radio satelital SIRIUS o para suscribirse, visite el sitio web «http://www.sirius.com».
-
Page 57: Mantenimiento
Mantenimiento Cómo limpiar los conectores Un desmontaje frecuente producirá el deterioro de los conectores. Para reducir esta posibilidad al mínimo, limpie periódicamente los conectores con un palillo de algodón, teniendo cuidado de no dañar los conectores. Conector Condensación de humedad Podría condensarse humedad en la lente alojada en el interior del reproductor de CD, en los siguientes casos:... -
Page 58: Localización De Averías
Localización de averías Síntomas Soluciones/Causas... - Page 59 Síntomas Soluciones/Causas Continúa...
- Page 60 Síntomas Soluciones/Causas...
-
Page 61: Especificaciones
Especificaciones SECCIÓN DEL AMPLIFICADOR DE AUDIO × Ω ≤ Ω Ω Ω Ω Ω Ω Ω SECCIÓN DEL SINTONIZADOR [Sintonizador de FM] Ω [Sintonizador de AM] SECCIÓN DEL REPRODUCTOR DE CD GENERAL Ω El diseño y las especificaciones se encuentran sujetos a cambios sin previo aviso. -
Page 62: Comment Réinitialiser Votre Appareil
Veuillez lire attentivement toutes les instructions avant d’utiliser l’appareil afin de bien comprendre son fonctionnement et d’obtenir les meilleures performances possibles. Précautions: Tout changement ou modification non approuvé par JVC peut annuler l’autorité de l’utilisateur d’utiliser l’appareil. [Union européenne seulement] IMPORTANT POUR PRODUITS LASER 1. - Page 63 Détachement... Attachement... TABLE DES MATIERES Opérations de base ... 6 Lecture d’un disque dans l’autoradio ... 11 Lecture de disques dans le changeur de CD ... 11...
-
Page 64: Panneau De Commande
Panneau de commande Fenêtre d’affichage ¢ ∞ N’EXPOSEZ PAS le capteur de télécommande à une forte lumière (lumière directe du soleil ou éclairage artificiel). Identification des parties Fenêtre d’affichage S’allume uniquement quand CD-CH est choisi comme source de lecture. S’allume pour le lecteur CD intégré. -
Page 65: Composants Principaux Et Caractéristiques
• Lors de l’écoute de la radio satellite (SIRIUS ou XM): – Change les catégories. • Lors de l’écoute de iPod lecteur D. JVC: – Pausez/arrêtez ou reprenez la lecture avec D ∞. – Quittez le menu principal avec 5 U. -
Page 66: Pour Commencer
∞ Pour commencer Opérations de base Mise sous tension de l’appareil. Ÿ * Vous ne pouvez pas choisir ces sources si elles ne sont pas prêtes ou connectées. Pour les stations FM/AM conventionnelles et les stations HD Radio Pour la radio SIRIUS Pour la radio XM... - Page 67 ⁄...
-
Page 68: Fonctionnement De La Radio
Fonctionnement de la radio Qu’est-ce que HD Radio Ÿ Démarrez la recherche d’une station. Quand un signal HD Radio est accordé... EX.: Lors de la réception d’une station FM conventionnelle Sélection de la bande EX.: Lors de la réception d’une station HD Radio Pour arrêter la recherche, Uniquement pour les canaux HD Radio multiplex:... - Page 69 Pour accorder une station manuellement— Recherche manuelle Avant de démarrer la recherche manuelle, 2 Choisissez la fréquence de station souhaitée. • ¢ Pour rechercher uniquement les stations HD Radio—Recherche HD Avant de démarrer la recherche manuelle, • ¢ Quand une émission FM stéréo est difficile à recevoir S’allume quand le mode monophonique est mis en service.
- Page 70 Mémorisation des stations Préréglage automatique des stations—SSM (mémorisation automatique séquentielle des stations puissantes) Choisissez la bande sur laquelle vous souhaitez mémoriser les stations. Préréglage manuel Le numéro de préréglage clignote un instant. Écoute d’une station préréglée Choisissez la station préréglée (1 – 6) souhaitée.
-
Page 71: Opérations Des Disques
Opérations des disques Ÿ... -
Page 74: Ajustements Sonores
Ajustements sonores Utilisation du mode EQ Pour choisir un mode EQ préréglé USER ROCK CLASSIC POPS HIP HOP JAZZ Pour changer un niveau de fréquence d’un mode EQ préréglé Choisissez le mode préréglé que vous souhaitez personnaliser, en vous référant à “Pour choisir un mode EQ préréglé”... - Page 75 Ajustement de la balance sonore Indication [Plage] FAD* * BAL* SUB.W* Utilisation du SRS Circle Surround Décodeur SRS Circle Surround II SRS FOCUS®: SRS TruBass®: Pour choisi un mode préréglé de SRS Circle Surround Auto TYPE A TYPE B TYPE C USER Auto (mode CS-A)
- Page 76 Pour ajuster un mode préréglé de SRS Circle Surround Auto Choisissez le mode CS-A que vous souhaitez ajuster, en vous référant à “Pour choisi un mode préréglé de SRS Circle Surround Auto puis... Les noms des articles choisis apparaissent. Choisissez un élément à ajuster. Réglage initial du mode CS-A préréglé...
-
Page 77: Réglages Généraux-Psm
Réglages généraux—PSM Choisissez une option PSM. Ex.: Quand “DIMMER” est choisi Indications Réglages pouvant être choisis, [page de référence] DEMO DEMO ON : [Réglage initial]; DEMO OFF : CLOCK H [Réglage initial: 1 (1:00)] CLOCK M [Réglage initial: 00 (1:00)] CLK ADJ* AUTO T-ZONE* *... - Page 78 Indications Réglages pouvant être choisis, [page de référence] SCROLL * ONCE AUTO WOOFER HIGH EXT IN * CHANGER EXT IN TAG DISP TAG ON TAG OFF BEEP AMP GAIN LOW PWR HIGH PWR AREA AREA US AREA SA AREA EU S MODE MANUAL HD SEEK...
-
Page 79: Utilisation De La Radio Satellite
Utilisation de la radio satellite • • • Écoute de la radio satellite Activez votre suscription SIRIUS après la connexion: Activez votre suscription XM après la connexion:... - Page 80 Écoute de la radio satellite SIRIUS Écoute de la radio satellite XM Recherche d’une catégorie/canal...
-
Page 81: Mémorisation Des Canaux
Choisissez le canal à écouter. Numéro du canal actuel Ex.: Quand vous choisissez “COUNTRY” pour la recherche de catégorie Vérification du numéro d’identification de la radio satellite Lors de la sélection de “XM1”, “XM2” ou “XM3”, choissiez le “Channel 0”. Pour annuler l’affichage du numéro d’identification, Mémorisation des canaux... -
Page 82: Utilisation De Ipod®/ Lecteur D
Utilisation de iPod®/ lecteur D. Adaptateur d’interface pour iPod Adaptateur d’interface pour lecteur D. Préparations: Ÿ Ajustez le volume. ⁄ Ajustez le son comme vous le souhaitez. (Voir les pages 14 à 16.) ® * Pour iPod * Pour le lecteur D. - Page 83 Sélection d’une plage à partir du menu Entrez dans le menu principal. 5 ∞ 4 ¢ Choisissez le menu souhaité. Pour iPod: PLAYLISTS Ô ARTISTS Ô ALBUMS Ô SONGS Ô GENRES Ô COMPOSERS Ô Pour le lecteur D.: PLAYLIST Ô ARTIST Ô ALBUM Ô GENRE Ô...
-
Page 84: Utilisation D'un Autre Appareil Extérieur
Utilisation d’un autre appareil extérieur Ÿ Mettez l’appareil connecté sous tension et démarrez la lecture de la source. Ajustez le volume. ⁄ Ajustez le son comme vous le souhaitez. (Voir les pages 14 à 16.) Pour vérifier l’heure de l’horloge tout en écoutant un appareil extérieur Pour en savoir plus à... - Page 85 À suivre...
- Page 86 30”, l’autoradio change automatiquement le volume sur “VOL 30”. Utilisation de la radio satellite • Vous pouvez aussi connecter la radio JVC SIRIUS PnP, en utilisant l’adaptateur de radio SIRIUS JVC, KS-U100K (non fourni) sur la prise de changeur de CD à l’arrière de l’appareil.
-
Page 87: Entretien
Entretien Connecteur Pour retirer un disque de sa boîte, Pour remettre un disque dans sa boîte, N’utilisez pas les disques suivants: Disque gondolé Autocollant Support central Reste d’étiquette Étiquette autocollante... -
Page 88: Guide De Dépannage
Guide de dépannage Symptôme Remèdes/Causes... - Page 89 Symptôme Remèdes/Causes À suivre...
- Page 90 Symptôme Remèdes/Causes...
-
Page 91: Spécifications
Spécifications SECTION DE L’AMPLIFICATEUR AUDIO × ≤ Ω Ω Ω Ω Ω Ω SECTION DU TUNER [Tuner FM] Ω [Tuner AM] Ω SECTION DU LECTEUR CD Ω GÉNÉRALITÉS Ω La conception et les spécifications sont sujettes à changement sans notification. ×... - Page 92 Having TROUBLE with operation? Please reset your unit Refer to page of How to reset your unit Still having trouble?? USA ONLY Call 1-800-252-5722 http://www.jvc.com We can help you! EN, SP, FR © 2007 Victor Company of Japan, Limited 0107MNMMDWJEIN...
Need help?
Do you have a question about the KD-HDW10J and is the answer not in the manual?
Questions and answers