Table of Contents
Advertisement
Advertisement
Table of Contents

Related Manuals for Robe DMX Control 24 Pro CT

Summary of Contents for Robe DMX Control 24 Pro CT
-
Page 3: Table Of Contents
DMX CONTROL 24 PRO CT Table of contents 1. Safety instructions ......................4 2. Operating determinations ..................... 4 3. Description of the device ....................5 4. Installation ........................7 4.1.Sound-control ......................7 4.2.DMX-512 connection with the projectors ..............7 4.3 Fixture addressing ..................... 8 4.4 Connection to the mains .................... -
Page 4: Safety Instructions
CAUTION! Keep this device away from rain and moisture! Unplug mains lead before opening the housing! FOR YOUR OWN SAFETY, PLEASE READ THIS USER MANUAL CAREFULLY BEFORE YOU INITIAL START - UP! 1. Safety instructions Every person involved with installation and maintenance of this device have to: - be qualilfied - follow the instructions of this manual CAUTION! -
Page 5: Description Of The Device
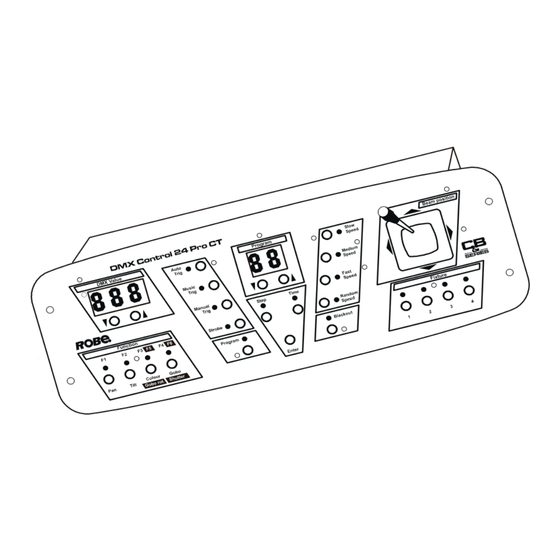
or dust. There should not be any cables lying around. You endanger your own and the safety of others! Operate the device only after having familiarized with its functions. Do not permit operation by persons not qualified for operating the device. Most damages are the result of unprofessional operation! Please use the original packaging if the device is to be transported. - Page 6 6 - DMX VALUE- DISPLAY Shows current DMX value. 7 - AUTO TRIG BUTTON If the LED shines, the controller is in Auto-mode (normal operation without sound-control). 8 - MUSIC TRIG BUTTON If this LED shines the controller is in Audio-mode (operation with sound-control). 9 - MANUAL TRIG BUTTON With the Manual Trig -button, you can jump from one step to another.
-
Page 7: Installation
The sound-control either works via the ¼” mono jack-socket or the built-in microphone. If the DMX CONTROL 24 PRO CT is supposed to work via a soundsignal at the Audio In-socket, connect the ¼“ jack socket with the soundsignal of your headphones output or a second adjustable output (if existing) of your mixer, or with the loud-speaker output of your amplifier. -
Page 8: Fixture Addressing
4.3 Fixture addressing Projector addressing Please note that the DMX CONTROL 24 PRO CT assigns the DMX-starting addresses every 6 steps. You have to address every projector to the respective starting address. Otherwise, the channel assignment will not be correct. All projectors with the same starting address work synchronically. - Page 9 If you want to return to the factory setting, press and hold the STEP and TIME-button at the same time for 10s. If you want delete dedicated the times of the program steps and set the programs no. 21-30 to minimum length (1 step), press and hold the PROGRAM- button and then press the ENTER- button.
-
Page 10: Technical Specifications
8. Appendix We believe you will enjoy your DMX CONTROL 24 PRO CT. We assure you will enjoy this product for years if you follow the instructions given in this manual. If you have any questions and comments, please do not hesitate to contact us.
Need help?
Do you have a question about the DMX Control 24 Pro CT and is the answer not in the manual?
Questions and answers