
Related Manuals for Advanced Elements AE2042


Summary of Contents for Advanced Elements AE2042
- Page 1 Inflatable Kayak Accessory Frame System Instruction Manual MODEL AE2042 IMPORTANT! PLEASE READ THIS MANUAL CAREFULLY BEFORE PROCEEDING. AFTER READING THIS MANUAL, SAVE THESE INSTRUCTIONS FOR FUTURE REFERENCE. ADVANCED ELEMENTS, INC. 2011 REV 04-2011...
- Page 3 • StraitEdge Kayak: AE1006 • StraitEdge 2 Kayak: AE1014 If you do not have an Advanced Elements kayak, make sure to measure your specific boat for proper fit: the layout pattern is 22” wide for the front grommets and 23” wide for the rear grommets.
- Page 4 Accessory Frame System Instruction Manual For this application you will need the following items from this package: • 4 Mounting Grommets • Application Glue • Plastic Cutting Mat • Both Mounting Templates Additional Items you will need for proper installation: •...
- Page 5 6. With the Mounting Grommets still on the Accessory Frame, locate the two Mounting Templates included with these instructions and place them underneath the grommets, aligning the circular shapes on the templates with the disk portion of the grommets. Align the front grommets first (these are the grommets nearest to the push buttons on the frame assembly), then slide the rear grommets (these are the grommets on the detachable arms) as needed to align them...
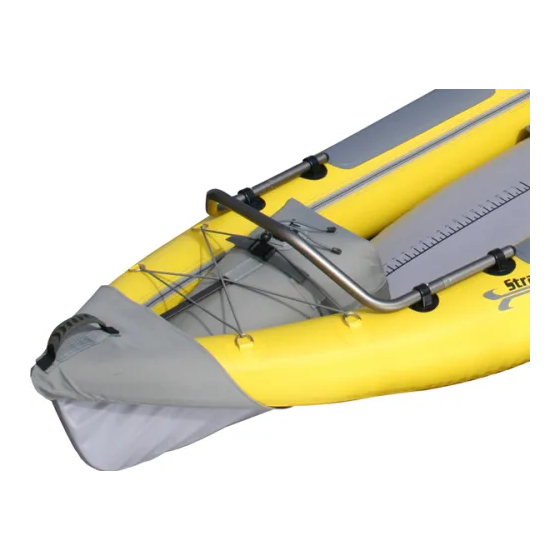
- Page 6 Accessory Frame System Instruction Manual After Cutting the openings for the Mounting Grommets, position each Mounting Grommet so that it is popping up through the newly cut openings from the underside of the deck of the kayak. SEE IMAGE 3. Install the Accessory Frame by inserting the Fame Body and the Detachable Arms through the grommets and connecting all parts.
- Page 7 5. Repeat steps 2-4 for the next three Mounting Grommets. 6. After gluing and taping all four Mounting Grommets, leave the glue to cure for at least 12 hours before installing the Accessory Frame for use. 7. Once the glue has dried, remove the duct tape, install the Accessory Frame, and you are ready to go! ------------------------------------------------------------------------------------------------- GROMMET APPLICATION FOR THE FOLLOWING AE MODELS:...
- Page 8 Accessory Frame System Instruction Manual Before starting, inflate your kayak so that you can have it ready for positioning the Accessory Frame and for gluing the Mounting Grommets into place. 1. Important: Begin by using your Exacto/Matte knife to cut a small notch in to each of your 4 Mounting Grommets.
- Page 9 6. Position the Accessory Frame where you would like it on your kayak and rotate the grommets as necessary to conform to the contours of the boat. Use a pencil to trace around the disk portion of the four Mounting Grommets. NOTE: Make sure to also mark the notches that you cut into the grommets in step 1, this is very important for proper alignment of the grommets when gluing them to your boat! NOTE: The Accessory Frame should be placed with the ends of the...
- Page 10 Accessory Frame System Instruction Manual Installing the Accessory Frame on your kayak: Once the glue on your Mounting Grommets has dried, follow these steps for installing your Accessory Frame for use. 1. Make sure that the Accessory Frame is in 3 parts. If the Accessory Frame is assembled: I.
- Page 12 If you would like a catalog of our latest products please visit our website at www.advancedelements.com or call Toll Free 866-262-9076 Email: info@advancedelements.com IMPORTANT! PLEASE READ THIS MANUAL CAREFULLY BEFORE PROCEEDING. AFTER READING THIS MANUAL, SAVE THESE INSTRUCTIONS FOR FUTURE REFERENCE.
Need help?
Do you have a question about the AE2042 and is the answer not in the manual?
Questions and answers