Table of Contents
Advertisement
Quick Links
Advertisement
Table of Contents

Related Manuals for Homentry HE60ANZ


Summary of Contents for Homentry HE60ANZ
- Page 1 HE60ANZ Garage Door Opener Installation and Operating Instructions Owners Copy: Please keep these instructions for future reference This manual contains IMPORTANT SAFETY information. DO NOT PROCEED WITH THE INSTALLATION BEFORE READING THOROUGHLY.
-
Page 3: Table Of Contents
START BY READING THESE IMPORTANT SAFETY INSTRUCTIONS WARNING • Failure to comply with the following instructions may result in serious personal injury or property damage. • Read and follow all instructions carefully. • The garage door opener is designed and tested to offer safe service provided it is installed and operated in strict accordance with the instructions in this manual. -
Page 4: Door Types
DOOR TYPES A. Sectional Door with Curved Track B. One-Piece Door with Horizontal Track Only Max door height : 2.125m Max door width : 3.5m NOTE: Unit will not work with One-Piece Doors with- out Horizontal and Vertical Tracks, Double-Wing Doors, or Canopy Doors. -
Page 5: Before You Begin
BEFORE YOU BEGIN 1. Look at the wall or ceiling above the garage door. The header bracket must be securely fastened to structural supports. 2. Do you have a finished ceiling in your garage? If so, a support bracket and additional fastening hardware (not supplied) may be required. - Page 6 ASSEMBLE CABLE PULLEY BRACKET Insert carriage bolt (1) through square hole in cable pulley bracket (4). Remove chain/cable assembly (3) from carton. Wrap cable around cable pulley (2) and insert pulley into bracket (NOTE: Make sure the bracket is assembled in position shown). Slide pin (5) through holes in cable pulley bracket and cable pulley. NOTE: Trolley with magnet (6) MUST be installed in the position shown.
-
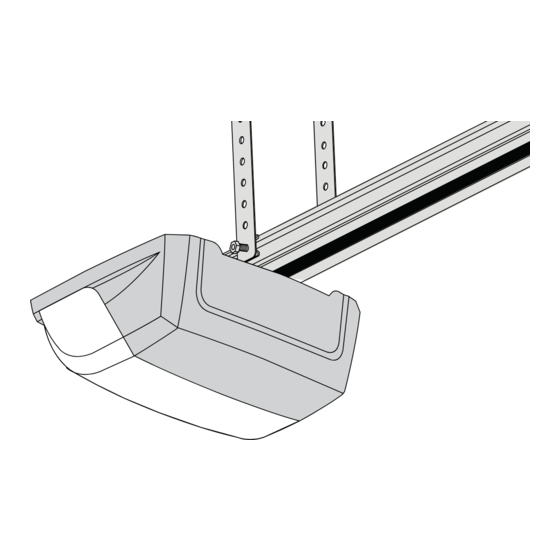
Page 7: Installation
ATTACH RAIL TO UNIT Turn rail assembly over and wrap chain around drive sprocket (1). Slide rail assembly (2) toward unit and into slots on top of unit. Attach C-Bracket (3) on the rail and secure with screws (4) as shown Push cable pulley bracket forward making chain tight on sprocket. - Page 8 POSITION THE HEADER BRACKET The header bracket must be rigidly fastened to a struc- tural support of the garage. Reinforce the wall or ceil- ing with a 40mm (1-1/2") board if necessary. Failure to comply may result in improper operation of safety reverse system.
-
Page 9: Fasten Door Bracket
FASTEN DOOR BRACKET Sectional and One-Piece Door Installation Procedure: Door bracket (1) has left and right side fastening holes. If your installation requires top and bottom fastening holes use both the door bracket and door bracket plate (2) as shown. 1. -
Page 10: Connect Electric Power
ATTACH EMERGENCY RELEASE ROPE & HANDLE Thread one end of rope (1) through hole in top of red handle so "NOTICE" reads right side up as shown (3). Secure with an over- hand knot (2). Knot should be at least 25mm (1") from end of the rope to prevent slipping. -
Page 11: Adjustment
ATTACH LIMIT SWITCHES NOTE: The limits must be installed as shown. If installed incorrectly the unit will not function properly. Close garage door by hand. Determine the position of the close limit switch (1) (long wire) by aligning the centre of trolley and the centre of the limit switch. -
Page 12: Test The Safety Reverse System
TEST THE SAFETY REVERSE SYSTEM The safety reverse system test is important. Garage door must reverse on contact with a 40mm obstacle laid flat on the floor. Failure to properly adjust opener may result in serious personal injury from a closing garage door. Repeat test once a month and adjust as needed. Procedure: Place a 40mm obstacle (1) laid flat on the floor under the garage door. -
Page 13: Wireless Programming
WIRELESS PROGRAMMING Activate the opener only when door is in full view, free of obstruction and properly adjusted. No one should enter or leave garage while door is in motion. Do not allow children to operate push but- ton(s) or remote(s). Do not allow childen to play near the door Your garage door opener receiver and transmitter are set to a matching code. - Page 14 KEYLESS DEVICE PROGRAMMING (OPTIONAL ACCESSORIES) Activate the opener only when door is in full view, free of obstruction and properly adjusted. No one should enter or leave garage while door is in motion. Do not allow children to operate push button(s) or remote(s).
-
Page 15: Install Door Control
REPLACE LIGHT BULB Replace light bulb (1) with a 21 watt maximum light bulb. Insert bulb into socket. The light will turn on and remain lit for 2 1/2 minutes when power is connected. After 2 1/2 minutes it will turn off. WIRING THE BACKLIT DOOR CONTROL BUTTON OR THE (OPTIONAL) MULTI- FUNCTION DOOR CONTROL PANEL Locate door control where the garage door is visible, away from door and door hardware and out... -
Page 16: Accessories
ACCESSORIES (1) Model 84335AML 3-channel mini transmitter (2) Model 84333AML 3-channel transmitter (3) Model 8747AML Wireless keyless entry keypad (4) Model 770AML The Protector System (IR Beams) (5) Model 845AML Multi-function door control panel (6) Model 75AML Backlit door control button (7) Model 760AML Outside keyswitch (8) Model 1702AML... -
Page 17: Operation Of Your Opener
OPERATION OF YOUR OPENER Your opener can be activated by any of the following devices: • The transmitter. Hold the push button down until the door starts to move. • The backlit door control button (if you have installed this accessory). Hold the button down until door starts to move. -
Page 18: Trouble Shooting
12. Door reverses after the force adjustment was complet- TROUBLE SHOOTING 1. Opener doesn’t operate from remote: • Watch rail if it bends or swings. If so see section 19 • Does the opener have electric power? Plug lamp into outlet. •... -
Page 19: Warranty
Zealand Limited (Seller) warrants to the original purchaser law or contract or for negligence, exceed the cost of repairing of the Home Entry HE60ANZ Garage Door Opener (Unit) or replacing the Unit or refunding the purchase price of the that it is free from defects in material and/or workmanship Unit. - Page 20 © 2010 The Chamberlain Group, Inc. 114A3370D...
Need help?
Do you have a question about the HE60ANZ and is the answer not in the manual?
Questions and answers