Table of Contents

Related Manuals for PhysioLogic ESSENTIA 106-930


Summary of Contents for PhysioLogic ESSENTIA 106-930
- Page 1 Blood Pressure Monitor Instruction Manual P/N 921-106930E Model: 106-930 Rev 1 0111...
-
Page 2: Table Of Contents
IMPORTANT INFORMATION ......1 Readings taken by the PhysioLogic essentiA are equivalent to those obtained by a trained observer using the cuff and •... -
Page 3: Important Information
IMPORTANT INFORMATION ABOUT BLOOD PRESSURE Blood Pressure Standard ATTENTION • This Blood Pressure Monitor does not replace examination by a The Joint National Committee on prevention, detection, evalua- physician. tion, and treatment of high blood pressure has developed a blood As your doctor is the one person best qualified to interpret your pressure standard, according to which areas of low and high risk results, we recommend that you keep a blood pressure journal to... -
Page 4: Blood Pressure Fluctuation
ABOUT BLOOD PRESSURE MEASUREMENT TIPS What are systolic and diastolic pressure? IMPORTANT NOTES When ventricles contract and pump blood out of the heart, Here are a few helpful tips to help you obtain more accurate blood pressure reaches its maximum value. The highest pressure readings: in the cycle is known as systolic pressure. -
Page 5: Your Bp Monitor
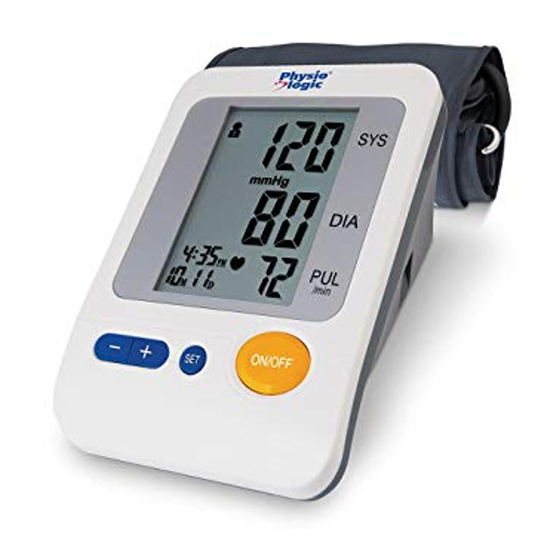
YOUR BP MONITIOR YOUR BP MONITIOR LCD layout Your Monitor LCD SCREEN SYSTOLIC MEMORY ZONE BLOOD PRESSURE POWER BUTTON LOW BATTERY INDICATOR mmHg CUFF IS INFLATING DIASTOLIC CUFF IS DEFLATING BLOOD PRESSURE TIME PULSE RATE DATE AIR JACK MEMORY NUMBER INDICATOR SET BUTTON (+) BUTTON Arm Cuff... -
Page 6: Power Options
POWER OPTIONS BEFORE YOU START Selecting memory zone and setting date, 1. Battery: 4 x AA alkaline 2. Power Adapter: A 6V 1000mA AC adapter time & unit of measurement can be used with this device (not included) It is important to set the clock before using your blood Adapter socket pictured at right pressure monitor, so that a time stamp can be assigned CAUTION... -
Page 7: Measurement
BEFORE YOU START MEASUREMENT Prepare the cuff 3. After selecting the right memory zone, press SET to 1. Firmly insert air plug into opening automatically move on to located on left side of the monitor. the next step. ON/OFF 4. Repeat steps 2 and 3 to set the MONTH, DAY, HOUR and MINUTE. -
Page 8: Start The Measurement
MEASUREMENT MEASUREMENT Start the measurement 3. The cuff should be snug but not too tight. 1. Press and hold the ON/OFF ~1” (You should be able to button until a beep sounds. (2~3cm) mmHg insert one finger The LCD screen will light up between the cuff and for one second as the unit your arm). - Page 9 MEASUREMENT MEASUREMENT 3. Once inflated, the cuff will 5. To measure again, press ON/OFF slowly deflate and measure to return to testing mode. your blood pressure. mmHg A flashing “ “ will appear NOTE simultaneously on screen It is recommended to wait signaling heart beat detection.
-
Page 10: Using The Memory
USING THE MEMORY USING THE MEMORY To recall previous readings To delete all records from memory ou can clear the memory for the selected group by With the power off, you may check following the steps listed below. past readings by using the “+” or “-” buttons. -
Page 11: Tips For Taking Accurate Readings
TIPS FOR TAKING ACCURATE READINGS MAINTENANCE How to clean and care for your blood pressure monitor. Store in a dry place and avoid exposing to Avoid contact with water, wipe away any Wait at least 1 hour after eating or drinking Avoid taking readings immediately after before taking a measurement. -
Page 12: Troubleshooting
TROUBLESHOOTING TROUBLESHOOTING The table below indicates how to solve common problems that you may encounter when using this monitor. If the product is not operating as you think it should, please check here first before calling customer service. PROBLEM CAUSE SOLUTION Cuff is too tight or not Firmly reposition cuff... -
Page 13: Specifications
SPECIFICATIONS WARRANTY 2 year limited warranty Power 4 AA batteries / DC 6V 1000mA Display Digital LCD 84.1mm x 55.1mm AMG Medical Inc. warrants this product to be free from defects in material and workmanship for a period of two (2) years. Measurement mode Oscillometric Method This warranty is valid for the original purchaser only. -
Page 14: Contact Information
CONTACT INFORMATION For any question concerning this product, please call: 1-800-363-2381 www.amgphysiologic.com...
Need help?
Do you have a question about the ESSENTIA 106-930 and is the answer not in the manual?
Questions and answers