
Related Manuals for R82 Mustang

Summary of Contents for R82 Mustang
- Page 1 English user manual © 2011 R82 A/S. All rights reserved. The R82 logo and the Mustang are registered trademarks of R82 A/S. 10.2011...
-
Page 2: Table Of Contents
CONTENTS Mustang ................3 Security precautions ............4 Warranty ................4 Tools .................. 4 Ready for use ..............5 Chest support (accessory)..........5 Height adjustment.............. 6 Angling................6 Height adjustment of the chest support bar ....... 7 Adjustment of the chest support ........7 Parking brakes.............. -
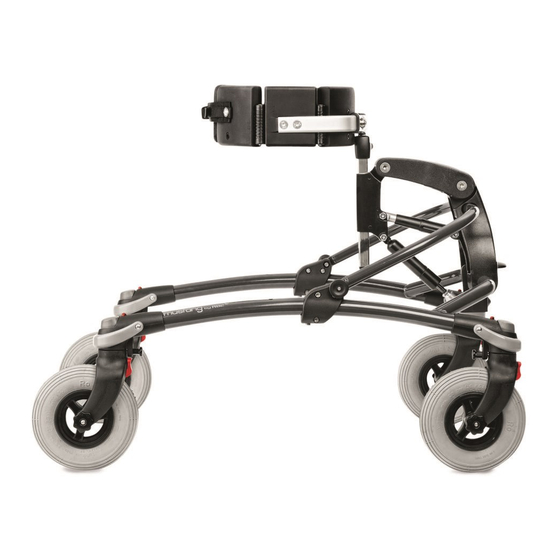
Page 3: Mustang
The Mustang comes in 4 sizes. Size 1 is equipped with four 4” castors and is pri- marily intended for indoor use and can be used outside as well on level surfaces. -
Page 4: Security Precautions
For further information, we refer to the R82 homepage/download. The warranty can only be sustained if the R82 product is in use in the same country where it was purchased and if the product can be identified by the serial number. The warranty does not cover accidental damage, including damage caused by misuse or neglect. -
Page 5: Ready For Use
• Remove the protective foam tubes • Remount the quick release bolts (C) Make sure that the Allen screws are tighte- ned before using the Mustang. Frequently check all screws and adjustments. Be aware not to get your fingers caught in the holes in the frame. -
Page 6: Height Adjustment
HEIGHT ADJUSTMENT • Activate the handle (A) to height adjust the chest support bar Be careful not to get your fingers caught when height adjusting the chest support. ANGLING • Turn the handle (B) to angle the chest sup- port bar Be careful not to get your fingers caught when angling the chest support. -
Page 7: Height Adjustment Of The Chest Support Bar
'max.' Make sure that the Allen screws are tighte- ned before using the Mustang. Frequently check all screws and adjustments. DO NOT place the center bar beyond the max mark indication! Make sure that both allen screws (C) on the black center joint are thightened before using the Mustang. -
Page 8: Parking Brakes
PARKING BRAKES The Mustang is as standard equipped with par- king brakes on all four wheels. • Activate the brake (A) • Deactivate the brake (B) Make sure that all four brakes are activated before placing the user into the Mustang... -
Page 9: Directional Stabilizers
DIRECTIONAL STABILIZERS The Mustang is as standard equipped with di- rectional stabilizers on all four wheels. The di- rectional stabilizers lock the wheels in a forward facing direction. 1) To activate the directional stabilizers pull the button (1A), turn it clockwise (1B), and release it so it engages in the slot. -
Page 10: Extension Piece For Chest Support (Accessory)
EXTENSION PIECE FOR CHEST SUPPORT (ACCESSORY) • Dismount the screw (A) to height adjust the extension piece. • Remount the screw (A) in one of the holes in the extension piece (B) Use the enclosed 5 mm Allen key to perform all fittings Make sure that the Allen screws are tigh- tened before using the product. -
Page 11: Head Support (Accessory) Adjustment
HEAD SUPPORT (ACCESSORY) ADJUSTMENT • Angle adjustment of the head support (A) 'max.' • Height adjustment (B) DO NOT place the head support beyond the max. mark indication • Angle adjustment of the head support bar system (C) Use the enclosed 5 mm Allen key to perform all fittings Be careful not to get your fingers caught when adjusting the head support... -
Page 12: Hip Support (Accessory) Adjustment
HIP SUPPORT (ACCESSORY) ADJUSTMENT • Height adjustment (A) • Height and width adjustment (B) Use the enclosed 5 mm Allen key to perform all fittings DO NOT place the back support beyond the max. mark indication 'max.' Make sure that all screws and handles are tightened before use. -
Page 13: Abdominal Support (Accessory) Adjustment
ABDOMINAL SUPPORT (ACCESSORY) 65 cm 25.5 inch ADJUSTMENT 85 cm 33.5 inch Height adjustment (A) MAXheight_Mustang.indd 1 18-08-2011 08:27:37 Height adjustment (B) 105 cm 41 inch MAXheight_Mustang.indd 1 18-08-2011 08:46:31 Use the enclosed 5 mm Allen key to perform all 130 cm 50.5 inch fittings... -
Page 14: Arm Prompts, Anterior Or Posterior (Accessories)
ARM PROMPTS, ANTERIOR OR POSTERIOR (ACCESSORIES) • Angle and depth adjustment (A) • Angle and depth adjustment (B) • Rotational adjustment (C) Use the enclosed 5 mm Allen key to perform all fittings 65 cm 25.5 inch BE AWARE of the max. height indication 85 cm 33.5 inch shown on the frame. -
Page 15: Seat (Accessory) Adjustment
SEAT (ACCESSORY) ADJUSTMENT • Height adjustment (A) Use the enclosed 5 mm Allen key to perform all fittings Make sure that the bracket from the seat is placed far enough up on the chest support bar before fastening. Make sure that all screws and handles are tightened before use. -
Page 16: Sling Seat (Accessory) Adjustment
SLING SEAT (ACCESSORY) ADJUSTMENT Only for size 1+2 • Pull the straps to adjust the height (A) • Undo the buckles for easy removal (B) Check all straps and buckles before every use and replace any worn out parts before using this product STORAGE POUCH (ACCESSORY) -
Page 17: Guide Bar (Accessory) Adjustment
GUIDE BAR (ACCESSORY) ADJUSTMENT Angle adjustment (A) Loosen the screw (B) and push in the security split (C) to dismount the guide bar Use the enclosed 5 mm Allen key to perform all fittings DO NOT use the guide bar for lifting. In- correct use could result in serious injury to the user Make sure that the Allen screws are tigh-... -
Page 18: Adjustment Of Leg Separator (Accessory)
ADJUSTMENT OF LEG SEPARATOR (ACCESSORY) Height adjustment (A) Use the enclosed 5 mm Allen key to perform all fittings Make sure that the bar from the leg se- parator is fully mounted into the bracket before fastening Please be careful not to get your fingers or the users toes caught between the leg separator and the floor or between the leg separator and the seat... -
Page 19: Height Settings
5° to 35° 0 to 30° -5 to 20° 5° to 35° 0 to 30° -10° to 20° The Mustang is measured with the centre bar in vertical position Size 3 Size 4 Hole 1 Hole 2 Hole 3 Hole 1... -
Page 20: Product Identification
PRODUCT IDENTIFICATION A) Serial number The label is located on the underside of the frame by the right rear wheel. B) Manufacturer The label is located on the underside of the frame by the left rear wheel. C) Max user height (floor to axila) The label is located on the left side of the centre bar. -
Page 21: Care And Maintenance
CARE AND MAINTENANCE FRAME Check all screws on a regular basis. Also, it is important to keep the Mustang clean, both for sa- nitary reasons and to prolong the life of the product. Take special care to clean the holes for the directional stabilizers. -
Page 22: Troubleshooting
Make sure the parking brakes and anti-reverse wheel stops have easy to propel been deactivated. Loosen/fasten the drag brake handle to regulate the force to propel the Mustang The anti-reverse wheel Remove dirt from the unit and clean the wheels... -
Page 23: Measurements
80 kg (176 lb) The Mustang is measured as standard delivered and with the centre bar in vertical position. Different settings may result in another set of measurements. To accomplish some of the measurements above, a slight adjustment might be required. We supply various types of... -
Page 24: Technical Data
TECHNICAL DATA Frame: Powder lacquered Steel tubes Plastic parts: Glass fibre strengthened nylon / ABS DISTRIBUTOR MANUFACTURER R82 A/S Parallelvej 3 8751 Gedved Denmark Please find your distributor on www.R82.com...