
Related Manuals for Hoover 5012PH VOGUE


Summary of Contents for Hoover 5012PH VOGUE
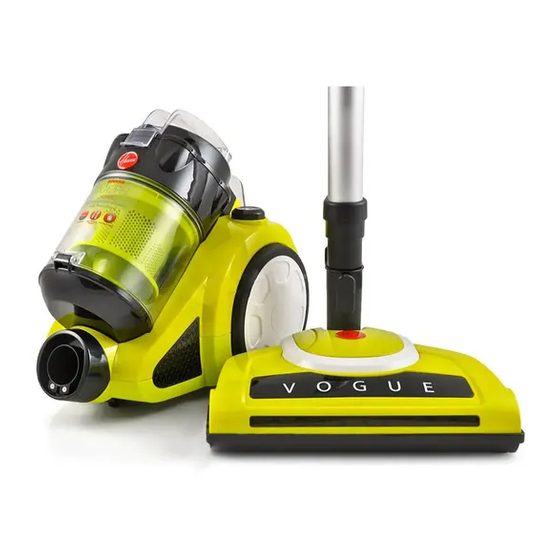
- Page 1 5012 PH VOGUE Bagless Vacuum Cleaner with Powerhead Compact Powerhead for a Powerful Clean Washable HEPA Filtration Bagless, Cyclonic Technology High Efficiency Soft Start Motor Vogue High Efficiency One Touch Empty Motor...
- Page 3 5012PH Heritage Congratulations on your purchase of your new HOOVER vacuum cleaner. There are many useful features built into your cleaner and we recommend that you carefully read this instruction book so that you may take best advantage of them.
-
Page 4: Before You Begin
Before you begin The cleaner must be operated in accordance with these instructions and used only for domestic household cleaning to remove DRY dirt and dust from household carpets, flooring and fabrics. This cleaner is not fit to be used as an industrial cleaner, and is not designed for the collection of vitreous building material including particle board, construction products and similar products such as wood/fibres, cement, fillers, fibre glass etc or excessive or frequent sand. - Page 5 Before you begin Precautionary measures: If the opening that sucks in the air, the suction pipe or the telescopic wand are blocked, you should switch off the vacuum cleaner at once. First clear the blocked substance before you attempt to start the vacuum cleaner again. Do not operate the vacuum cleaner too close to heaters and like radiators, cigarette butts etc.
- Page 6 7. Do not pull or carry the appliance by the power cable, 19. If the power cable is damaged, return to a Hoover use the power cable as a handle, or pull the power service agent or contact Hoover Customer Care in cable around sharp edges or corners.
-
Page 7: Assembling The Vacuum Cleaner
Assembling the vacuum cleaner Always remove the plug from the power socket before fitting or removing accessories! Connecting the dust container subassembly 1. Align the mark on the handle with the mark on the top cover, and fit the cover into the dust container. Align the two marks 2. - Page 8 Assembling the vacuum cleaner (continued) 3. When the mark on the top cover and the mark on the middle of the dust container are lined up completely, the dust container assembly is correctly assembled. 4. Disassemble the dust container by following the above instructions in reverse.
- Page 9 1. Fitting or removing the flexible hose Fitting: Insert the flexible hose into the air intake duct of the vacuum. Press until it clicks into position. Removing: Remove the plug from the power socket and then release the flexible hose from the air intake duct by depressing the two buttons.
- Page 10 Assembling the vacuum cleaner (continued) c. Ideal for daily cleaning on carpets and hard floors. Clean on carpet Clean on hard floors...
-
Page 11: Crevice Tool
Accessories Combination Floor Head For use on hard floors and carpets Crevice tool For radiators, crevices, corners, baseboards and between cushions. Upholstery tool For vacuuming furniture and upholstery. Dusting brush For furniture, blinds, bookshelves and lamp shades. -
Page 12: Instructions For Use
Instructions for Use Before using the appliance, unwind a sufficient length of cable and insert the plug into the power socket. A yellow mark on the power cable shows the ideal cable length. Don’t expend the cable beyond the red mark. 1. -
Page 13: Maintenance
Maintenance Ensure the vacuum cleaner is not connected to the power supply when performing any maintenance procedures. Use a damp cloth and mild detergent when cleaning the appliance. Vacuum Cleaner Storage When not in use, ensure the cleaner is not connected to the power supply, and pull the power cable gently out of the power socket. - Page 14 Maintenance (continued) Motor Filter Cleaning Warning: Ensure the cleaner is not connected to the power supply when performing any maintenance procedures. Press the handle of the dust canister to remove the dust canister from the cleaner. Remove the top cover on the canister and then remove the filter. The filter can be cleaned by dusting with a brush.
- Page 15 Rear Motor HEPA Filter Replacement The rear motor filter is installed behind the air outlet grid, this filter is washable. When dust or dirt is visible on the surface of the filter, the filter should be replaced or washed with warm water to maintain efficient suction. It is required to clean and replace the filters for the motor, after they have been used for 6 - 12 months.
- Page 16 Maintenance (continued) Cleaning and changing the Air Inlet Filter (continued) Pull dustcup upward. Take out the sponge from the machine. Clean as per the above directions and replace back into machine once completely dry. Replace the sponge filter with a new sponge filter when required.
- Page 17 Changing the Motorised Powerhead Drive Belt WARNING: To reduce the risk of electric shock, turn all power off from the unit and unplug the unit before performing any cleaning, maintenance or troubleshooting checks. Failure to do so may result in electric shock or personal injury.
- Page 18 Maintenance (continued) Changing the Motorised Powerhead Drive Belt (continued) 3. First lift up the end of the rotating brush with no belt and remove it. Then lift the end cap where the belt loops around. End Cap 4. Slide the old belt off the drive shaft and then the end cap.
-
Page 19: Troubleshooting
Check the appliance to ensure there are no blockages. Please clear any blockages that may be found. Please contact Hoover Customer Care: 1300 360 845 to find your local spare parts provider. Part Part Number Dust Container... -
Page 20: Conditions Of Warranty
Conditions of warranty Your Hoover cleaner, in the case of domestic use, has a two cleaner is at the sole discretion of Hoover Floorcare. If Hoover Floorcare year parts and labour warranty against product defects decide to repair or replace the cleaner, it will do so at its own cost.
Need help?
Do you have a question about the 5012PH VOGUE and is the answer not in the manual?
Questions and answers
Not sucking properly