Advertisement
Quick Links
Advertisement

Related Manuals for Jumpking Orbounder 12ft Combo YJ

Summary of Contents for Jumpking Orbounder 12ft Combo YJ
- Page 1 WARNING YJ USA Corp., 3970 Lindbergh Drive Adison, TX 75001 www.jumppod.com 877-928-8777...
- Page 3 1. The owner and supervisors of the trampoline are responsible to make sure all the users are aware of practices specified in this manual. 2. Trained Spotter supervision is recommended. 3. Place the trampoline and trampoline enclosure on a level surface before use. 4.
- Page 4 25. Do not attach anything to the barrier that is not a manufacturer approved accessory or part of the enclosure system. 26. Wear clothing free of drawstrings, hooks, loops, or anything that could get caught in the barrier. 27. Enter and exit the trampoline enclosure only at the door designed for that purpose.
- Page 5 Note: The...
- Page 10 sharply spot.
- Page 14 1. Make sure you understand the information in the box at the top of this page before you begin assembling the trampoline. Lay three Top Tubes (1), (2) and (3) on the ground as shown. Make sure there is a T-connector(4) on Top Tube (1, A marking with bigger end), Socket(7) on the Top Tube(2, B marking with bigger end) and T-connector(4) on the Top Tube(3, c marking with bigger end).
- Page 15 3. Lay the Bed (8) on the ground inside of the assembled frame. Make sure that the two warn- ing decals (not shown) are on top of the Bed. Note: There are V-rings around the edge of the Bed (8) and holes around the top of the frame. During this step, you will attach the Bed to the frame using the included Springs (10) for holes on top of frame and for holes on bottom of frame...
- Page 16 4. Lay the Frame Pad (9) on the frame. Double D-rings on the middle of pad should be fixed exactly on the right of each T-connector of frame. Do not use the trampoline without the Frame Pad (9), which is designed to reduce the likelihood of injury to the user from coming in con- tact with the trampoline frame.
- Page 17 6. Using the included plastic tie, attach the Safety Placard (11) to the frame near the point where jumpers will climb onto and off the trampoline. The trampoline is now fully assembled. Make sure that all parts are securely attached. Familiarize yourself and all users of the tram- poline with the safety precautions, use and instructional materials, and care and mainte-...
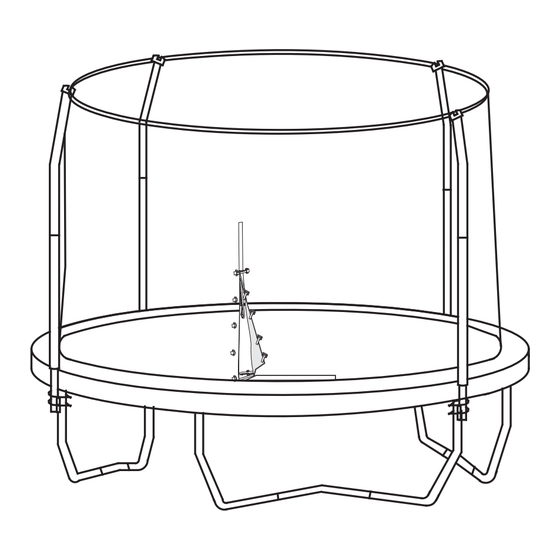
- Page 18 10. Attach the other three Pole(16,17) in the same way. See inset drawing. 11. Lay out Top G3 Pole (18), joint each section Connector to a straight line as shown. Assemble the remaining Top G3 Pole (18) in the same way. Spread the Netting (20) on the trampoline bed, insert a Top G3 Pole (18) into the opening of Top Sleeve on the Netting (20).
- Page 19 13. Note: During steps 14 and 15, you will “sew”the lower edge of the Netting(20) to the V-rings on the bed using the Cords(25). Locate the V-ring closest to the door. Thread one end of a Cord(25)through the lower edge of the Netting(20)above the V-ring and then thread the Cord through the V-ring.
- Page 20 It is possible for the trampoline/enclosure be blown about by high wind. If you anticipate high winds, the trampoline/enclosure should be moved to a sheltered location, disassembled, or tied down to the ground with ropes and stakes (not included). At least three ropes and three stakes should be used.
- Page 21 Top Tube(With T-connector, A marking) Top Tube(With Socket, B marking) Top Tube(With T-connector, C marking) T-Connector Leg Extension Center Socket Stitched Bed with V-ring Frame Pad Springs User’s Manual and safety Placard (2 pcs) Self-tapping screw Locknut U-bolt Bracket 18(BLACK) U-bolts Straight Tube Top Tube...
Need help?
Do you have a question about the Orbounder 12ft Combo YJ and is the answer not in the manual?
Questions and answers