Pontiac 2004 Vibe Navigation System Owner's Manual
Hide thumbs
Also See for 2004 Vibe Navigation System:
- Owner's manual (370 pages) ,
- Getting to know manual (12 pages)
Table of Contents
Advertisement
Quick Links
Download this manual
See also:
Owner's Manual
2004 Pontiac Vibe Navigation System
Overview ........................................................ 1-1
Overview
.................................................. 1-2
Features and Controls ..................................... 2-1
Features and Controls
................................ 2-2
Navigation Audio System ................................ 3-1
Navigation Audio System
Index ................................................................ 1
M
............................ 3-2
Advertisement
Table of Contents

Related Manuals for Pontiac 2004 Vibe Navigation System


Summary of Contents for Pontiac 2004 Vibe Navigation System
- Page 1 2004 Pontiac Vibe Navigation System Overview ............1-1 Navigation Audio System ........ 3-1 Overview ..........1-2 Navigation Audio System ......3-2 Features and Controls ........2-1 Index ..............1 Features and Controls ........ 2-2...
- Page 2 GENERAL MOTORS, GM and the GM Emblem, Please keep this supplement with the owner’s manual in PONTIAC, the PONTIAC Emblem are registered your vehicle, so it will be there if you ever need it while trademarks and the name VIBE is a trademark of you’re on the road.
- Page 3 Section 1 Overview Overview ............1-2 Introduction ...........1-2 Screen Setup ..........1-3...
- Page 4 Overview Before you begin to operate this system, read this manual thoroughly to become familiar with it and to understand how the system works. Introduction The navigation system allows you to do the following: • Plan a route with provided turn-by-turn route and map guidance with voice prompts.
-
Page 5: Day And Night Screen Changes
Screen Setup Day and Night Screen Changes When the headlamp switch is turned to off, the screen will change to a lighter background for better viewing in the daytime. At night, the screen will go to a darker background. You can select Auto for automatic adjustment. -
Page 6: Adjust Clock
Language Adjust Clock Your vehicle has been set for the English language, but you may also select French for all instructional text and voice prompts. However, names on the location map when using the navigation functions will not change. If you wish to change the language, do the following: 1. - Page 7 12Hr/24Hr: This feature allows you to decide whether Calendar the time is displayed in standard or military time. Use the control pad to select which one is desired. Once you have the time set, you must hit the OK button to save your changes and return to the Setup Menu.
-
Page 8: Maintenance Information
Maintenance Information You can also choose Set dealer from the Maintenance screen. This allows you to register your dealer’s name and address. After you enter your dealer’s name and address, the screen changes and displays the map location of the dealer. You can also edit your dealer’s name, location and phone number if you have already registered the dealer. -
Page 9: Table Of Contents
Section 2 Features and Controls Features and Controls ........2-2 Global Positioning System (GPS) ....2-20 Using the Navigation System ......2-2 Vehicle Positioning ........2-21 Navigation System Screen .......2-5 Problems with Route Guidance .......2-22 Maps ............2-6 If the System Needs Service ......2-22 Symbols ............2-7 Ordering Map DVDs ........2-22 Navigation Menu ..........2-8 Database Coverage Explanations ....2-22... -
Page 10: Using The Navigation System
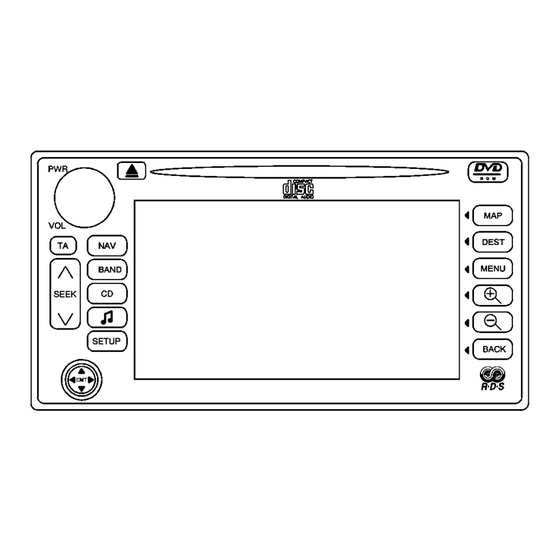
Features and Controls Hard Keys The following hard keys are located to the left of the navigation screen: Using the Navigation System • (Eject) This section presents the basic information you will • need to know to operate the navigation system. •... - Page 11 The system also has the following reconfigureable soft These keys allow you to do the following: keys located to the right of the navigation screen. These have hard key labels for easier understanding while in navigation mode. The six keys change functions for different modes of the system.
-
Page 12: Key Pad
Key Pad If you select an incorrect character, press the back space symbol button. The letters, symbols and punctuation available to you If you are unsuccessful when inputting a name, it may are displayed on the alpha bar. The alpha bar will need to be selected differently. -
Page 13: Navigation System Screen
Navigation System Screen NAV (Navigation) Key If the DVD is inserted and you are in a menu and are not on the map, the first press of the NAV key, located to the left of the display screen, will take you to the map that shows the vehicle’s current position. -
Page 14: Maps
Navigation Repeat When your vehicle is delivered from the factory, the dealer may have installed the map DVD. If the DVD was You can press the MAP button to have the current not installed in your vehicle when first purchased, use audio navigation prompt repeated. -
Page 15: Symbols
Map Adjustments Symbols The system allows you to adjust the scale of view on The following symbols are the most common that the map. Also, the map will scroll automatically based appear on a map screen. on the direction you are traveling. Your vehicle is shown as To view a smaller or larger scale of the map, press the this symbol. -
Page 16: Navigation Menu
This symbol indicates the Navigation Menu map with North up. Regardless of the direction of vehicle travel, North is always up on the screen. This symbol indicates the map with the vehicle travel direction up. The main navigation menu allows you to choose from an itemized list of options or to use the multi-function keys to make adjustments to the system and plan routes. - Page 17 You will be able to choose from the following list of These keys are also available: items on the main navigation menu: • • Suspend Guidance • DEST (Destination) • Route Overview • MENU • Map Appearance • Zoom In •...
-
Page 18: Edit Route
Suspend Guidance DVD Information When this function is selected, the current navigation Selecting DVD will display the information for the route will be canceled. The highlighted route will current navigation database disc. no longer be highlighted and you will no longer receive Edit Route voice prompts for navigation. -
Page 19: Route Preview
Route Preview Marked Points Selecting route preview from the MENU screen displays the map screen with the route highlighted. The total Selecting this function will display the Marked Points mileage traveled and drive time is also displayed. The menu. This menu contains options for adding, deleting route is traced by the vehicle icon. -
Page 20: Dest (Destination)
DEST (Destination) You may choose to enter a destination using one of the items from the list. Use the control pad to choose from the following destination planning options: Press this key to display one of the three Destination menus. This menu will give you more ways to plan Marked Points Destination Entry: This option allows a route by entering destination points. - Page 21 Previous Destination Entry: This option allows you to Intersection Destination Entry: This option allows you select a destination by choosing from a list of previous to select a destination by inputting the intersecting destinations once entered. roads you wish to travel to. When you select Intersection from the Destination menu, the alpha bar will appear to allow you to input the name of the first street.
- Page 22 Emergency Destination Entry: This option allows you Freeway Entrance/Exit Destination Entry: This option to select a destination by choosing from a list of allows you to select a destination by entering a emergency facilities. The list will vary by area. Selecting freeway entrance or exit point.
- Page 23 Map Entry: Selecting Map on the Destination menu allows the screen to change and displays the map. Use the control pad to scroll across the map to the desired destination. Once you have reached the desired destination, simply press the Enter button and the route will be planned for you.
-
Page 24: Points Of Interest
• Select the City button and then type in the city you wish to select a point of interest from. Press the List button to see a list of cities and select the correct one from it. While inputting a point of interest or city name, the List button will become available. - Page 25 • • Casino Museums • • City Center Park & Ride • • City Hall Park/Recreation Area • • College and University Parking Garage • • Community Center Parking Lot • • Commuter Rail Station Performing Arts • • Convention/Exhibition Center Police Station •...
- Page 26 If a right or left arrow appears to the left or right of the To enter the city name, select City on the Address item name, the complete name is too long for the display. screen. Select Input City Name. Enter the name of the Use the left or right arrows on the control pad and the city using the alpha bar.
- Page 27 Route Overview: Once a destination has been selected the Route Overview screen is displayed. This screen displays the highlighted route and the following options: • Start • 3 Routes: This screen will display the map with three highlighted routes with three different colors; Quick, Short and Alternative.
-
Page 28: Colors On The Screen
Colors on the Screen The system may not be available or interferences may occur if any of the following are true: When a route has been planned, it will be highlighted • Signals are obstructed by tall buildings, large trucks on the screen in blue. - Page 29 Vehicle Positioning • The vehicle is being driven at high speeds. • The vehicle is repeating a change of directions by At times, the position of the vehicle on the map may be going forward and backward, or turning on a turn inaccurate due to one or more of the following table in a parking lot.
-
Page 30: If The System Needs Service
Problems with Route Guidance If the System Needs Service Inappropriate route guidance may occur under any of If you are still experiencing difficulty with your Navigation the following conditions: System after reading this information, see your dealer for assistance. • You have not turned onto the road indicated by the system. - Page 31 Section 3 Navigation Audio System Navigation Audio System ........3-2 Six-Disc CD Changer ........3-11...
- Page 32 Navigation Audio System The audio system has been designed to operate easily and give years of listening pleasure. You will get the most enjoyment out of it if you acquaint yourself with it first. Find out what your audio system can do and how to operate all its features, to be sure you’re getting the most out of the advanced engineering that went into it.
-
Page 33: Playing The Radio
Playing the Radio Finding a Station The audio system can be operated using the knobs and TUNE: Use the control pad in the lower left corner of hard keys located on both sides of the navigation screen. the navigation system to select radio stations manually. PWR (Power): Press this knob to turn the audio and SEEK : Press the up or the down arrow to go... -
Page 34: Setting Preset Stations
Setting Preset Stations Audio Screen The six multi-function keys, located to the right of the navigation screen, allow you to store your favorite stations. You can store up to 18 stations (6 AM, 6 FM1 and 6 FM2). To set preset stations, do the following: 1. -
Page 35: Radio Data Systems (Rds)
EQ (Equalizer): While in the audio menu, use the keys Radio Data Systems (RDS) labeled EQ1 through EQ5 to choose preset bass, Your audio system is equipped with a Radio Data midrange and treble equalization settings. The Custom System (RDS). Using RDS, the radio can do the key allows you to choose and set the equalization following: levels you desire. - Page 36 RDS Option Menu RDS Seek: When this function is selected, the system will only stop on stations which broadcast one of the Once you are at the FM screen, press the arrows on program types (PTY) selected in the RDS Criteria menu. the control pad to bring up the RDS Option menu.
- Page 37 Regionalization: When this function has been selected on the RDS menu, the tuner will stay tuned to the current RDS station even if it departs from RDS network broadcast in favor of broadcasting local or regional content. Traffic Interrupt: While in FM1 or FM2 mode, pressing and holding the TA button for more than two seconds will cause the tuner to seek to the next RDS station capable of broadcasting traffic announcements.
-
Page 38: Playing Cds
Playing CDs Playing a Single Compact Disc You can play a single CD by sliding a CD into the slot above the navigation screen or by using a six-disc changer. Both of these features are explained further in this supplement. CD (Compact Disc): Press this hard key to change the source to CD, if an audio disc is loaded in the single disc slot above the navigation screen, or to the CD changer if... - Page 39 Playing a Compact Disc with the CD (Forward): Press and hold this button to quickly Changer advance within a track. As the CD advances, elapsed time will be displayed to help you find the correct passage. (Reverse): Press and hold this button to quickly reverse within a track.
- Page 40 TRACK SCAN mode for the current CD. While TRACK (Forward): Press and hold this button to quickly SCAN is active, the first 10 seconds of each track advance within a track. As the CD advances, elapsed on the current disc will be played before advancing to time will be displayed to help you find the correct the next.
-
Page 41: Six-Disc Cd Changer
Six-Disc CD Changer With the compact disc changer, you can play up to six discs continuously. Normal size discs may be played using the trays supplied in the magazine. The CD changer is located under the front passenger’s seat. To access the changer, pull the front passenger seat forward to load the changer from the back seat. -
Page 42: Compact Disc Changer Errors
All of the CD functions are controlled by the navigation system hard keys, except for ejecting the magazine. Whenever a CD magazine with discs is loaded in the changer, the CD Changer screen will be available on the radio display by pressing the CD hard key. When a CD begins playing, a disc and track number will be displayed. - Page 43 Adjust Clock ............ 1-4 Finding a Station ..........3-3 Audio Screen ........... 3-4 Audio System ..........3-2 Global Positioning System (GPS) ...... 2-20 Brightness ............1-3 Hard Keys ............2-2 Calendar ............1-5 CD ............... 3-11 Six-Disc Changer ......... 3-11 If the System Needs Service ......
- Page 44 Maintenance Information ........1-6 Radio Data Systems (RDS) ........ 3-5 Map Adjustments ..........2-7 Radio ............. 3-2 Map DVDs ............. 2-22 Route Overview ..........2-10 Ordering ............. 2-22 Route Preview ..........2-11 Map Scales ............. 2-7 Maps .............. 2-6 Marked Points ..........2-11 Menu ..............
Need help?
Do you have a question about the 2004 Vibe Navigation System and is the answer not in the manual?
Questions and answers