
Related Manuals for Andrew James 4 Day Automatic Pet Feeder


Summary of Contents for Andrew James 4 Day Automatic Pet Feeder
- Page 1 4 Day Automatic Pet Feeder Please read the instruction manual carefully and keep it for future reference.
- Page 2 Contents page Control panel Page 3 Features Page 3 Appliance components illustration Page 4 Disassemble Page 5 Assembling the appliance Page 6 Filling the bowl with food Page 7 Getting started Page 8 Setting the current clock time Page 8 Setting the feeding time Page 9 Review and start the feeding timer...
- Page 3 Control Panel MODE - switches between clock or feeding time display. Also increases clock time during clock / feeding time set mode. SET – enters settings mode. Also confirms the time you enter and advances to next setting. ...
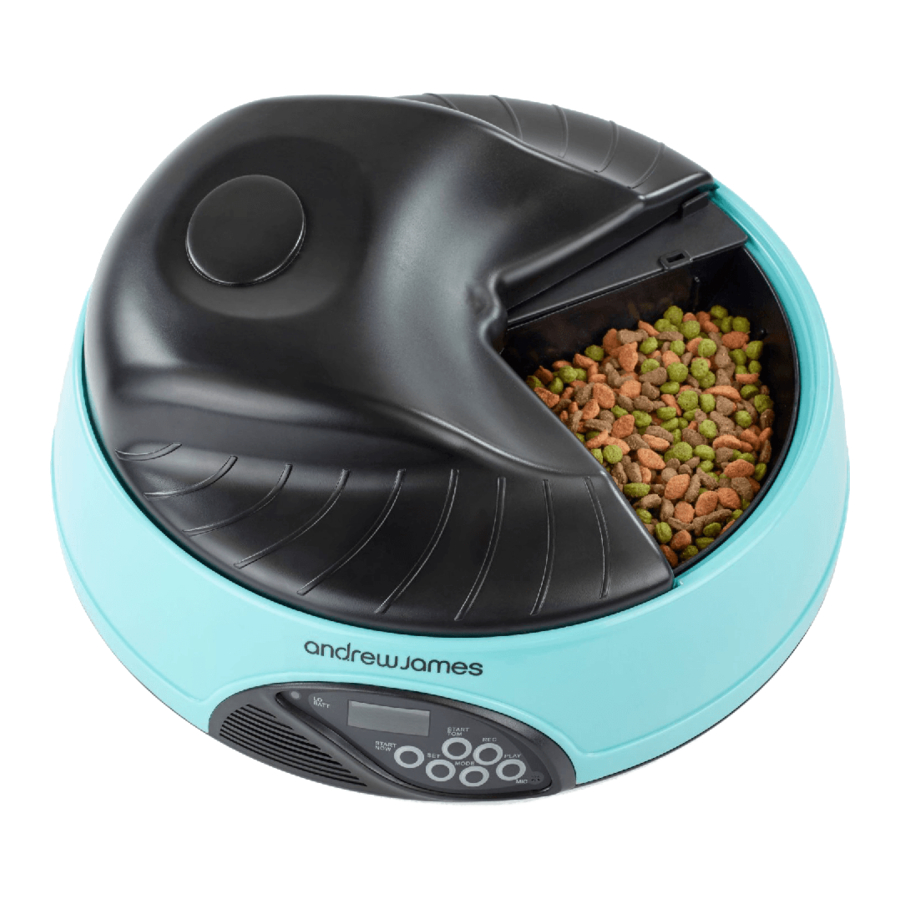
- Page 4 Appliance components illustration A. Bowl cover D. Food bowl B. Inner bowl cover E. Hob C. Slide cover F. Feeder base...
- Page 5 Disassemble Remove the bowl cover (A) by forcefully lifting the lid from underneath. Remove the inner bowl (B). Remove the slide cover (C). Optional: Remove the feedings trays from the feeding base (D) the appliance can be used with or without the trays and firmly push down.
- Page 6 Re-assembling the appliance Fit the food bowl (D) so that it locks with the Hub (E) located in the feeder base (F). Place the Inner feeding trays into the food bowl (D) this is optional. Fit the slide cover (C) onto the top of the food bowl (D). Fit the inner bowl (B) onto the feeder so that it locks with the slide cover (C).
- Page 7 Filling the bowl with food Please disassemble the appliance first. Fill the food bowl (D) with the required amount of food (the appliance can be used either with or without the food trays). Place the slide cover (C) onto the appliance so that it fits the grooves. Attach the Inner bowl (B) so that it fits with the slide cover.
-
Page 8: Setting Current Clock Time
Getting started Carefully turn the pet feeder upside down. Remove both battery doors by squeezing the two tabs and gently pull each door away. Keep the ON switch set to OFF. Insert four C size alkaline batteries into the battery tray. DO NOT use old or cheap carbon batteries. Close the battery doors, rotate the feeder right-side up and switch ON The feeder will cycle one time until “12:00”... -
Page 9: Setting The Feeding Time
Setting the Feeding Time After setting the clock time, press the MODE key one time. (1 1) will show on the display. This is the feeding-time display mode. Now press and hold the SET key for (2 seconds) to enter the Feeding time SET mode. -
Page 10: Review And Start Feeding Timer
Review and Start the feeding timer Use the MODE key to cycle through the clock and your set feeding times (clock - then 1st feed time→2nd feed time→3rd feed time→ 4th feed time→ back to clock…) The sequence will repeat. Press the START NOW key to start the feeding timer immediately. - Page 11 Notes and FAQ’S: When the bowl is rotating both the clock setting and mode setting are not allowed. Under clock display mode the colon icon (:) will flash. The colon icon (:) is turned Off when in feeding timer mode. A PM icon will be displayed in the afternoon under 12-hour clock mode and turned off in the AM.
- Page 12 UK and EU Guarantee Your new Andrew James product comes with a 24 month guarantee and a 2 year fixed warranty, effective from receipt confirmation. Your receipt or order number is required as proof of purchase date so it is imperative that you keep it safe. This guarantee only applies if the item has been used solely for the use intended, and all instructions have been followed accordingly.
Need help?
Do you have a question about the 4 Day Automatic Pet Feeder and is the answer not in the manual?
Questions and answers