
Related Manuals for Vizio VHT510


Summary of Contents for Vizio VHT510
- Page 1 5.1 SURROUND SOUND HOME THEATER WITH WIRELESS SUbWOOfER VHT510 - QUICK START GUIDE...
-
Page 2: Table Of Contents
LegAL & COMPLIANCe ............................27 INFORMATION ON HeARINg DAMAge ........................27 CARe & MAINTeNANCe ............................27 * These sections are used when you own two or more VIzIO wHDA devices. Incorporated under license from SRS Labs, Inc. Manufactured under license under U.S. Patent #’s:... -
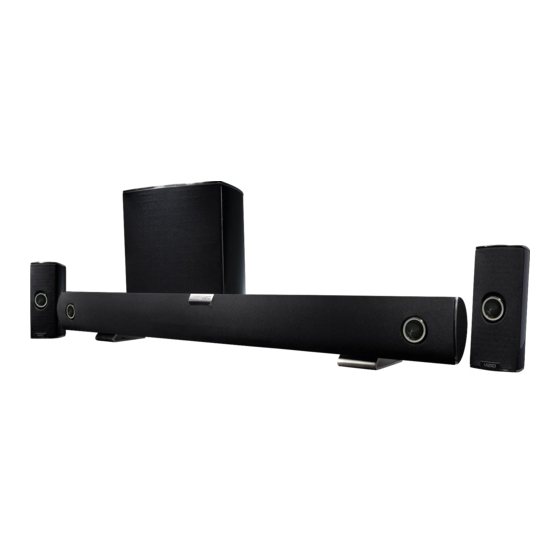
Page 3: Package Contents
pACKAGE ConTEnTS High Definition Sound bar with Stands/wall Mounts wireless Subwoofer Satellite Speakers with 20’ Speaker Cable Remote Control with battery Power Cable for Subwoofer Power Adapter for Sound bar Quick Start guide RCA Stereo Cable... -
Page 4: Controls & Connections
ConTRolS & ConnECTIonS Volume Up Power Press to increase overall Press to turn on or off. system volume. Input Vol - Vol + Input Volume Down Press to change Press to decrease overall input source. system volume. High Definition Sound Bar back BACK Service Port... - Page 5 Wall Mounting Holes LINK Link Button ON/OFF Switch LEFT RIGHT Satellite Threaded Hole for Speaker Ports M6 Wall Mount AC 100 - 240 v (Sold Separately) Power Cable Port Speaker Port Cover (Attached to Speaker Cable) Satellite Speaker Port Satellite Speakers Wireless Subwoofer...
-
Page 6: First-Time Setup
fIRST-TImE SETUp LINK LEFT RIGHT AC 100 - 240 v LINK LEFT RIGHT AC 100 - 240 v LINK LEFT RIGHT AC 100 - 240 v... - Page 7 AUDIO OUT AUDIO OUT Optical back of TV* Optical/SPDIF Cable Stereo RCA Cable (Sold Separately) BEST AUDIO GOOD AUDIO (Dolby Digital, DTS) (Stereo) *For best performance, connect the Sound bar to one of the audio outputs of your TV as shown above. Not all TVs have the audio outputs shown above. To connect the Sound bar directly to your other devices (blu-ray player, game system, etc) see your device’s user manual.
- Page 9 Satellite Speakers are positioned behind the listener to the left and right. be sure to look on the back of the Subwoofer to Sound Bar is determine which cable leads to the left centered below the TV. and right Speaker. Left Speaker Subwoofer is near the corner of the room, up to 60 feet away from...
- Page 10 LINK LEFT RIGHT AC 100 - 240 v LINK Flip ON/OFF Switch to ON. LEFT RIGHT AC 100 - 240 v Slide out the remote, then gently pull the plastic tab from the back of the remote control. (The plastic tab can be thrown away.)
- Page 11 Turn your TV on, then press the Power button on the remote to turn the Sound bar on. Power Press the Input Shortcut button on the remote that matches the port you used in step 4 (IN or BASS TREB CENTER REAR OPTICAL).
-
Page 12: Using The Remote
Input Shortcuts commercials and other unusually Press to output audio from the loud audio. selected device port. Slide Out Remote *These buttons only control an iPod or iPhone connected to VIzIO High Definition Home Theater Headphones with wireless iPod Dock. -
Page 13: Extended Functions Using Button Combinations
ExTEnDED fUnCTIonS USInG bUTTon CombInATIonS Mute/Unmute = Volume Up + Volume Down Press and hold both buttons for 1 second to mute/unmute your Input Vol - Vol + Sound bar. Factory Reset = Power + Volume Up + Volume Down Press and hold all 3 buttons for 10 seconds to return your Input Vol -... -
Page 14: Wall Mounting The Sound Bar And Satellite Speakers
wAll moUnTInG ThE SoUnD bAR AnD SATEllITE SpEAKERS Remove the screw from the Sound bar stands and rotate as shown. 26 11/16” be sure your screws are attached to wood studs or drywall anchors (for drywall) or concrete anchors (for brick/concrete walls). - Page 15 Purchase a size M6 speaker mount (sold be sure your screws are attached to wood studs separately) and attach satellite as shown. or drywall anchors (for drywall) or concrete anchors (for brick/concrete walls). See your mount’s user manual for instructions on safely mounting it to your wall.
-
Page 16: Sound Bar Indicator Lights
SoUnD bAR InDICAToR lIGhTS Sound bar is in Client Mode. Sound bar is in Hub Mode. Dolby Digital signal detected. (Flashing slowly) Sound bar cannot connect to network as DTS signal is detected. client or is only device in No Dolby Digital /DTS signal network as hub. - Page 17 when you increase the volume on the Sound bar, the number of lit blue bars increases. when you decrease the volume on the Sound bar, the number of lit blue bars decreases. when the volume is muted, the blue bars flash. when the treble or bass is at zero (default), the light is centered.
-
Page 18: Re-Linking The Subwoofer And Sound Bar
RE-lInKInG ThE SUbwoofER AnD SoUnD bAR you may need to re-link the Subwoofer to the Sound bar if there is no sound coming from the Subwoofer and the orange light on the front of the Subwoofer is flashing in this pattern: LONg ON, SHORT OFF. V IZ IO Input Vol -... -
Page 19: Replacing The Remote Battery
CR 2025. be sure that the + sign on the battery is facing up as shown. pRoGRAmmInG yoUR vIzIo Tv UnIvERSAl REmoTE If you own a VIZIO TV with a Universal Remote, you can program a VIZIO UNIVERSAL VIZIO SOUND BAR device button (AUX or AUDIO) to control your Sound bar. -
Page 20: Vizio Recommends
• Integrated Dolby Digital and SRS processing deliver a mind-blowing audio experience with powerful 40mm neodymium drivers for exceptional audio reproduction. • And best of all, with wireless HD Audio (wHDA), you can link the Headphones and wireless Dock to your wHDA-enabled VIzIO Sound bar for the ultimate in home audio connectivity! -
Page 21: What Is Wireless Hd Audio
Others might be watching the big game inside, but you won’t miss a moment. And because the Headphones are Active Noise Cancelling, you hear the action, not the lawn mower! For wHDA-compatible devices, go to www.VIzIO.com or look for the wireless HD Audio logo. -
Page 22: Linking Home Theater Headphones With The Sound Bar
VIZIO Wireless HD Audio - Read this section if you own two or more WHDA devices. lInKInG homE ThEATER hEADphonES wITh ThE SoUnD bAR DC IN AUDIO IN SPDIF AUDIO OUT HUB / CLIENT PAIR DC IN AUDIO IN SPDIF... - Page 23 VIZIO Wireless HD Audio - Read this section if you own two or more WHDA devices. Input Vol - Vol + Press and hold the INPUT button on the Sound bar for Press and hold the POWER button on the 5 seconds.
-
Page 24: Playing Audio From The Wireless Dock On Your Soundbar
VIZIO Wireless HD Audio - Read this section if you own two or more WHDA devices. plAyInG AUDIo fRom ThE wIRElESS DoCK on yoUR SoUnDbAR BASS TREB CENTER REAR INPUT BASS TREB CENTER REAR DC IN AUDIO IN SPDIF AUDIO OUT... -
Page 25: Switching Between Audio Sources On The Headphones
VIZIO Wireless HD Audio - Read this section if you own two or more WHDA devices. SwITChInG bETwEEn AUDIo SoURCES on ThE hEADphonES To switch the Headphones between audio sources (either the Dock or the Sound bar), press and hold the INP button for 3 seconds. -
Page 26: Technical Support
For technical assistance contact our VIzIO Technical Support Department via email Monday - Friday: 6 am to 9 pm (PST) or phone. Please have your VIzIO model number, serial number, and date of purchase available Saturday - Sunday: 8 am to 4pm (PST) before your call. -
Page 27: Important Safety Instructions
ImpoRTAnT SAfETy InSTRUCTIonS Your Sound Bar is designed and manufactured to operate within defined design • The exclamation point within an equilateral triangle is intended to limits, and misuse may result in electric shock or fire. To prevent your Sound Bar alert the user to the presence of important operating and servicing from being damaged, the following rules should be observed for its installation, instructions in the literature accompanying your Sound bar. -
Page 28: One-Year Limited Warranty
Covers units purchased as new in United States and Puerto Rico Only Product to the VIzIO service center. VIzIO provides a warranty to the original purchaser of a new Product against defects Limitations and Exclusions in materials and workmanship for a period of one year of non-commercial usage VIzIO’s one-year limited warranty only covers defects in materials and workmanship. -
Page 29: Legal & Compliance
lEGAl & ComplIAnCE FCC Class B Radio Interference Statement RF Exposure Information NOTe: This equipment has been tested and found to comply with the limits for a Class This device meets the government’s requirements for exposure to radio waves. This b digital device, pursuant to Part 15 of the FCC Rules. - Page 30 RECommEnDS bring the 3D experience home with VIzIO’s 65” Theater 3D Edge Lit Razor LED LCD HDTV! • Crystal-clear, flicker-free 3D that’s up to 50% brighter than conventional 3D. That means less eye strain and less ghosting. • Includes four pairs of comfortable, lightweight Theater 3D glasses, so you can immediately share the excitement with friends and family.
- Page 31 • 7.1 channels of crystal-clear digital surround sound, Dolby True HD, and DTS deliver an immersive, mind-blowing audio experience. • Combine with a VIZIO 3D HDTV to transform your movie nights into theater-like events!
- Page 32 © 2011. All RIgHTs ReseRVeD. THe V, VIZIO, VIZIO InTeRneT Apps, THeATeR 3D, Full ARRAy TRuleD, eDge lIT RAZOR leD, 240HZ sps, 480HZ sps, enTeRTAInmenT FReeDOm AnD enTeRTAInmenT FReeDOm FOR All nAmes, lOgOs AnD pHRAse ARe RegIsTeReD OR unRegIsTeReD TRADemARks OF VIZIO, Inc.
Need help?
Do you have a question about the VHT510 and is the answer not in the manual?
Questions and answers