Table of Contents
Advertisement
Advertisement
Table of Contents

Related Manuals for Cuisinart DGB600BCU


Summary of Contents for Cuisinart DGB600BCU
- Page 1 Grind & Brew DGB600BCU...
- Page 3 Congratulations on your purchase of the Cuisinart Grind & Brew. For over 30 years Cuisinart’s aim has been to produce the very fi nest kitchen equipment so that cooks at home as well as professional chefs have the tools to express their creativity.
-
Page 4: Table Of Contents
Contents Product Description ........... . Safety Cautions. -
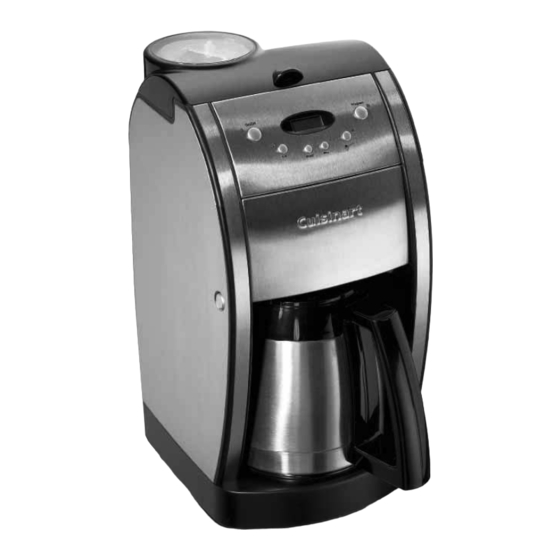
Page 5: Product Description
Product Description Grind Chamber Water Reservoir (not shown) Control Panel Filter Compartment Filter Compartment Release Button Thermal Carafe Housing Unit... -
Page 6: Safety Cautions
ß Do not use the appliance if it has fallen or shows signs of damage or cuts out in use. Discontinue use immediately and contact Cuisinart After Sales Service for further advice. ß No repair can be carried out by the user. Return the appliance to “Cuisinart Service Centre” for inspection or repair / replacement (See “UK After Sales Service” section). - Page 7 ß Always ensure the voltage to be used corresponds with the voltage on the appliance, which is indicated on the bottom of the motor unit. ß Do not use any attachments other than those recommended or sold by Cuisinart. ß This appliance should not be used by adults or children whose lack of experience, product knowledge or disability might cause a hazard, unless they have been correctly instructed and are adequately supervised.
-
Page 8: Programming
Programming Setting the Clock When the grind and brew is plugged in, “12:00” will appear until you set the time. Entering “Time Set” mode: To set the time, press and hold either the “Hours” or “Minutes” button until the clock begins to fl ash. This signals that you have entered the “Time set”... -
Page 9: B Setting The Programme Time
Setting the Programme Time This feature allows you to pre-programme brewing for the desired time. By pressing the ’Programme’ but- ton the digital display shows the current program time. This default setting is 12.00pm. Entering “Set Programme Time” mode: Press and hold the “Programme Set” button until the green light and LCD display begin to fl ash, this si- gnals that you have entered the “Set Programme Time”... - Page 10 Inserting the Charcoal Water Filter N.B. Your appliance is supplied with two charcoal water fi lters. It is strongly recommended that the water fi lter is replaced after 90 days or 90 uses; more often if you have hard water. Failure to do so can lead to a build-up of limescale and affect the performance of your appliance. Replacement fi lters can be purchased directly from the manufacturer, (see “UK After Sales Service”section for further details).
-
Page 11: Instructions For Use
Instructions for Use A Preparing to Brew N.B. Before making coffee for the fi rst time, we recommend operating the appliance once, using only water, to remove any dust or residue that may remain in the system from the manufacturing process. Grinder basket lid Filter basket lid Filter basket... -
Page 12: Preparing The Carafe
WARNING: Maximum capacity is 14 level scoops. Do not over fi ll or you may damage the grinder and/or the appliance may overfl ow. ß Once the grinder basket lid has been closed, carefully fi ll the water reservoir with the desired amount of water, up to 10 cups, using the graduated water level indicator located at the rear of the reservoir. -
Page 13: B Grinding & Brewing Coffee
B Grinding and Brewing Coffee Now the coffee machine is ready to grind and brew. Immediate Brewing To start the appliance immediately, press the “0/1” button. The indicator light will illuminate and the pro- cess will begin. Programmed Brewing To set the appliance to start at a programmed time, refer to “Set Programme Time” section B. Brewed Coffee ß... -
Page 14: C Brewing 1- 4 Cups
C Brewing 1 - 4 cups This function brews the coffee at a slower rate to extract maximum fl avour from the coffee for a more rounded fl avor in just 1 - 4 cups ß Add 1-1/2 scoops coffee beans per cup to the grind chamber fi t the grinder lid. ß... -
Page 15: Cleaning & Maintenance
Cleaning & Maintenance ß Completely clean and dry all parts after every use. ß Always turn the appliance off and remove the plug from the mains outlet before cleaning. ß Open the reservoir lid. Remove the grinder basket lid by using the recesses on each side of the lid. Then remove grinder basket by lifting directly upwards. -
Page 16: Descaling
ß Do not use scouring agents or harsh cleaning agents on any part of the appliance. ß Never immerse the main housing unit in water or other liquid. To clean the base, simply wipe with a clean damp cloth and dry before storing. ß... -
Page 17: Guarantee
Guarantee ß This Cuisinart appliance is guaranteed for domestic consumer use for 3 years. ß The guarantee covers defects under normal use from date of purchase and ceases to be valid in the event of alteration or repair by unauthorized persons. -
Page 18: Uk After Sales Service
For further advice on using your Cuisinart Grind and Brew and other products in the Cuisinart range, contact the Cuisinart Customer Care Line on 0870 240 6902 (09:00 to 17:00 hrs Monday to Friday) or, alternatively, email your enquiry to support@cuisinart.co.uk... - Page 20 U IB-4/336C...
- Page 21 Total Pages:20pp Material:157gsm B/S Gloss art paper (whole book) Cover: Inside: Coating: waterbase varnishing for whole book Color:1C+1C(black) Cover: Inside: Die cut:old same as DGB600BCU IB-4/336A Bar Code: Date:06/28/08 (00) Coordinator: Alice Chong Tel: 2669 6173 Fax: 2677 6556...
Need help?
Do you have a question about the DGB600BCU and is the answer not in the manual?
Questions and answers