Miele KF 1801 Vi Operating And Installation Instructions
Miele fridge-freezer combination operating and installation instructions
Hide thumbs
Also See for KF 1801 Vi:
- Operating and installation instructions (96 pages) ,
- Specification (3 pages) ,
- Operating and installation manual (88 pages)
Table of Contents

Related Manuals for Miele KF 1801 Vi


Summary of Contents for Miele KF 1801 Vi
- Page 1 Operating and Installation Instructions Fridge-Freezer Combination KF 1801 Vi KF 1811 Vi KF 1901 Vi KF 1911 Vi en - US, CA To prevent accidents and machine damage read these instructions before installation or use. M.-Nr. 07 155 800...
-
Page 2: Table Of Contents
Contents IMPORTANT SAFETY INSTRUCTIONS....... . . 4 Guide to the Fridge-Freezer combination ......7 Before use . - Page 3 Contents Cleaning and care ..........29 Cleaning the interior and accessories .
-
Page 4: Important Safety Instructions
IMPORTANT SAFETY INSTRUCTIONS Electrical Safety When using the appliance, follow basic safety precautions, including Before installation, make sure that the following: the voltage and frequency listed on the data plate correspond with the Read all instructions before household electrical supply. This data installation and use to prevent must correspond to prevent injury and accidents and machine damage. - Page 5 Installation and repair work should disinfection or other treatment before or be performed by a Miele authorized after the filter is used; the filter alone is service technician. Work by unqualified not an adequate safeguard.
-
Page 6: Disposal Of Your Old Appliance
IMPORTANT SAFETY INSTRUCTIONS Disposal of your old appliance Do not handle frozen food or ice with wet hands. Danger of injury. Before disposing of an old Do not store or use gasoline or other appliance, first make the door latch or flammable vapors and liquids in the lock unusable. -
Page 7: Guide To The Fridge-Freezer Combination
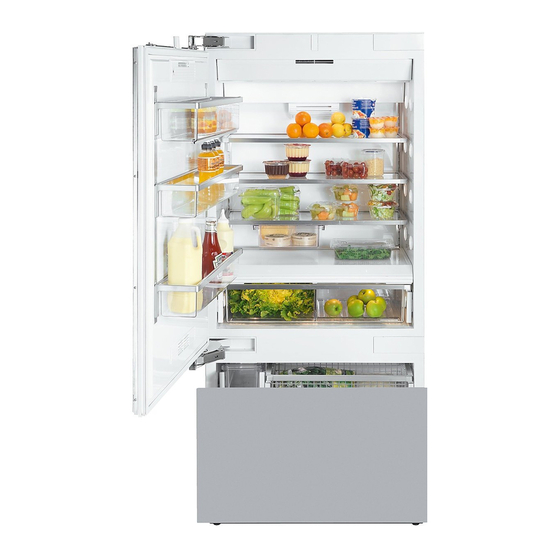
Guide to the Fridge-Freezer combination a Hinged door shelf g Main switch to turn the appliance On/Off b Shelves (height adjustable) h SmartFresh drawer c Door shelves (height adjustable) i Water filter d Floating drawer j Small freezer basket e Control panel k Large freezer basket f Humidity filter l Ice cube container... - Page 8 Guide to the Fridge-Freezer combination Control panel a Access button "p" g Food type(s) to be stored in the activates the control panel SmartFresh drawer b Refrigerator h On/Off sensor button for the SuperCool function c Left SmartFresh drawer i On/Off sensor button for the ice cube d Right SmartFresh drawer maker e Freezer...
-
Page 9: Before Use
Before use Before using for the first time Turning the appliance On/Off ^ Clean the inside of the appliance and ^ Open the upper appliance door. the accessories with a mild solution of warm water and liquid dish soap. Dry with a soft cloth. After installing the appliance, wait at least 30 minutes before turning the ^ Turn the appliance On/Off with the... -
Page 10: Settings
Settings Using the settings Depending on the zone selected, you can now: When a sensor button has been selected with a finger touch, it will – adjust the temperature, appear yellow. – select the SuperCool function, or A de-selected button will appear white. –... -
Page 11: Turning The Button Sound On/Off
Settings Custom settings Turning the button sound On/Off In the custom settings mode you can select and change functions. The If you prefer the buttons to be silent function possibilities are described in when touched, the button sound can be the respective chapters of this manual. -
Page 12: Turning Off For Longer Periods Of Time
Settings ^ By touching the X button, you can Turning off for longer periods choose between: of time = 0 : Button sound is off If the appliance is not going to be used = 1 : Button sound is on for an extended time (for example, = –... -
Page 13: Alarm
Alarm The appliance is equipped with an Turning the temperature alarm Off alarm system, to ensure that the As soon as the alarm condition is temperature does not rise unnoticed corrected, the alarm signal turns off because of energy loss or open doors. and the affected zone stops flashing in the display. -
Page 14: Setting The Temperature
Setting the temperature Setting the temperature in the Temperature range refrigerator and freezer The temperature can be selected within sections the following ranges: The refrigerator and freezer sections – Refrigerator: can be set independently of each other. 36°F to 46°F (2°C to 8°C) ^ Touch the access button "p"... - Page 15 Setting the temperature ^ By touching the X button you can Temperature unit select either Fahrenheit or Celsius for (Fahrenheit/Celsius) the temperature display. The temperature can be displayed in † 0: Fahrenheit degrees Fahrenheit (°F) or Celsius (°C). † 1: Celsius †...
-
Page 16: Smartfresh Drawers
SmartFresh drawers Using the SmartFresh drawers The SmartFresh drawers provide the right combination of temperature and humidity. The result is freshness up to three times longer than in the other zones of the refrigerator. ^ Use the sensor button to select the Storage temperatures desired drawer. - Page 17 SmartFresh drawers For optimal storage conditions, it is always best to store similar foods together in one crisper. Foods that are best stored under dry conditions – fresh fish and shellfish, meats, poultry, sausage, dairy products and deli salads. Foods that are best stored under moist conditions –...
-
Page 18: Using The Refrigerator Efficiently
Using the refrigerator efficiently Different storage zones Coldest area Due to the natural circulation of air in The coldest area in the refrigerator is the appliance, there are different directly above the SmartFresh drawers. temperature zones in the refrigerator. The temperature in the drawers Cold, heavy air sinks to the lowest themselves is even colder. -
Page 19: Using The Freezer Efficiently
Using the freezer efficiently Freezing food Placing food in the freezer Fresh food should be frozen as quickly Food to be frozen can be placed as possible. This helps maintain the anywhere in the freezer section. nutritional value, vitamin content, Use the large freezer basket for large appearance and taste of the food. -
Page 20: Defrosting
Using the freezer efficiently Defrosting Cooling drinks quickly Frozen food can be defrosted in To cool drinks quickly, switch on the different ways: SuperCool function. See "SuperCool" for more information. – in a microwave oven, Do not leave bottles in the freezer for –... -
Page 21: Supercool
SuperCool When the SuperCool function is The temperature in the appliance now activated, the appliance is cooled as begins to fall, with maximum cooling in quickly as possible (to a factory-preset the zone selected. temperature). Switching off SuperCool SuperCool The SuperCool function automatically switches off after: When used with the refrigerator the Refrigerator: approx. -
Page 22: Ice Cube Maker
Ice cube maker For the automatic ice cube maker to Do not use the ice cube container operate, it must be connected to the for rapid cooling of food or drinks. household water supply. See The ice cube maker may become "Plumbing". -
Page 23: Automatic Defrost
Automatic defrost Refrigerator section and Freezer section SmartFresh drawers The freezer section defrosts automatically. The refrigerator and SmartFresh drawers defrost automatically. The moisture generated in the appliance collects in the evaporator. It During normal operation, condensate is automatically defrosted and and frost can form on the rear wall of dissipated by the condenser the refrigerator and drawers. -
Page 24: Adjusting The Interior Fittings
Adjusting the interior fittings Moving the shelves SmartFresh drawer The shelves can be adjusted according These drawers are set on telescopic to the height of the food. tracks. They can be pulled in and out for loading and unloading, or removed ^ Using both hands, grasp the shelf for cleaning. - Page 25 Adjusting the interior fittings The divider in the drawer can also be removed for cleaning. ^ Remove the drawer. ^ Lift the divider upward and out. To re-insert the divider, slide it back down along the tracks. Important: If the divider is not in place, the SmartFresh drawer will not work properly.
-
Page 26: Removing The Storage Shelf From Above The Drawer
Adjusting the interior fittings Adjusting the door shelves Removing the hinged door shelf ^ Pull the stops upward and out of the For easier loading, unloading, and cleaning, the door shelves can be shelf, and remove the shelf lid shifted or completely removed. upward. -
Page 27: Ice Cube Container
Adjusting the interior fittings Ice cube container Small freezer basket The ice cube container is set on The small freezer basket can be telescopic tracks, and can be removed removed for cleaning. for loading, unloading and cleaning. ^ Slide the basket forward until ^ Slide the container forward until resistance is felt. -
Page 28: Large Freezer Basket With Partition
Adjusting the interior fittings Large freezer basket with Replacing the partition partition ^ Arrange the fasteners in an upright position and audibly click the The large freezer basket can be partition into them. removed for cleaning. ^ Place the safety locks into the ^ Lift the freezer basket out of the fasteners. -
Page 29: Cleaning And Care
Cleaning and care Before cleaning To reduce the risk of electrical shock, disconnect the appliance from the power supply by shutting off the power main, tripping the circuit breaker or unplugging the power cord before maintenance. ^ Use the main switch to turn the appliance off completely. -
Page 30: Humidity Filters
Cleaning and care Aluminum frames The shelf frames are made of aluminum. ^ Clean the frames with a mild solution of warm water and liquid dish soap. Aluminum is susceptible to scratches and nicks, treat with care. ^ Unhook the filter cover, 1. in each The aluminum frames may become side of the drawer and remove them discolored or otherwise altered if... -
Page 31: Ventilation Slits
Cleaning and care Ventilation slits After cleaning ^ Check the ventilation slits in the base ^ Return all shelves and accessories. panel regularly. Remove any dirt/dust ^ Place food back in the refrigerator with a vacuum cleaner or brush. section, close the appliance doors, Clean as needed. -
Page 32: Changing The Light Bulb
Cleaning and care Changing the light bulb Never touch a halogen bulb with The lighting automatically switches off bare fingers. after the door has been open for When inserting a glass halogen bulb approx. 5 minutes. This is not a fault. always hold it with a soft cloth. - Page 33 Cleaning and care Side lighting ^ Turn the light cover counterclockwise and pull out. Never touch a halogen bulb with bare fingers. When inserting a glass halogen bulb always hold it with a soft cloth. ^ Pull the defective light bulb from the socket.
-
Page 34: Water Filter
Replacement filters can be ordered unsafe or of unknown quality without from Miele. adequate disinfection or other treatment before or after use of a – When the red filter indicator flashes, filter. -
Page 35: Exchanging The Water Filter
Water filter Exchanging the water filter ^ Push in and rotate the filter cap on the base panel of your appliance ^ Push the filter cartridge with cap, in a counterclockwise 180°, 1. horizontal position, all the way into the opening in the base panel, 5. ^ Pull the used filter cartridge out of the appliance, 2. - Page 36 Water filter By touching the X button you can Re-setting the filter indicator select the following settings: The filter indicator still flashes in the ^ 0: filter is installed display. ^ 1: filter is not installed (external filter) ^ 2: filter change confirmed ^ -: return to menu ^ Tap the X button until ^ 2 appears in ^ Touch the access button "p"...
- Page 37 The "filter" indicator is no longer visible To purchase a bypass cartridge, on the control panel. contact Miele. When you are in the Custom settings mode the door alarm is turned off automatically. Once the door is closed it is reactivated.
-
Page 38: Filter Performance Data Sheet
Filter Performance Data Sheet... - Page 39 Filter Performance Data Sheet...
-
Page 40: Frequently Asked Questions
Frequently asked questions With the aid of the following guide minor problems can be corrected without a service call. Repairs should only be carried out by a qualified and trained person in strict accordance with local and national safety regulations. Unauthorized repairs could cause personal injury or machine damage and may void the warranty. - Page 41 Possible fault Solution Water is flowing out of Close the shut-off valve immediately. the appliance. Check whether the water Contact Miele Technical pipe in the appliance is Service. defective. Check whether the water Contact a plumber. pressure is too low.
- Page 42 The filter display is red. This is a warning that the Order replacement filters water filter needs to be from Miele. changed soon. The filter display is The water filter needs to See "Replacing the water flashing red.
- Page 43 The appliance is not turned Check that the appliance is switched on. The water supply line was Contact Miele. not primed (purged of air) before the appliance was used for the first time. Check if: See "Ice Cube Maker"...
- Page 44 Frequently asked questions Problems with the ice maker Issue Possible fault Solution The ice cubes are Other domestic appliances Avoid using such items as small. that use water are in a dishwasher, washing operation. machine or shower at the same time. Check whether the water See "Water filter"...
- Page 45 Frequently asked questions Problems with the ice maker Issue Possible fault Solution The ice maker is not Check the water Contact a plumber. producing enough ice pressure. The water pressure must be or the ice cubes are misshapen. between 25 and 120 psi (1.72-8.25 bar).
- Page 46 Frequently asked questions The appliance is making noises. Issue Possible fault Solution Brrrrr... Humming noise made by the These noises are not a compressor. This noise can fault. get louder for brief periods The noise of the when the motor is switching compressor and the coolant circulating in the system is unavoidable.
-
Page 47: After Sales Service
Miele Service department, Extended Service Contracts offered by other providers for Miele products will not be recognized by Miele. Our goal is to prevent unauthorized (and untrained) service personnel from working on your Miele products, possibly doing further damage to them, you and/or your home. -
Page 49: Installation Instructions
Installation instructions To prevent accidents and machine damage read these instructions before installation or use. -
Page 50: Caring For The Environment
Caring for the environment Disposal of packing materials Disposal of an old appliance The cardboard box and packing Old appliances contain materials that materials are biodegradable and can be recycled. Please contact your recyclable. Please recycle. local recycling center about the possibility of recycling these materials. -
Page 51: Installation
Installation Installation site Have the appliance installed by a The appliance should be installed in a qualified technician, according to dry, well-ventilated room. the enclosed installation instructions. Do not install the appliance: The manufacturer is not liable for - outdoors damage to property due to an - in an environment with dripping incorrect installation or water... -
Page 52: Installation Niche
See "Niche dimensions". If in doubt, contact Miele. The side walls of the installation cavity Furniture/fixtures must be plumb. The new appliance will be mounted... -
Page 53: Custom Door Panels
Upper door ... 53 lbs (24 kg) Contact Miele or your dealer for Lower door ... 24 lbs (11 kg) -
Page 54: Side Panels
Installation . . . with partition The "Merging Kit" can be obtained from Miele. Side panels If one side of the appliance is visible, a side panel must be used. The side panel must be firmly secured to the wall, the floor and the overhead furniture/fixtures before the appliance is placed in the cavity. - Page 55 To connect these furniture doors, a metal strip can be purchased as an optional accessory. Contact Miele. When attaching the metal strip to the furniture doors, observe the maximum length of the screws and the position of the drill holes.
-
Page 56: Dimensions
Dimensions Niche dimensions Niche width (A) KF 1801 Vi, KF 1811 Vi 30" (762 mm) KF 1901 Vi, KF 1911 Vi 36" (915 mm) - Page 57 Dimensions 1. Power supply 2. Water connection KF 1801 Vi, KF 1811 Vi 15" (381 mm) KF 1901 Vi, KF 1911 Vi 18" (458 mm) Door dimensions (open 90°) KF 1801 Vi, KF 1811 Vi " (829 mm) KF 1901 Vi, KF 1911 Vi...
-
Page 58: Installing The Appliance
Installing the appliance Before you begin Tools needed for installation – Cutter with adjustable blade Read these instructions completely and carefully. – Cordless screwdriver T 20 Have the appliance installed by a – Torx screwdriver T 20 qualified technician, according to the enclosed installation instructions. -
Page 59: Before Installation
Installing the appliance Check the installation niche Before installation To ensure a safe, trouble-free Caution - the appliance is very installation and the best possible heavy. Use caution when unpacking cosmetic result, check to be sure and opening the door, danger of that the installation space complies tipping. -
Page 60: Remotevision Module Installation (Optional Accessory)
Installing the appliance ^ Loosen the bracket that holds the ^ Unscrew the screws a on the cover appliance to the pallet. b and pull off the sticker c. Caution! The appliance is no ^ Remove the cover b. longer secured and may be unstable. -
Page 61: Preparing The Installation Niche
In that case, repeat the process. If that does not correct the Keep the appliance doors closed problem, contact Miele. until it is securely fastened in the niche. Tipping hazard. ^ Pull the antenna d straight out. If the installation niche is deeper than... - Page 62 Installing the appliance Anti-tip brackets The anti-tip brackets help keep the appliance safely secured to the installation niche to prevent tipping. Two anti-tip brackets are recommended for each appliance or appliance combination (side-by-side). ^ Drill pilot holes: – " (3 mm) for 5 x 60 mm wood screws –...
- Page 63 Installing the appliance Securing an alternative anti-tip – The beam must cover the appliance by at least 2" (50.8 mm). device ^ Mark the installation height (lower If the anti-tip brackets cannot be attached securely, an alternative edge of the beam) on the rear wall of anti-tip device can be used.
-
Page 64: Sliding The Appliance Into The Installation Niche
Installing the appliance Sliding the appliance into the In the case of side-by-side installation niche installations, a separate outlet must be used for each appliance. ^ To prevent the power cord from becoming caught: Tie a piece of string to the middle of the power cord and feed it forward under the appliance. -
Page 65: Aligning The Appliance
Installing the appliance Aligning the appliance A mark is located on the appliance base and is used as a standard gauge ^ Align the appliance with the custom for height adjustment. When adjusting front. the height, align this mark at 1 "... -
Page 66: Attaching The Appliance To The Installation Niche
Installing the appliance Note: – Do not twist or jam the appliance inside the niche. When unscrewing the height-adjustable feet, proceed gradually, alternating between left and right. – The adjustment of the rear feet is aided if the appliance is lifted at the rear (tipped forward slightly). - Page 67 Installing the appliance For a side-by-side combination the filler strips from both appliances are put together to form one long filler strip: ^ Take the peg from the "side-by-side merging kit" and insert it halfway into ^ Open both appliance doors and the filler strip rail on the left-side remove the large freezer basket from appliance.
-
Page 68: Preparing The Custom Door
Installing the appliance Preparing the custom door For best results, it is important to mount the upper door before the lower door. ^ Measure the distance X between the bracket from the upper door and the overhead furniture/fixtures. ^ Open the appliance door. ^ Loosen the two nuts. - Page 69 Installing the appliance ^ Mark the distance X on the back-side Please note: When attaching the mounting frame onto two adjacent of the custom door. doors (see "Front panel gap kit") ^ Also calculate and mark the center of screw into the thicker outer frames the custom door Y.
-
Page 70: Attaching And Aligning The Custom Door Front
Installing the appliance Attaching and aligning the custom door front ^ Fit the door handle to the custom door. Note that the screws are applied from the reverse side. ^ Align the custom door with the double-threaded bolts. ^ Tighten the nuts on the adjusting rail. This will correct the side alignment of the door. -
Page 71: Attaching The Lower Bracket
Installing the appliance Attaching the lower bracket (Only for appliances using the "Front panel gap kit".) ^ Measure the distance Y between the adjusting rail from the lower door and the upper door. ^ Be sure to leave a distance of ^ Open the lower appliance door. -
Page 72: Attaching The Covers
Installing the appliance Attaching the covers The lower bracket corrects the side position of the door. ^ Loosen the screw. ^ Check the side position of the door. ^ Thread the wood screw. ^ Tighten the screw. ^ Place the cover on the brackets. ^ To mount the cover strips on both sides of the upper and lower doors, click them into place from bottom to... - Page 73 Installing the appliance ^ Insert the cover plate on the freezer compartment door. Attaching the toe-kick panel ^ Insert the cover strip into the space between the appliance and the side The maximum height of the toe-kick panel. panel is 4" (101 mm) from the top of For side-by-side combinations, the the floor.
- Page 74 Installing the appliance ^ Put the included covering plate in place. ^ Attach the toe-kick panel to the plinth. Mounting the air separator The air separator keeps the supply and exhaust air separate. This prevents warm exhaust air from flowing into the machine, optimizing the energy performance of the unit.
-
Page 75: Plumbing
Plumbing All plumbing work should be carried out by a suitably qualified and competent person, in accordance with all applicable local and national regulations. The manufacturer is not liable for damage to property due to an incorrect installation or water connection. - Page 76 Plumbing Preparing the water connection The connection to the household water supply must be installed before the appliance is installed. ^ Turn off the main water valve to prevent damage caused by leaking water. ^ Attach the connecting pipe to the shut-off valve, according to the instructions supplied by the manufacturer of the ice cube maker...
-
Page 77: Connecting The Water Supply
Plumbing ^ Push the union nut and seal onto the Connecting the water supply water pipe. When connecting the water pipe to ^ Push the end of the water pipe into the solenoid valve of the appliance, the appliance connection and screw follow the instructions supplied by on the union nut, 3. -
Page 78: Electrical Connection
If there are any questions regarding the electrical connection of this appliance to the power supply, please consult a licensed electrician or call the Miele Technical Service. U1-800-999-1360 V1-800-565-6435... -
Page 79: Remotevision
* Please note that each wireless router available as an optional accessory manufacturer supplies their own device from Miele. It can only be installed drivers and setup programs. Due to the by a Miele Service Technician. differences in manufacturers, exact router setup instructions are not included in this manual. -
Page 80: Accessing The Remotevision Control Panel
RemoteVision ^ Tap the X button until ; appears in Accessing the RemoteVision the display. control panel ^ Touch the access button "p" to ^ Touch the access button "p" so it confirm. turns yellow. See the table on the following page for a description of each setting in the display. - Page 81 RemoteVision MasterCool control panel options for RemoteVision Selectable Description of function options Back Reboot the module Reset the module to factory settings Enter Ad-Hoc Mode Note: If you cannot select any option (other than ; - "back"), the module has not been installed correctly.
- Page 84 Alteration rights reserved / 2908 M.-Nr. 07 155 800 / 04 For the most updated manual see the Miele web site.
Need help?
Do you have a question about the KF 1801 Vi and is the answer not in the manual?
Questions and answers