Table of Contents
Advertisement
Quick Links
Advertisement
Table of Contents

Related Manuals for Buhler 50" Series


Summary of Contents for Buhler 50" Series
-
Page 3: Table Of Contents
65 Series Rotary Tiller TABLE OF CONTENTS DESCRIPTION PAGE Warranty ..............1 Introduction..............2 Safety ................3 General Safety............. 4 Operating Safety............4 Maintenance Safety ............. 5 Transport Safety ............5 Storage Safety ............. 5 Safety Signs..............5 Safety Sign Locations ..........6 Operation.............. - Page 4 65 Series Rotary Tiller TABLE OF CONTENTS – cont’d. Bolt Torque..............29 Parts Lists and Drawings Tiller Drawing (50”, 60” & 72”)........30 Tiller Drawing (82”) ............32 Tiller Parts List ............. 33 PTO (Slip Clutch) Drawing........... 36 PTO (Slip Clutch) Parts List (50”, 60” & 72”)....37 PTO (Slip Clutch) Parts List (82”) ........
-
Page 5: Warranty
65 Series Rotary Tiller WARRANTY POLICY Buhler Manufacturing products are warranted for a period of twelve (12) months (90 days for commercial application) from original date of purchase, by original purchaser, to be free from defects in material and workmanship under correct, normal agricultural use and proper applications. -
Page 6: Introduction
65 Series Rotary Tiller INTRODUCTION Congratulations on your choice of a Buhler Farm King 65 Series Rotary-Tiller to complement your landscaping operation. This equipment has been designed and manufactured to meet the needs of a discerning landscaping industry for the efficient tilling of soil. -
Page 7: Safety
65 Series Rotary Tiller SAFETY YOU are responsible for the SAFE operation and maintenance of your Buhler Farm King 65 Series Rotary-Tiller. YOU must ensure that you and anyone else who is going to operate, maintain or work around the Rotary-Tiller be familiar with the operating and maintenance procedures and related SAFETY information contained in this manual. -
Page 8: General Safety
65 Series Rotary Tiller GENERAL SAFETY Have a first-aid kit available for use and know how to use it should the need arise. Have a fire extinguisher available for use and know how to use it, should the need arise. Wear appropriate protective gear. -
Page 9: Maintenance Safety
65 Series Rotary Tiller MAINTENANCE SAFETY Follow ALL the operating, maintenance and safety information in the manual. Support the machine with blocks or safety stands when working beneath it. Follow good shop practices - Keep service area clean and dry. - Be sure electrical outlets and tools are properly grounded. -
Page 10: Safety Sign Locations
65 Series Rotary Tiller How to Apply Safety Signs: Be sure that the application area is clean and dry. Decide on the exact position before you remove the backing paper. Remove the smallest portion of the split backing paper. Align the safety sign over the specified area and carefully press the small portion with the exposed sticky backing in place. - Page 11 65 Series Rotary Tiller SAFETY SIGN LOCATIONS - cont'd. Safety sign “A” Safety sign “B” Safety sign “C” Replace safety signs immediately should they become damaged, torn or illegible. Obtain replacements from your authorized dealer using the part numbers shown.
-
Page 12: Operation
OPERATION TO THE NEW OPERATOR OR OWNER The Buhler Farm King 65 Series Rotary Tiller is a machine that combines the primary and secondary tillage operation into one machine. It breaks up the soil and prepares the seed bed in one pass. Rotational power to the rotor is provided by the tractor PTO. -
Page 13: Machine Break-In
65 Series Rotary Tiller MACHINE BREAK-IN Although there are no operational restrictions on the Tiller when used for the first time, it is recommended that the following mechanical items be checked: A. After operating for 1/2 hour or after completing 1/2 acre: Check all nuts, bolts and other fasteners. -
Page 14: Equipment Matching
65 Series Rotary Tiller EQUIPMENT MATCHING To insure the safe and reliable operation of the Tiller, it is necessary to use a tractor with the correct specifications. Use the following list as a guide in selecting a tractor to use on the machine. Horsepower: Use Table 1 as a guide in selecting the tractor horsepower appropriate for your width of machine. -
Page 15: Driveline Dimension
65 Series Rotary Tiller DRIVELINE DIMENSION A PTO driveline is supplied with the machine. To accommodate the variety of 3 point hitch geometry available today, the driveline can be too long for some machines and must be cut. It is very important that the driveline be free to telescope but not bottom out when going through its working range. - Page 16 65 Series Rotary Tiller DRIVELINE DIMENSION – cont’d. Pull the driveline apart and cut 1/2 of the dimension determined in step 5 from each end. Add another ½ inch (12MM) to each cut off segment. Be sure to use a hacksaw to cut 1/2 from each end of the separated shaft. Cut both the plastic tube and the metal cores.
-
Page 17: Attaching/Unhooking
65 Series Rotary Tiller ATTACHING/UNHOOKING The Tiller should always be located on a level, dry area that is free of debris and other foreign objects. When attaching the machine to a tractor, follow this procedure: Clear the area of bystanders, especially small children. Be sure the tractor 3 point hitch is in the Category 1 configuration and the lift arms are in the non-sway configuration (See tractor manual). - Page 18 65 Series Rotary Tiller ATTACHING/UNHOOKING – cont’d. Attach the PTO driveline: Check that the driveline telescopes easily and that the shield rotates freely. CAUTION: Be sure that the driveline does not bottom out when going through its working angles. Attach the driveline to the tractor by retracting the locking pin, slide the yoke over the shaft and push on the yoke until the lock pin clicks into position.
-
Page 19: Field Operation
65 Series Rotary Tiller FIELD OPERATION Buhler Farm King 65 Series Rotary Tillers are designed with the inherent flexibility of operating well in almost any kind of soil and terrain conditions. However, the operator has the responsibility of being familiar with all operating and safety procedures and following them. - Page 20 65 Series Rotary Tiller FIELD OPERATION - cont'd. Offset: The Category Pin Brackets can be moved 3 to 4 inches along the Deck Assembly to either side of center if required. Center the machine for normal operation. Offset if the tire tracks are wider than the machine or when tilling around trees, bushes or other areas.
- Page 21 65 Series Rotary Tiller FIELD OPERATION - cont'd. Operating hints: Determine the moisture content of the soil before starting. Soil that is too wet will "ball-up" in the rotor blades making tilling impossible. Sandy soils normally can be worked better than heavy clay or loam soils. It is the responsibility of the operator to determine the soil type and moisture content before starting.
-
Page 22: Transporting
65 Series Rotary Tiller TRANSPORTING When transporting the machine, review and follow these instructions: Be sure all bystanders are clear of the machine. Be sure that the machine is securely attached to the tractor and all retainer pins are installed. Clean the SMV emblem, lights and reflectors and be sure they are working. -
Page 23: Storage
65 Series Rotary Tiller STORAGE After the season's use, the machine should be thoroughly inspected and prepared for storage. Repair or replace any worn or damaged components to prevent any unnecessary down time at the start of next season. To insure a long, trouble free life, this procedure should be followed when preparing the unit for storage: Clear the area of bystanders, especially small children. -
Page 24: Service And Maintenance
65 Series Rotary Tiller SERVICE AND MAINTENANCE SERVICE Follow Maintenance Safety Instructions as outlined in Maintenance Safety. FLUIDS AND LUBRICANTS Hydraulic Oil: Use standard hydraulic oil for all operating conditions. Gear Box Oil: Use an SAE 85W90 gear oil for all operating conditions. Gear Box Capacity: 1 U.S. -
Page 25: Servicing Intervals
65 Series Rotary Tiller SERVICING INTERVALS The periods recommended below are based on normal operating conditions. Severe or unusual conditions may require more frequent lubrication or oil changes. 8 Hours or Daily; Telescoping Tubes and Quick Disconnect 20 Hours 1. Lubricate PTO driveline (7 locations). ALERT: When using the safety chains supplied with the PTO shaft, the shield bearings must be kept lubricated. - Page 26 65 Series Rotary Tiller SERVICING INTERVALS – cont’d. 40 Hours 1. Check gearbox oil level. Add as required 2. Add approximately 10 squirts of grease in chain case. Annually 1. Change gear box oil. Refill with SAE 85W90 gear oil. 2.
-
Page 27: Maintenance
65 Series Rotary Tiller MAINTENANCE By following a careful service and maintenance program for your machine, you will enjoy many years of trouble-free operation. A-FRAME ADJUSTMENT When moving the hitch along the front frame to adjust the offset, follow this procedure: Clear the area of bystanders, especially small children. -
Page 28: Slip Clutch
65 Series Rotary Tiller SLIP CLUTCH During normal operation, the slip clutch can release and slip when encountering an obstruction or when overloaded. It is designed to slip when the load exceeds 3 times its nominal rating. When the clutch slips too frequently during normal operating conditions, it is necessary to replace the clutch linings. -
Page 29: Clutch Maintenance
65 Series Rotary Tiller CLUTCH MAINTENANCE Before first use or after storage of more than one month, the clutch should be checked. Disengage clutch by turning in the four socket set screws. Run the PTO at low idle to slip the clutch linings. This will help remove the dirt, corrosion, and surface gloss from the clutch plates and also ensure that the linings are loose. -
Page 30: Repair
65 Series Rotary Tiller REPAIR MAIN SHAFT REPLACEMENT The main shaft is designed with a replaceable Final Drive Assembly on the driven end. This feature keeps the cost of repairs down should replacement be required and makes main shaft replacement easier. When replacing the Final Drive Assembly, follow this procedure;... -
Page 31: Troubleshooting
65 Series Rotary Tiller TROUBLE SHOOTING The Buhler Farm King 65 Series Rotary Tiller moves curved Tines on a turning rotor through the ground to break it up and prepare a seed bed. It is a simple and reliable system that requires minimal maintenance. -
Page 32: Assembly
65 Series Rotary Tiller ASSEMBLY The machine is shipped with the PTO shaft not installed. To install the PTO driveline on the machine, follow this procedure: Clear the area of bystanders, especially small children. Clean the splines on the yoke and the input shaft. Align the splines on the yoke and the shaft. -
Page 33: Bolt Torque
65 Series Rotary Tiller BOLT TORQUE CHECKING BOLT TORQUE The tables shown below give correct torque values for various bolts and capscrews. Tighten all bolts to the torques specified in chart unless otherwise noted. Check tightness of bolts periodically, using bolt torque chart as a guide. Replace hardware with the same strength bolt. -
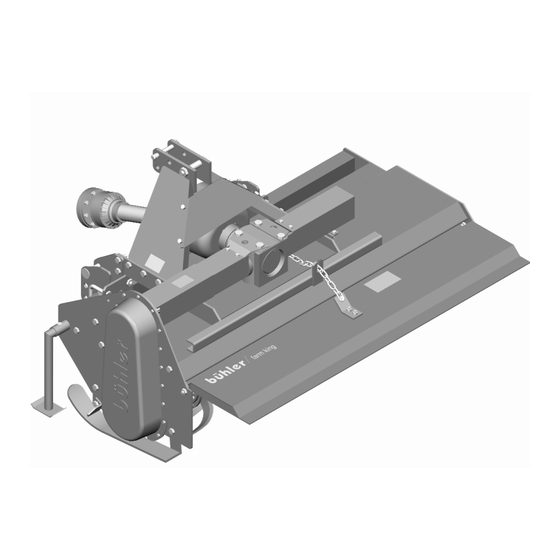
Page 34: Parts Lists And Drawings Tiller Drawing (50", 60" & 72")
65 Series Rotary Tiller 50”, 60” & 72” SERIES TILLERS... - Page 35 65 Series Rotary Tiller 50”, 60” & 72” “65” SERIES TILLERS...
-
Page 36: Tiller Drawing (82")
65 Series Rotary Tiller 82” “65” SERIES TILLER ONLY... -
Page 37: Tiller Parts List
65 Series Rotary Tiller PARTS LIST WHEN ORDERING PARTS Always give your dealer the Model, Color and Serial Number of your machine to assist him in ordering and obtaining the correct parts. Use the exploded view and tabular listing of the area of interest to exactly identify the required part. 50", 60", 72", &... - Page 38 65 Series Rotary Tiller 982825212 Drive Shaft Shield (82") F0354 PTO Shaft w/ Slip Clutch (50", 60", & 72") F0355 PTO Shaft w/ Slip Clutch (82" only) 967392 Gearbox PTO Guard (50", 60", & 72") 912300160 Gearbox PTO Guard (82") 982005111 Drive Shaft Shield Mount 967558...
- Page 39 65 Series Rotary Tiller 907306 LH Side Plate Assy 982005711 Tension Spring 967378 Chain Tensioner Weldment 81525 1/4" X 3/4" Hex Bolt (pl) 84498 1/4" Lock Nut (pl) 81627 1/2" X 3" Hex Bolt (pl) 81637 1/2" Lock Washer (pl) 81636 1/2"...
-
Page 40: Pto (Slip Clutch) Drawing
65 Series Rotary Tiller 65 SERIES TILLER PTO (SLIP CLUTCH) (50”, 60”, 72” & 82”) -
Page 41: Pto (Slip Clutch) Parts List (50", 60" & 72")
65 Series Rotary Tiller 65 SERIES TILLER PTO PARTS LIST (SLIP CLUTCH) - 50'', 60'' & 72'' ITEM PART NO. DESCRIPTION F0354 Shaft Complete 908262 Outer Half Shaft - Tractor 936527 Inner Half Shaft - Implement 908259 Quick Disc Yoke - RS 966236 Repair Kit 936352... -
Page 42: Pto (Slip Clutch) Parts List (82")
65 Series Rotary Tiller 65 SERIES TILLER PTO PARTS LIST (SLIP CLUTCH) - 82'' ONLY ITEM PART NO. DESCRIPTION F0355 Shaft Complete 908263 Outer Half Shaft - Tractor 936530 Inner Half Shaft - Implement 908260 End Yoke - RS 910-036 Repair Kit 910-039 Outer Tube Yoke... -
Page 43: Gearbox Drawing & Parts List (50", 60", & 72")
65 Series Rotary Tiller 50'', 60'', & 72'' 65 SERIES TILLER GEARBOX PARTS LIST ITEM PART NO. DESCRIPTION QUANTITY 967558 Gearbox Assembly 967395 Housing 967396 Hex Shaft 967397 Cover 967305 Snap Ring, 1.80, DIN 472 967398 Snap Ring Din 472/1 967399 Snap Ring Din 471/2 967400... -
Page 44: Gearbox Drawing & Parts List (82")
65 Series Rotary Tiller 82'' 65 SERIES TILLER GEARBOX PARTS LIST ITEM PART NO. DESCRIPTION QUANTITY 912300159 Gearbox Assembly 967280 Housing 967323 Hex Shaft, 41.15mm Dia. 967281 Cover, 160mm Dia. 967325 Snap Ring E.45, DIN 471/2 967326 Snap Ring, I.95, DIN 472/2 967335 Ring, 45.2 x 54.8 x .6 As Required... -
Page 45: Shipping Bundles
65 Series Rotary Tiller SHIPPING BUNDLES QUANTITY BUNDLE REQUIRED NUMBER DESCRIPTION C6550 50” Tiller c/w PTO F0158 Deck Assembly C6560 60” Tiller c/w PTO F0160 Deck Assembly C6572 72” Tiller c/w PTO F0162 Deck Assembly C6582 82” Tiller c/w PTO F0164 Deck Assembly C6550-4 50”... - Page 46 NOTES...
- Page 48 011-46-500-452651 (306) 781-2300 Naestved, Denmark ON, Woodstock 011-45-557-29511 (519) 539-0435 ON, Jasper (613) 283-1758 QC, Dorion (450) 455-4840 Buhler Manufacturing “a partnership” 301 Mountain Street S. Morden MB. R6M 1X7 Ph.: (204) 822-4467 Fax: (204) 822-6348 www.buhler.com Printed in Canada...
Need help?
Do you have a question about the 50" Series and is the answer not in the manual?
Questions and answers