
Subscribe to Our Youtube Channel
Related Manuals for Uniden UWG700

Summary of Contents for Uniden UWG700
- Page 1 UWG700 Gate Keeper Video Intercom For more exciting new products please visit our website: Australia: www.uniden.com.au New Zealand: www.uniden.co.nz...
- Page 3 UWG700 Digital Wireless Gatekeeper System Owner’s Manual What's in the box? Gatekeeper camera/intercom 7inch LCD Colour Display monitor AV cable AC adaptor (small) AC adaptor Not shown: (large) - 2 wire power cable Owner’s Manual UWS1117 - 1m cable (for optional...
-
Page 4: Important Safety Instructions
Important Safety Instructions! This manual contains important information about this product’s operation. If you are installing this product for others, you must leave this manual or a copy with the end user. When using your equipment, always follow basic safety precautions to reduce the risk of fire, electric shock and injury to persons, including the following: This equipment is NOT waterproof. -
Page 5: Table Of Contents
Remove the power adapter during long periods between usages. Clean only with a dry cloth. Failure to follow the instructions in this operating manual will void the warranty. Uniden assumes no liability for damages to property or injury to persons caused by improper handling or failure to comply with these safety instructions. -
Page 6: Getting Started
GETTING STARTED The UWG700 comes included with mounting hardware, cables, AC adaptors and screwdriver with security head. A Philips head and flat head screwdriver (not included) will also be required for installation. Mounting and Plugging in the Monitor The monitor is able to be mounted on a wall using the wall mount or it can be rested on a table top using the attached table stand. -
Page 7: Standing Monitor Up On A Table
Standing Monitor up on a Table Monitor Stand Pull the table stand away from the back of the monitor and place monitor on a flat level surface with the stand. Note: Make sure that the flat surface is close to a power source so it can be plugged in Pull the bottom side of the stand away from the monitor and stand the monitor up on a table. -
Page 8: Mounting And Plugging In The Camera
Mounting and Plugging in the Camera Using the AC adaptor is the recommended method of powering the Camera. The placement of the camera should be within reach of a power point. Note: The camera can also operate in a limited capacity using batteries. Note: The camera is NOT WATERPROOF. -
Page 9: Battery Powering The Camera
With the wires pulled through the hole on the backing and mounts, and the devices paired, screw the small backing back onto the back of the camera. • If connecting a door strike, please see connecting an electric door strike before placing the backing back on camera. Note: The devices will only pair when the camera is plugged into a power source With wires pulled through rubber... -
Page 10: Mounting The Camera
Mounting the Camera The camera can be mounted flat to a wall. Make sure that both devices are plugged in and paired. Ensure that the black and red wires are pulled through the provided wire slot, located on the bottom of the flat mount. Make sure you put the mount at an acceptable face level so that your camera can view the face of the person ringing the doorbell, as well as an appropriate height for someone to be able to push the doorbell... -
Page 11: Connecting The Camera To An Optional Electronic Door Strike
Connecting the Camera to an Optional Electronic Door Strike You can connect the camera to an electronic door strike (door strike not included with the UWG700 ). This allows you to unlock your door by pressing the key icon on the monitor. The door strike must be able to be triggered by a 15V DC power supply to be compatible with the UWG700. -
Page 12: Controls And Connections
CONTROLS AND CONNECTIONS Camera Camera Front Camera Back Camera Bottom Camera Backing... - Page 13 Antenna: Allows the signal between the camera and monitor to stay strong. Power Light: The light will glow green when the camera is properly powered and the doorbell is pressed. Infrared LEDs: These lights allow your camera to see up to 2m in the dark. IR Sensor: Senses when it is dark so night vision turns on automatically.
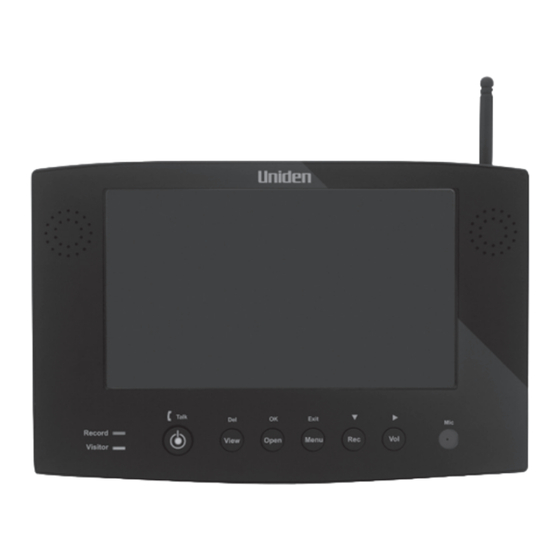
- Page 14 Monitor Monitor Front 7 8 9 10 11 12 Monitor Back...
- Page 15 Antenna: Allows the signal between the camera and monitor to stay strong. Keep pointed up for best reception. SD card slot: Insert an optional SD card into this area to record and store footage. Speakers Record Indication: When light is flashing (red) it will indicate that the device is recording. Visitor Indication: When light is on (green), the device is indicating that you have an unanswered door chime with recorded footage.
-
Page 16: Screen Icons
SCREEN ICONS Signal: Indicates the signal strength between the camera and monitor. The bars vary based on connectivity, one bar is weak and four is strong No Signal: Indicates that there is no signal between the camera and monitor. The words NO SIGNAL will also appear on the screen Visiting Record: Indicates that Visiting Record is set to ON... -
Page 17: Basic Operation
BASIC OPERATION Turning power ON/OFF Press and hold to turn power ON. The blue LED indicates power is on. Press and hold when the display is off (standby) to turn power OFF. When a Visitor Comes to Your Entrance Way Ringing the doorbell on the camera To ring the doorbell on the camera, press the bell button momentarily. - Page 18 Other Operations View To view and listen to the camera without speaking through it, press the del/view button. To close the view screen select the view button again. The screen will stay on for one minute then shut off. This feature is not available if camera is using batteries. Record* To prompt recording, make sure the screen is on and press the record button.
-
Page 19: Pairing The Camera And Monitor
PAIRING THE CAMERA AND MONITOR Note: The Camera and Monitor will already come paired with each other. Follow these steps if you need to pair them again. Pairing menu on monitor On the Monitor Timer while devices is Menu) to open the main menu. Press ( pairing Using... -
Page 20: Main Menu
MAIN MENU The Main Menu has four main options: • Camera Setup • Event List • Record Setup • System Setup Note: The menu will automatically time out and return to live screen mode if inactive for one minute. -
Page 21: Camera Setup
CAMERA SETUP Camera Brightness The Camera Setup allows you to adjust the brightness of your camera and pair the camera and monitor. If the camera is located in a bright area it is best to have the brightness low, if the camera is located in a darker area, it is best to have the brightness turned up. -
Page 22: Record Setup
RECORD SETUP With the use of an optional SD card the built-in DVR (digital video recorder) can record manually or when a visitor rings the doorbell. This menu option allows you to turn visiting record on/off, format the optional SD card and set SD card overwrite on/off. - Page 23 SD Card Format Formatting your SD card erases all saved footage from the card. It is best to backup the footage on your computer before formatting your SD card (see Saving Recorded Footage). To format your SD card: SD Card Format Screen (Menu) to open the main Press menu.
-
Page 24: Event List And Playback
EVENT LIST AND PLAYBACK This menu option lists the recorded footage by date and then by time. Through the event list you can view your recorded footage. To access the event list: (Menu) to open the main menu. Press , scroll to Event List and press (OK). Using The event list will appear with the footage organized into dates (year/month/day). -
Page 25: System Setup
Once the footage has completed playing back it will automatically begin playing back the recorded footage listed after that. If there is no recorded footage afterwards it will return to the time list. (Exit). Each time you press (Exit) you will return to the previous To stop and exit the footage, press menu (stop footage, time list, date list, main menu, live viewing) until you are in the live view mode. -
Page 26: Software Version
Software Version To view device information: Press (Menu) to open the main menu. , scroll to System Setup and press (OK). Using Using , scroll to the information/question (?) mark icon. The screen displays the monitor information (receiver - RX) as well as the camera information (transmitter - TX). -
Page 27: Restore Factory Default
Restore Factory Default This system gives you the option to restore all the settings back to the factory default settings. When you restore the factory default settings all settings will be restored except the date and time settings. You will NOT lose any recorded footage when you restore the default settings. -
Page 28: Computer Viewing
COMPUTER VIEWING The removable optional SD card allows you to open, save and play recorded files from your UWG700 on your computer. All you need is a SD compatible card reader and Windows Media Player. To watch recorded footage on your computer:... -
Page 29: Solving Problems
Solving Problems If you have any trouble with your system, try these simple steps first. If you still have a question,visit the customer support page on our website; www.uniden.com.au for Australia or www.uniden.co.nz for New Zealand. If… Try.. Make sure all the connections are secure and properly connected... - Page 30 If… Try.. Make sure all the connections are set up properly and securely Make sure you are not pressing the ‘View’ button; the view button allows you to see No one can hear me and hear outside but prevents the outside from hearing you. outside but I can hear them.
- Page 31 Unstable or Weak Signal If the video seems to lag and or the audio sounds weak, the camera and the receiver do not have a strong, clear signal between them. There are several causes for a weak signal: Possible Cause Solution Adjust the antennas on the receiver and the camera.
- Page 32 Check near the camera for one of the common interference sources. Try moving the camera away from a suspected source, or try moving the suspected source so it’s not between the camera and the receiver. Try moving closer to the receiver. There is always more noise at the edges of the receiver’s range.
-
Page 33: Additional Information
Additional Information Product Specifications WIRELESS FREQUENCY Radio Frequency 2.400-2.485GHz Digital Modulation FHSS, GFSK Data rate 2 Mbps Service range 200M (Open Space) CAMERA Image sensor 1/4” color CMOS Outdoor use Resolution 640 X 480 Pixels Night Vision Automatic Number of IR LEDs and Range 9 PCS / 2 Meters IR LED control Viewing Angle... -
Page 34: One-Year Limited Warranty
Please refer to our Uniden website for any details or warranty durations offered in addition to those contained below. Warrantor The warrantor is either Uniden Australia Pty Limited ABN 58 001 865 498 (“Uniden Aust”) or Uniden New Zealand Limited (“Uniden NZ”) as the case may be. - Page 36 © 2011 Uniden Australia Pty Ltd/Uniden New Zealand Limited Printed in PRC...
Need help?
Do you have a question about the UWG700 and is the answer not in the manual?
Questions and answers