Table of Contents
Advertisement
Advertisement
Table of Contents

Related Manuals for Spectra Studehaker SB6052

Summary of Contents for Spectra Studehaker SB6052
-
Page 2: Important Safety Instructions
IMPORTANT SAFETY INSTRUCTIONS WARNING: TO REDUCE THE RISK OF FIRE OR ELECTRIC SHOCK, DO NOT EXPOSE THIS APPLIANCE TO RAIN OR MOISTURE. DANGEROUS HIGH VOLTAGES ARE PRESENT INSIDE THE ENCLOSURE. DO NOT OPEN THE CABINET REFER SERVICING TO QUALIFIED PERSONNEL ONLY. THE CAUTION MARKING IS LOCATED AT THE BACK OF THE UNIT THE RATING PLATE IS LOCATED AT THE BACK OF THE UNIT CAUTION:... - Page 3 6. CLEAN ONLY WITH A DRY CLOTH. 7. DO NOT BLOCK ANY OF THE VENTILATION OPENINGS. INSTALL IN ACCORDANCE WITH THE MANUFACTURER’S INSTRUCTIONS. 8. DO NOT INSTALL NEAR ANY HEAT SOURCES SUCH AS RADIATORS, HEAT REGISTERS, STOVES, OR OTHER APPARATUS (INCLUDING AMPLIFIERS) THAT PRODUCE HEAT. 9.
-
Page 4: Fcc Notice
FCC NOTICE THIS EQUIPMENT HAS BEEN TESTED AND FOUND TO COMPLY WITH THE LIMITS FOR A RADIO RECEIVER, PURSUANT TO PART 15 OF THE FCC RULES. THESE LIMITS ARE DESIGNED TO PROVIDE REASONABLE PROTECTION AGAINST HARMFUL INTERFERENCE IN A RESIDENTIAL INSTALLATION. -
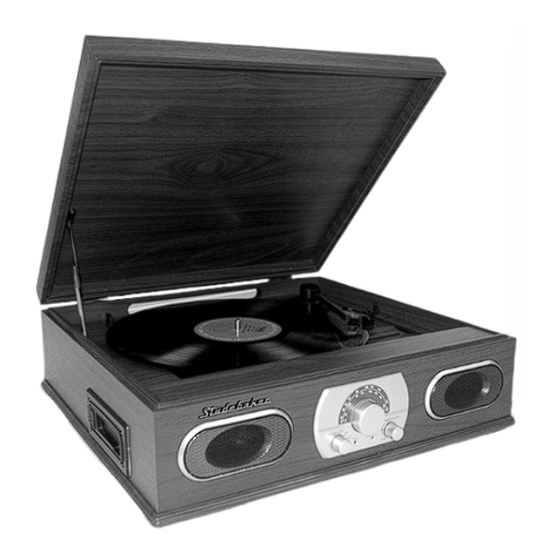
Page 5: Location Of Controls
1) DUST COVER 2) LEFT SPEAKER 3) DIAL SCALE 4) TUNING KNOB 5) FUNCTION SELECTOR (PHONO/TAPE/AM/ 6) FM STEREO INDICATOR 7) RIGHT SPEAKER 8) POWER ON/OFF AND VOLUME CONTROL 9) POWER LED INDICATOR 10) TAPE FORWARD/EJECT BUTTON 11) CASSETTE DOOR 12) 45 RPM ADAPTOR 13) 33/45/78 RPM SPEED SELECTOR 14) TONE ARM CLAMP... - Page 6 EXPERIENCE THIS DURING PLAYBACK, SET THE AUTO-STOP SWITCH (15) LOCATED ON THE BACK OF THE UNIT TO THE “OFF” POSITION. THE TURNTABLE WILL NOW RUN TO THE END OF THE RECORD BUT WILL NO LONGER STOP AUTOMATICALLY. TO STOP THE TURNTABLE YOU WILL NEED TO EITHER SET THE FUNCTION SELECTOR (5) TO ANOTHER POSITION OTHER THAN PHONO OR RETURN THE AUTO-STOP SWITCH (15) TO THE “ON”...
-
Page 7: Listening To Tape
LISTENING TO TAPE SET THE FUNCTION SELECTOR (5) TO “TAPE”. PLAYBACK LOAD CASSETTE TAPE INTO THE UNIT (LOCATED ON SIDE OF THE UNIT) PLAYBACK WILL AUTOMATICALLY BEGIN ADJUST THE VOLUME CONTROL (8) TO OBTAIN THE DESIRED SOUND LEVEL.. FAST FORWARD : PRESS BUTTON HALFWAY TO FAST FORWARD THE TAPE. -
Page 8: Stylus Replacement
STYLUS REPLACEMENT PLEASE REFER TO THE DIAGRAM BELOW TO REPLACE THE STYLUS. NO ADDITIONAL STYLUS IS SUPPLIED WITH THE SYSTEM. (1) Loosen the red part of stylus by screw driver and take out as diagram A and B. CARE AND MAINTENANCE CLEAN YOUR UNIT WITH A DAMP (NEVER WET) CLOTH. - Page 9 90 DAY LIMITED WARRANTY AND SERVICE SPECTRA MERCHANDISING INTERNATIONAL, INC. warrants this unit to be free from defective materials or factory workmanship for a period of 90 days from the date of original customer purchase and provided the product is utilized within the U.S.A. This warranty is not assignable or transferable. Our obligation under this warranty is the repair or replacement of the defective unit or any part thereof, except batteries, when it is returned to the SPECTRA Service Department, accompanied by proof of the date of original consumer purchase, such as a duplicate copy of a sales receipt.
Need help?
Do you have a question about the Studehaker SB6052 and is the answer not in the manual?
Questions and answers