Table of Contents
Advertisement
Advertisement
Table of Contents

Related Manuals for Audiovox KCD3180


Summary of Contents for Audiovox KCD3180
-
Page 2: Safety Precautions
SAFETY PRECAUTIONS WARNING: TO REDUCE THE RISK OF FIRE OR ELECTRIC SHOCK, DO NOT EXPOSE THIS APPLIANCE TO RAIN OR MOISTURE. CLASS 1 LASER PRODUCT APPAREIL À LASER DE CLASSE 1 PRODUCTO LASER DE CLASE 1 DO NOT EXPOSE THIS UNIT TO RAIN OR MOISTURE WARNING: SHOCK HAZARD - DO NOT OPEN AVIS: RISQUE DE CHOC ÉLECTRIQUE - NE PAS OUVRIR This... - Page 3 SAFETY PRECAUTIONS FCC Information (FOR USERS IN USA) This equipment has been tested and found to comply with the limits for a Class B digital device, pursuant to Part 15 of the FCC Rules. These limits are designed to provide reasonable protection against harmful interference in a residential installation.
-
Page 4: Important Safety Instructions
IMPORTANT SAFETY INSTRUCTIONS 1. This portable luminaire has a polarized plug (one blade is wider than the other) as a feature to reduce the risk of electric shock. This plug will fit in a polarized outlet only one way, if the plug does not fit, contact a qualified electrician. Never use with an extension cord unless plug can be fully inserted. -
Page 5: Table Of Contents
TABLE OF CONTENTS SAFETY PRECAUTIONS...................1-2 IMPORTANT SAFETY INSTRUCTIONS................3 TABLE OF CONTENTS......................4 PACKAGE CONTENTS....................5 MOUNTING INSTRUCTIONS...................6-8 FRONT PANEL CONTROLS....................9 REMOTE CONTROL....................9-10 USING THE COUNTERTOP LIGHT................11 SETTING THE CLOCK....................12 CD PLAYBACK......................12-13 CD REPEAT PLAYBACK....................13 CD PROGRAMMABLE PLAYBACK................14 LISTENING TO THE RADIO...................15 SETTING THE COOKING TIMER..................16 DISPLAY FUNCTION......................16 TROUBLESHOOTING,CARE &... -
Page 6: Package Contents
PACKAGE CONTENTS E. (4) - .57" (14.4mm) spacers A. (1) - Main Unit PLEASE READ MOUNTING INSTRUCTIONS Drill Here IN USER MANUAL BEFORE INSTALLING UNIT. Drill Here Taladre aquí Taladre aquí ANTES DE INSTALAR LA UNIDAD, POR FAVOR F. (4) - .32" (8.2mm) spacers LEA LAS INSTRUCCIONES DE MONTAJE QUE APARECEN EN EL MANUAL DEL USUARIO. -
Page 7: Mounting Instructions
MOUNTING INSTRUCTIONS STEP 1 STEP 2 If your cabinet does NOT have an Use an electric drill with a ¼” drill bit (not overhang: included) to drill all four holes marked on the Mounting Template (see Figure 3). To a) Place the Mounting Template in the reduce splintering, please a small piece of desired location inside or underneath masking tape over each hole location... - Page 8 MOUNTING INSTRUCTIONS (Continued from previous page) c) Hold the unit up against the bottom of the cabinet, and align the four holes on the top of the unit with the screws. Remove one side of the protective Partially tighten each screw, but do tab and tape to the holes.
-
Page 9: Mounting Instructions
MOUNTING INSTRUCTIONS g) Gently tighten each screw until they (Continued from previous page) are firmly holding the unit in place. The top front edge of the unit should clear Cabinet the overhang. Go to STEP4. Bottom STEP 4 Cabinet Spacers Overhang Plug the cord into the wall outlet a) Before connecting power cord, make... -
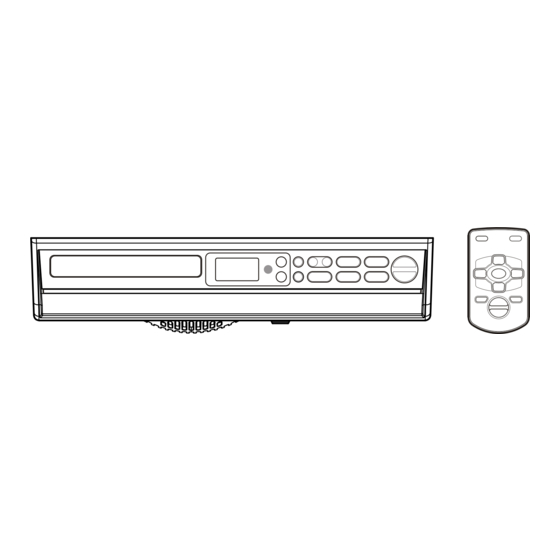
Page 10: Front Panel Controls
FRONT PANEL CONTROLS 3 4 5 6 7 8 1. CD Drawer PLAY/PAUSE button 2. LCD Display 10. VOLUME+/- button 3. Remote Control Sensor STOP/BAND button 4. POWER (ON/STANDBY) button 12. TUNING · SKIP/TIMER - button 5. REPEAT/PRESET button 13. CD · RADIO FUNCTION button 6. -
Page 11: Remote Control
REMOTE CONTROL USING THE REMOTE CONTROL CORRECTLY • Point the Remote Control at the REMOTE SENSOR located on the unit. • When there is a strong ambient light source, the performance of the infrared REMOTE may be degraded, causing unreliable operation. •... -
Page 12: Using The Countertop Light
USING THE COUNTERTOP LIGHT The countertop light and its ON/OFF switch are located on the bottom of the unit. 1. Turning on the light. LIGHT LIGHT • Slide the LIGHT switch to ON. 2. Turning off the light. • Slide the LIGHT switch to OFF. Replacing the light bulb 1. -
Page 13: Setting The Clock
SETTING THE CLOCK The unit must be in standby mode. To enter standby mode, make sure that the unit is plugged in, but not turned on. 3. Press the TUNING • SKIP/TIMER + 1. Press the CLOCK SET/MEMORY button until the TIME blinks. button to set current minutes. -
Page 14: Cd Playback
CD PLAYBACK To PAUSE Playback • Press the PLAY/PAUSE button. The " " indicator blinks. • To resume playback, press the PLAY/PAUSE button again. To STOP Playback • Press STOP/BAND button. To SKIP to a Different Track • To SKIP to the beginning of the CURRENT track, press the TUNING • SKIP/TIMER- button once. -
Page 15: Cd Programmable Playback
CD PROGRAMMABLE PLAYBACK A program of up to 20 tracks can be programmed to play in a preset order. 1. When the unit is ON and in the CD 3. Press the CLOCK SET/MEMORY MODE, make sure the CD is STOPPED. button to store the track in Press the CLOCK SET/MEMORY memory. -
Page 16: Listening To The Radio
LISTENING TO THE RADIO TUNING IN TO A STATION MANUALLY . Press the POWER button to turn on the To Quickly Search for a Station unit. Press and hold the TUNING • SKIP/ 2. Press the CD · RADIO FUNCTION TIMER +/- button until the tuner starts button until TUNER is displayed. -
Page 17: Setting The Cooking Timer
SETTING THE COOKING TIMER 1. Press the TIMER/ON/OFF • SET 3. When the preset time elapses, the button. The “TIMER” indicator and “00” ALARM will sound and the "TIMER" appear in the display. will blink. TIMER TIMER 2. Press the TUNING • SKIP/TIMER +/- 4. -
Page 18: Troubleshooting,Care & Maintenance
TROUBLESHOOTING, CARE & MAINTENANCE If you continue having problems after trying these troubleshooting tips, please visit http://www.1800customersupport.com. REMOTE CONTROL CLOCK DOES NOT SHOW CORRECT TIME: • Is the unit plugged into a working power • There was a power outage, set the outlet? clock again as described in "SETTING Try plugging it into one that you know... - Page 19 Printed in China 811-318091-010 - 18 -...
Need help?
Do you have a question about the KCD3180 and is the answer not in the manual?
Questions and answers