Table of Contents
Advertisement
Available languages
Available languages
BM 1619929E58 07-12_BM 1619929E58 07-12 8/1/12 8:02 AM Page 1
IMPORTANT:
Read Before Using
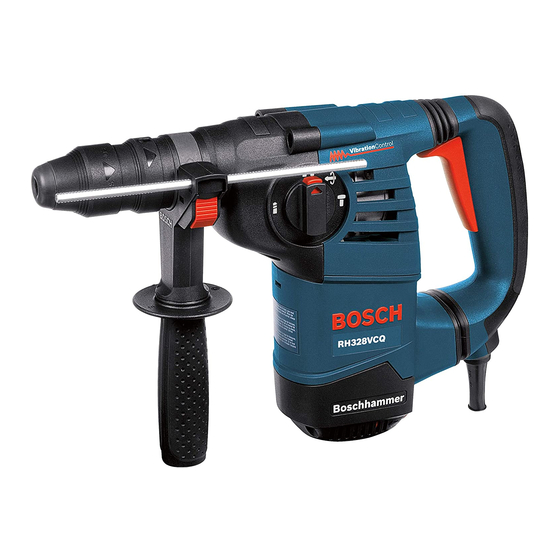
RH328VC
RH328VCQ
Call Toll Free for
Consumer Information
& Service Locations
1-877-BOSCH99 (1-877-267-2499) www.boschtools.com
For English Version
See page 2
IMPORTANT :
Lire avant usage
Operating/Safety Instructions
Consignes de fonctionnement/sécurité
Instrucciones de funcionamiento y seguridad
Pour obtenir des informations
et les adresses de nos centres
de service après-vente,
appelez ce numéro gratuit
Version française
Voir page 14
IMPORTANTE:
Leer antes de usar
Llame gratis para
obtener información
para el consumidor y
ubicaciones de servicio
Versión en español
Ver la página 26
Advertisement
Table of Contents

Related Manuals for Bosch RH328VCQ


Summary of Contents for Bosch RH328VCQ
- Page 1 Lire avant usage Leer antes de usar Operating/Safety Instructions Consignes de fonctionnement/sécurité Instrucciones de funcionamiento y seguridad RH328VC RH328VCQ Call Toll Free for Pour obtenir des informations Llame gratis para Consumer Information et les adresses de nos centres obtener información &...
-
Page 2: General Power Tool Safety Warnings
BM 1619929E58 07-12_BM 1619929E58 07-12 8/1/12 8:02 AM Page 2 General Power Tool Safety Warnings Read all safety warnings and all instructions. Failure to follow the warnings WARNING and instructions may result in electric shock, fire and/or serious injury. SAVE ALL WARNINGS AND INSTRUCTIONS FOR FUTURE REFERENCE The term “power tool”... - Page 3 BM 1619929E58 07-12_BM 1619929E58 07-12 8/1/12 8:02 AM Page 3 Disconnect the plug from the power source Keep cutting tools sharp and clean. Properly and/or the battery pack from the power tool maintained cutting tools with sharp cutting before making any adjustments, changing edges are less likely to bind and are easier to accessories, or storing power tools.
-
Page 4: Additional Safety Warnings
GFCI and personal protection devices like Risk of injury to user. The power cord must only electrician’s rubber gloves and footwear will be serviced by a Bosch Factory Service Center further enhance your personal safety. or Authorized Bosch Service Station. - Page 5 BM 1619929E58 07-12_BM 1619929E58 07-12 8/1/12 8:02 AM Page 5 Symbols IMPORTANT: Some of the following symbols may be used on your tool. Please study them and learn their meaning. Proper interpretation of these symbols will allow you to operate the tool better and safer.
- Page 6 BM 1619929E58 07-12_BM 1619929E58 07-12 8/1/12 8:02 AM Page 6 Symbols (continued) IMPORTANT: Some of the following symbols may be used on your tool. Please study them and learn their meaning. Proper interpretation of these symbols will allow you to operate the tool better and safer.
-
Page 7: Functional Description And Specifications
AUXILIARY HANDLE HAND GRIP LOCKING RING ® SDS-plus QUICK CHANGE CHUCK (Model RH328VCQ only) Model number RH328VC & RH328VCQ Maximum Capacities: ® Shank style SDS-plus Carbide tipped bits 1-1/8" Thin wall core bits 3-1/4" NOTE: For tool specifications refer to the nameplate on your tool. - Page 8 ® ATTACHING SDS-plus ment chuck has the proper number of QUICK CHANGE CHUCK identification grooves. (Model RH328VCQ only) ® REMOVING THE SDS-plus Before attaching the chuck apply a light coat of QUICK CHANGE CHUCK grease to end of the shank.
- Page 9 BM 1619929E58 07-12_BM 1619929E58 07-12 8/1/12 8:02 AM Page 9 ATTACHING THE 3-JAW CHUCK Do not carry the tool by the WARNING (Model RH328VCQ only) chuck. Tool may unexpectedly (Not included, available as accessory) fall if the chuck is not fully engaged.
-
Page 10: Auxiliary Handle
BM 1619929E58 07-12_BM 1619929E58 07-12 8/1/12 8:02 AM Page 10 FIG. 9 AUxILIARy HANDLE The tool must be supported with the auxiliary handle, which can be swiveled 360˚. To reposition and/or swivel the handle, loosen the hand grip, move the handle to the desired position along the barrel and securely retighten the hand grip (Fig. - Page 11 3 JAW CHUCK The 3 Jaw Chuck can convert your tool for The high efficiency available from the BOSCH use with straight shank bits. Rotary Hammer can only be obtained if sharp and undamaged drilling tools are used. Note...
-
Page 12: Drilling Metal
BM 1619929E58 07-12_BM 1619929E58 07-12 8/1/12 8:02 AM Page 12 hammer. Too little pressure will keep the bit wood to avoid splintering. Complete the hole from cutting and cause excess friction by from the opposite side immediately after the sliding over the surface. This can be point breaks through. -
Page 13: Tool Lubrication
Bosch Factory Service Center or Autho- rized Bosch Service Station. Cleaning To avoid accidents always TOOL LUBRICATION WARNING... - Page 14 BM 1619929E58 07-12_BM 1619929E58 07-12 8/1/12 8:02 AM Page 14 Avertissements généraux concernant la sécurité des outils électroportatifs Veuillez lire tous les avertissements et toutes les consignes de sécurité. Si l'on AVERTISSEMENT n'observe pas ces avertissements et ces consignes de sécurité, il existe un risque de choc électrique, d'incendie et/ou de blessures corporelles graves.
- Page 15 BM 1619929E58 07-12_BM 1619929E58 07-12 8/1/12 8:02 AM Page 15 Utilisation et entretien des outils Entretenez les outils électroportatifs. Vérifiez que les pièces mobiles sont alignées correctement et ne électroportatifs coincent pas. Vérifiez qu’il n’y a pas de pièces Ne forcez pas sur l’outil électroportatif. Utilisez l’outil cassées ou d’autre circonstance qui risquent électroportatif qui convient à...
- Page 16 Avertissements supplémentaires concernant la sécurité L’emploi d’un GFCI et de dispositifs de protection Centre de service usine de Bosch ou par une Station personnelle tels que gants et chaussures d’électricien en service agréée de Bosch. caoutchouc améliorent votre sécurité personnelle.
- Page 17 BM 1619929E58 07-12_BM 1619929E58 07-12 8/1/12 8:02 AM Page 17 Symboles IMPORTANT : Certains des symboles suivants peuvent être utilisés sur votre outil. Veuillez les étudier et apprendre leur signification. Une interprétation appropriée de ces symboles vous permettra d'utiliser l'outil de façon plus efficace et plus sûre.
- Page 18 BM 1619929E58 07-12_BM 1619929E58 07-12 8/1/12 8:02 AM Page 18 Symboles (suite) IMPORTANT : Certains des symboles suivants peuvent être utilisés sur votre outil. Veuillez les étudier et apprendre leur signification. Une interprétation appropriée de ces symboles vous permettra d'utiliser l'outil de façon plus efficace et plus sûre.
-
Page 19: Description Fonctionnelle Et Spécifications
MARCHE POIGNEE AUXILIAIRE POIGNEE (PRISE) BAGUE DE VERROUILLAGE ® SDS-plus MANDRIN À CHANGEMENT RAPIDE (modèle RH328VCQ seulement) Numéro de modèle RH328VC et RH328VCQ Capacités maximales : ® Type de tige SDS-plus Mèches à pointe au carbure 29 mm Mèches creuses à paroi mince 83 mm REMARQUE : Pour spécifications de l'outil, reportez-vous à... - Page 20 MONTAGE DU MANDRIN À CHANGEMENT toujours que le mandrin de remplacement a le nombre ® RAPIDE SDS-plus approprié de rainures d'identification. (modèle RH328VCQ seulement) RETRAIT DU MANDRIN À CHANGEMENT Avant de monter le mandrin, appliquez une légère ® RAPIDE SDS-plus couche de graisse à...
- Page 21 BM 1619929E58 07-12_BM 1619929E58 07-12 8/1/12 8:02 AM Page 21 Ne portez pas l’outil par le MONTAGE DU MANDRIN À 3 MORS AVERTISSEMENT (modèle RH328VCQ seulement) mandrin car il risque de (Non fourni, disponible à titre d’accessoire) tomber de manière inattendue si le mandrin n’est pas Agrippez le mandrin à...
-
Page 22: Consignes De Fonctionnement
BM 1619929E58 07-12_BM 1619929E58 07-12 8/1/12 8:02 AM Page 22 POIGNEE AUXILIAIRE FIG. 9 La poignée auxiliaire, qui pivote sur 360°, doit être utilisée pour supporter l’outil. Pour repositionner et/ou faire pivoter la poignée, desserrez la manette, déplacez la poignée à la position désiré le long du cylindre, puis resserrez fermenment la manette (Fig. - Page 23 Vous ne bénéficierez du rendement maximal du poser sur la surface à percer AVANT d’appuyer sur la marteau rotatif Bosch que si vous utilisez l’équipement gâchette. Pendant le perçage, tenez fermement le de forage bien affûté et en bon état. Sachez que les marteau en exerçant une pression modérée et...
- Page 24 BM 1619929E58 07-12_BM 1619929E58 07-12 8/1/12 8:02 AM Page 24 Il faudrait essuyer à fond la tige des forets PERÇAGE DANS LE MÉTAL immédiatement avant et après l’usage. Pratiquez un trou central au poinçon dans le matériau pour faciliter l’approche. Utilisez suffisamment de POUR VOTRE SECURITE, SOUVENEZ-VOUS: pression pour que le foret continue à...
-
Page 25: Entretien
BM 1619929E58 07-12_BM 1619929E58 07-12 8/1/12 8:02 AM Page 25 Entretien de faire remplacer les paliers par un centre de service Service d’usine Bosch ou une station service agréée Bosch. Si Tout entretien préventif AVERTISSEMENT les paliers commencent à faire du bruit (à cause de effectué... - Page 26 BM 1619929E58 07-12_BM 1619929E58 07-12 8/1/12 8:02 AM Page 26 Advertencias generales de seguridad para herramientas mecánicas Lea todas las advertencias de seguridad y todas las instrucciones. Si no se siguen las ADVERTENCIA advertencias e instrucciones, el resultado podría ser sacudidas eléctricas, incendio y/o lesiones graves. GUARDE TODAS LAS ADVERTENCIAS E INSTRUCCIONES PARA REFERENCIA FUTURA La expresión “herramienta mecánica”...
- Page 27 BM 1619929E58 07-12_BM 1619929E58 07-12 8/1/12 8:02 AM Page 27 Uso y cuidado de las herramientas hay piezas rotas y si existe cualquier otra situación que podría afectar el funcionamiento de la mecánicas herramienta mecánica. Si la herramienta mecánica No fuerce la herramienta mecánica. Use la está...
-
Page 28: Advertencias De Seguridad Adicionales
No use herramientas mecánicas con capacidad debe recibir servicio de ajustes y reparaciones nominal solamente para CA con una fuente de solamente por un Centro de Servicio de Fábrica Bosch o energía de CC. Aunque pueda parecer que la una Estación de Servicio Bosch Autorizada. - Page 29 BM 1619929E58 07-12_BM 1619929E58 07-12 8/1/12 8:02 AM Page 29 Símbolos IMPORTANTE: Es posible que algunos de los símbolos siguientes se usen en su herramienta. Por favor, estúdielos y aprenda su significado. La interpretación adecuada de estos símbolos le permitirá utilizar la herramienta mejor y con más seguridad.
- Page 30 BM 1619929E58 07-12_BM 1619929E58 07-12 8/1/12 8:02 AM Page 30 Símbolos (continuación) IMPORTANTE: Es posible que algunos de los símbolos siguientes se usen en su herramienta. Por favor, estúdielos y aprenda su significado. La interpretación adecuada de estos símbolos le permitirá utilizar la herramienta mejor y con más seguridad.
-
Page 31: Descripción Funcional Y Especificaciones
EMPUNADURA ANILLO DE FIJACIÓN MANDRIL DE CAMBIO ® RÁPIDO SDS-plus (modelo RH328VCQ solamente) Número de modelo RH328VC y RH328VCQ Brocas con punta de carburo 29 mm ® Estilo de cuerpo SDS-plus Brocas para de pared delgada 83 mm Capacidad máxima: NOTA: Para obtener las especificaciones de la herramienta, consulte la placa del fabricante colocada en la herramienta. - Page 32 INSTALACIÓN DEL MANDRIL DE CAMBIO de repuesto tenga el número apropiado de ranuras de ® RÁPIDO SDS-plus identificación. (modelo RH328VCQ solamente) REMOCIÓN DEL MANDRIL DE CAMBIO Antes de instalar el mandril, aplique una capa ligera de ® RÁPIDO SDS-plus grasa al extremo del vástago.
- Page 33 BM 1619929E58 07-12_BM 1619929E58 07-12 8/1/12 8:02 AM Page 33 CAMBIO DEL MANDRIL INSTALACIÓN DEL MANDRIL DE 3 MORDAZAS No transporte la herramienta agarrándola por el mandril. (modelo RH328VCQ solamente) La herramienta podría caerse inesperadamente si el (No incluida, disponible como accesorio) mandril no está completamente acoplado.
-
Page 34: Instrucciones De Funcionamiento
BM 1619929E58 07-12_BM 1619929E58 07-12 8/1/12 8:02 AM Page 34 MANGO AUXILIAR FIG. 9 La herramienta se debe sujetar con el mango auxiliar, el cual se puede girar 360°. Para reposicionar y/o hacer girar el mango, afloje la empuñadura, mueva el mango hasta la posición deseada a lo largo del cuerpo cilíndrico y vuelva a apretar firmemente la empuñadura (Fig. - Page 35 La alta eficacia que proporciona el martillo giratorio Usted prolongará la vida de las brocas y realizará un BOSCH sólo se puede obtener si se utilizan trabajo mejor ejecutado si siempre pone la broca en herramientas de taladrado afiladas y sin daños.
- Page 36 BM 1619929E58 07-12_BM 1619929E58 07-12 8/1/12 8:02 AM Page 36 El cuerpo de todas las brocas para taladro se debe TALADRADO DE METAL limpiar antes de la utilización de éstas e inmediatamente Realice una punzonadura para marcar en el material a después de quitarlas.
-
Page 37: Mantenimiento
ADVERTENCIA rodamientos deben cambiarse en un Centro de servicio realizado por personal no de fábrica Bosch o en una Estación de servicio Bosch autorizado pude dar lugar a la colocación incorrecta autorizada. Los rodamientos que se vuelven ruidosos de cables y componentes internos que podría (debido a la carga pesada o al corte de materiales muy constituir un peligro serio. - Page 38 BM 1619929E58 07-12_BM 1619929E58 07-12 8/1/12 8:02 AM Page 38 Notes: -38-...
- Page 39 BM 1619929E58 07-12_BM 1619929E58 07-12 8/1/12 8:02 AM Page 39 Remarques : Notas: -39-...
- Page 40 Robert Bosch Tool Corporation ("el Vendedor") garantiza, únicamente al comprador original, que todas las herramientas mecánicas portátiles y para tablero de banco BOSCH estarán libres de defectos de material o de fabricación durante un período de un año a partir de la fecha de compra.
Need help?
Do you have a question about the RH328VCQ and is the answer not in the manual?
Questions and answers