Table of Contents
Advertisement
Simon
Installation Instructions
Simon® Basic : 2
Panic Code 12
Opener Module* 24
Panel 25
Panel 25
®
Security System
Document No. 466-1574
Rev F Dated February 2003
Table of Contents
Numbers* 28
trols* 28
35
Panel Tamper 35
Typical Backup Battery Life of the 9 Volt Ul-
traLife 38
Notices 39
Index 41
Quick Reference Guide (Back Page)
Attachment: 466-1622, Booklet of Installa-
tion Instructions for SAW Sensors
1
Advertisement
Table of Contents

Subscribe to Our Youtube Channel
Related Manuals for Simon Simon


Summary of Contents for Simon Simon
-
Page 1: Table Of Contents
Security System Installation Instructions Document No. 466-1574 Rev F Dated February 2003 Table of Contents Simon® Basic : 2 Programming Overview 26 Special Installation Requirements 3 Programming Sensors 27 Programming the House Code and Unit Requirements for UL-Listed Installations 3... -
Page 2: Simon® Basic
Chime Special Motion Wall Switch Modules (13-397) Light Control Touchtalk 2-Way RF Touchpad (60-788-95R) Wireless Sirens Supervised Wireless Siren SWS (60-736-95) Options not for Use with Simon ® Basic Option 33: 2-Way Voice Option 36: Sensor Activated Light Lockout Start Time... -
Page 3: Special Installation Requirements
Installation Instructions Document No. 466-1574 Special Installation Require- Residential Fire Alarm System Unit (UL 985) ments Basic system above, plus: • System Sensor Smoke Sensor (60-506-95) This security system can be used as a fire warning Canada Listings (pending) system, an intrusion alarm system, an emergency no- tification system, or any combination of the three. -
Page 4: Introduction
Note: Both ITI SAW and Crystal sensors function with this Two configurations of the Simon Control Panel are Control Panel. available. One has an on-board 2-way voice micro- You may use any of these modules: phone, the other does not. - Page 5 Installation Instructions Document No. 466-1574 Door/Window Sensor family rooms, and hallways are candidates for Indoor Motion Sensors. Indoor Motion Sensors are not suit- For intrusion protection, install Door/Window sen- able for rooms where pets can enter. Indoor motion sors on all ground-floor doors and windows. At a min- sensors can also be used to sound chimes, but cannot imum, install them in the following locations: be used for intrusion protection and as a chime sensor...
- Page 6 Installation Instructions Document No. 466-1574 ® ITI HomeLink Transceiver (IHT) Carbon Monoxide (CO) Alarm The ITI HomeLink Transceiver is a radio transmitter/ The Learn Mode CO Alarm (#60-652-95) alerts users receiver designed to receive signals from the Prince to hazardous levels of carbon monoxide gas. If dan- Universal Transmitter (HomeLink), then retransmit gerous concentrations of gas are present, the CO the signals to a security system panel, allowing the...
-
Page 7: Planning Sensor Types & Locations
Installation Instructions Document No. 466-1574 Planning Sensor Types & Locations will be adding. You’ll need to understand the applica- tion for each sensor. For example, KeyChain Touch- pads are typically programmed as sensor type 01 (Portable panic), used to send an intrusion alarm to a The first step to an easy and successful installation is central monitoring station. - Page 8 Installation Instructions Document No. 466-1574 Sensor/Device Location Planning Table Table 1 Locations in order as communicated by Control Panel when adding sensors, except that Remote Locations are not used by the Control Panel, but only used here for planning purposes. Sensor/Device Name (use Table 2 on page 6 &...
- Page 9 Installation Instructions Document No. 466-1574 Table 3 Sensor Type Characteristics Rest Super Active in Name/Application Siren Type oral visory Levels Fixed Panic: 24 hour audible fixed emergency button Intrusion 1234 Intrusion 1234 Portable Panic: 24 hour audible portable emergency buttons Fixed Panic: 24 hour silent fixed emergency buttons.
-
Page 10: Planning Control Locations
Installation Instructions Document No. 466-1574 Planning Control Locations code. The numbered dial sets the unit number. The unit number tells the system which device you want to control. Each unit number should be different (unless Control Panel you want specific lights or appliances to be activated Locate the Control Panel so that the alarm sounds can together). - Page 11 Installation Instructions Document No. 466-1574 Use the following three tables to help you further plan module installation. Table 4 Unit Number Assignments* Unit Number Result (1 through 16) Used for sensor-activated, time-activated, and entry/exit delay lights. Sensor-activated lights are enabled and disabled pressing the LIGHTS Sensor Activated button on the Control Panel.
-
Page 12: Planning System Access Codes
Installation Instructions Document No. 466-1574 Planning System Access Codes The Panic Code is able to disarm or subdisarm the panel and send a silent alarm to the Central Station. There will be no indication of an alarm at the panel. Use the following to plan system Access Codes. - Page 13 Installation Instructions Document No. 466-1574 Table 8 Panel Piezo Beeps Activity Beep Response ARM Doors & Win- Exit delay beeps sound 2 times when you arm and 2 times at the end of the delay time; dows Entry delay beeps sound 2 times every 5 seconds and 2 times per second during the last 10 seconds ARM Motion Sensors Exit delay beeps sound 3 times when you arm and 3 times at the end of the delay time;...
- Page 14 Installation Instructions Document No. 466-1574 Option 09: DL Code (Downloader Code) Add programs the downloader access code. The Table 9 Phone Mod 1 Downloader Code is used during Control Panel pro- Enter # Reports Format gramming with the ITI ToolBox. The Control Panel’s downloader code must match the downloader access Contact ID code in the ITI ToolBox account in order to program...
- Page 15 Installation Instructions Document No. 466-1574 Option 15: No Activity Option 19: Supervisory Time (SUPSYNC) Add enables the no activity time-out. Program the no Add sets the supervisory time. Program the time in activity time-out in hours. The range is 02-24 hours (2 hours.
- Page 16 Installation Instructions Document No. 466-1574 Option 24: AC Power Failure again. 3. The Control Panel should answer on the first Add enables AC power failure reports. The panel ring. LEDs will shut off and an AC power failure report will be sent to the central station if the Control Panel Program # 2 - Repeat steps 1 &...
- Page 17 Installation Instructions Document No. 466-1574 Delete disables the Control Panel’s piezo from sound- alarm, pick up the CS phone. ing alarms. Alarms will not sound from the Control 2. Press the * button on the phone to start the audio Panel.
- Page 18 Installation Instructions Document No. 466-1574 Option 37: Sensor Activated Light Lockout Stop • There is sensor trouble. Time* • There is a fail to communicate problem. • The no activity timer has timed out. Trouble Add enables sensor activated light lockout stop time. beeps will continue for 5 minutes and if the panel The panel will not turn on a light, between the pro- does not see activity, the trouble beeps will stop...
- Page 19 Installation Instructions Document No. 466-1574 Option 43: Pager Phone Number Option 45: Sensor Alarm Restoral Add enables pager phone number. Program the pager Add enables sensor alarm restoral. This sends a report phone number. The phone number can only call a to the central station when a restoral sensor that is in pager.
-
Page 20: Reset Memory To The Factory Defaults
Installation Instructions Document No. 466-1574 Option 51: 24 Hour Battery Test Add sets battery test period to 24 hours. This feature is only useful when using a non-rechargeable Ultra- Life 9V lithium battery because it extends battery life. Delete sets battery test period to 4 hours. Option 52: High Level Status Add sets status beeps and arming level beeps to high volume. -
Page 21: Programmable Options
Installation Instructions Document No. 466-1574 Programmable Options Table 18 Who Can Change: U1 - Utility Installer Function Default Delete Range Access Code 1; Settings U2 - Utility Access Code 2; M - Master; Panel Piezo Beeps On/Off U1 U2 M Panel Voice On/Off U1 U2 M... - Page 22 Installation Instructions Document No. 466-1574 Programmable Options Table 18 Who Can Change: U1 - Utility Installer Function Default Delete Range Access Code 1; Settings U2 - Utility Access Code 2; M - Master; No Delay from KeyChain Touchpad On/Off U1 U2 Panel Piezo Alarm On/Off U1 U2...
-
Page 23: Wiring The Control Panel
Installation Instructions Document No. 466-1574 Wiring the Control Panel Connecting a Hardwire Exterior Siren The following ITI exterior siren may be used with this This section describes how to: Control Panel: • connect hardwire interior and exterior sirens (if being installed) •... -
Page 24: Connecting The Universal/Garage Door Opener Module
Installation Instructions Document No. 466-1574 HARDWIRE INPUTS/SIREN HARDWIRE INPUTS/SIREN All inputs are Class II Hardwire Hardwire Hardwire Hardwire power-limited circuits. Input 1 Hardwire Input 2 Input 1 Hardwire Input 2 AC POWER Exterior Interior Power Exterior Power Interior Siren Common Siren 9 VAC –... -
Page 25: Installing A Rechargeable Battery
Installation Instructions Document No. 466-1574 Installing a Rechargeable Battery Installing an RJ-31X Jack Plug the AC power transformer into an unswitched Install and wire the RJ-31X jack as shown in Figure 8. outlet. TO PANEL Connect the rechargeable battery (#34-051 or #34- PHONE CORD JACK LABELED 'TO LINE'... -
Page 26: Programming Overview
Installation Instructions Document No. 466-1574 Programming Overview To get you started: These instructions tell you how to set up for program- 1. Press Add or Delete from the Start Menu. ming and to put the Control Panel in program mode. 2. -
Page 27: Programming Sensors
Installation Instructions Document No. 466-1574 Programming Sensors The Control Panel uses an ascending numbering se- quence (beginning with 1) when adding (learning) sensors. You may override the system suggested sen- sor number by using the red numbered keys. These instructions show you how to program sensors, touchpads and other system devices into the Control Use Table 1 on page 5, which was filled out during the Panel. -
Page 28: Programming The House Code And Unit Numbers
Installation Instructions Document No. 466-1574 Programming Light and Appliance To delete sensors: 1. Press Delete from the Start menu. Controls* 2. Press Sensor/Remote from the Main menu until you hear the name you want to delete. 3. Press DONE. The system confirms the item you Use Table 6 on page 9, which was filled out during the removed. -
Page 29: Programming Options
Installation Instructions Document No. 466-1574 your programming. 2. Press Option # and 04, 05, or 06. 3. Enter a phone number with the red numbered To delete a sensor-activated light: keys. Press Test to enter a pause in the phone 1. -
Page 30: Programming System Access Codes
Installation Instructions Document No. 466-1574 phone test (3 digits must be entered). 3. Enter the minutes (2 digits must be entered). To set system option 17: To set system option 43: 1. Press Add from the Start menu. 1. Press Add from the Start menu. 2. -
Page 31: Installing The System
Installation Instructions Document No. 466-1574 To delete a code: Table 20 Arming Levels 1. Press Delete from the Start menu. Arming 2. Press the Access Code button. Continue pressing Description of Level Level the Access Code button until you hear the access code to be deleted. -
Page 32: Sensor Installation
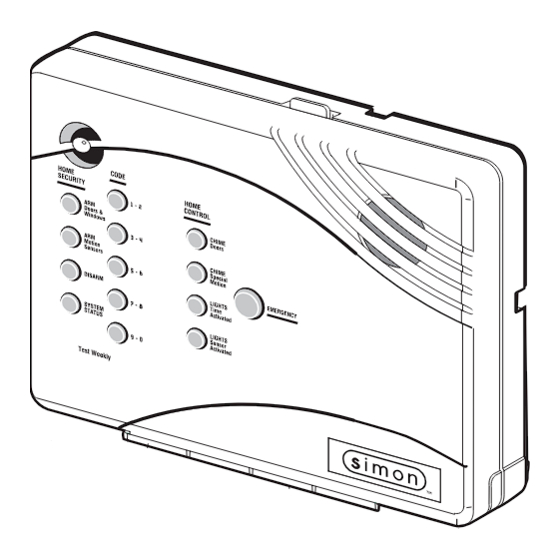
Installation Instructions Document No. 466-1574 • Screwdriver Windows, and Motion Sensors when also enter- ing the appropriate access code. To mount the panel: • SYSTEM STATUS-Press to determine system 1. Choose a spot within a few feet of an electrical status and system time. -
Page 33: Sensor Tripping Instructions
Installation Instructions Document No. 466-1574 Sensor Tripping Instructions: gramming is completed and whenever a sensor-relat- ed problem occurs. Sensor Do This Note: While the sensor test is a valuable installation and Rate-of-Rise Heat Rub your hands together until service tool, it only tests sensor operation for the current Detector warm, then place one hand on conditions. -
Page 34: If A Sensor Fails The Sensor Test
Installation Instructions Document No. 466-1574 To replace a sensor: 1. Test a known good sensor at the same location. Table 21 Minimum Transmission Beeps 2. If the transmission beeps remain below the mini- mum level, avoid mounting a sensor at that loca- Number of Type of Sensor Beeps... -
Page 35: Testing The X-10 Lamp Modules
Installation Instructions Document No. 466-1574 To test communication with the central station: 1. Call the central station and tell the operator that Table 22 Alarm Siren and X-10 Light you will be testing the system. Information 2. Arm the system. 3. -
Page 36: Troubleshooting
Installation Instructions Document No. 466-1574 Troubleshooting Use the following table to aid you with troubleshooting problems during installation. Table 23 Troubleshooting Guide Problem Solution SYSTEM STATUS How to clear SYSTEM STATUS (Alarm Memory) From a disarmed state press SYSTEM STATUS twice, listen to the status message, then press DISARM. - Page 37 Installation Instructions Document No. 466-1574 Table 23 Troubleshooting Guide Problem Solution Door or window is closed, but the Control Panel voice • Be certain the arrow on the magnet and the guide line on the says it is open. transmitter are aligned and are within 1/4’ of each other. •...
-
Page 38: Tralife
Installation Instructions Document No. 466-1574 Typical Backup Battery Life of the 9 Volt UltraLife Table 24 Typical Backup Battery Life Cycle Over Time Estimated Hours of The following table and chart demonstrate backup Months in Use Backup Power battery life over time if the battery is tested every 4 hours (option 50 is off). -
Page 39: Notices
FCC Notices FCC Part 15 Information to the User Changes or modifications not expressly approved by GE Interlogix can void the user’s authority to operate the equipment. FCC Part 15 Class B This equipment has been tested and found to comply with the limits for a Class B digital device, pursuant to part 15 of the FCC Rules. These limits are designed to provide reasonable protection against interference in a residential installation. - Page 40 Installation Instructions Document No. 466-1574 Canada Notice The Canadian Department of Communications label identifies certified equipment. This certification means that the equipment meets certain telecommunica- tions network protective, operational, and safety requirements. The department does not guarantee the equipment will operate to the user’s satisfaction. Before installing this equipment, users should ensure that it is permissible to be connected to the facilities of the local telecommunications company.
-
Page 41: Index
Installation Instructions Document No. 466-1574 Numerics Battery Pack, Nickel Metal Hydride 3 24 Hour Battery Test 22 battery test 24 2-Way Voice 17 2-way voice, on-board 4 Carbon Monoxide (CO) Alarm 4, 6 300 Baud Central Station Communications 17, CHIME Doors 18, 32 CHIME Special Motion 18, 32 319.5 Sensors 4 Chime Voice 18, 22... - Page 42 Installation Instructions Document No. 466-1574 Force Arm 15 Motion Sensor, Indoor 5 Forced Armed Report 21 Motion Sensor, Indoor/Outdoor 4 Freeze Sensor 4, 8 Motion Sensor, Outdoor 5 mount the panel 32 Garage Door Modules 4 No Activity 15 Hardwire Exterior Siren, Connecting 23 No Activity Report 21 Hardwire Interior Sirens, Connecting 23 No Delay from KeyChain Touchpad 16, 22...
- Page 43 Installation Instructions Document No. 466-1574 Option 34 Fail to Open 17 program the house code 28 Option 35 Fail to Close 17 Programming Access Codes 30 Option 36 Motion Activated Light Lock-Out Programming Light/ Appliance Controls 28 Start Time 17 Programming Options 29 Option 37 Motion Activated Light Lock-Out Programming Overview 26...
- Page 44 Installation Instructions Document No. 466-1574 Specifications Control Panel 31 Toggle Lights 16 Standard Delay 9 ToolBox, ITI 5 Status, System 16 Touchpad, 2-Way RF Touchtalk 4 Subdisarm 9 Touchpad, KeyChain 4, 5 subdisarm 12 Touchpad, Remote Handheld 4, 5 Supervised Wireless Siren (SWS) 6 Touchpad, Touchtalk 2-Way RF 5 Supervisory Time (SUPSYNC) 15, 21 Touchtalk 2-Way RF Touchpad 4, 5, 8...
- Page 45 Installation Instructions Document No. 466-1574...
- Page 46 Installation Instructions Document No. 466-1574...
- Page 47 Installation Instructions Document No. 466-1574...
- Page 48 466-1574...
Need help?
Do you have a question about the Simon and is the answer not in the manual?
Questions and answers