Table of Contents
Advertisement
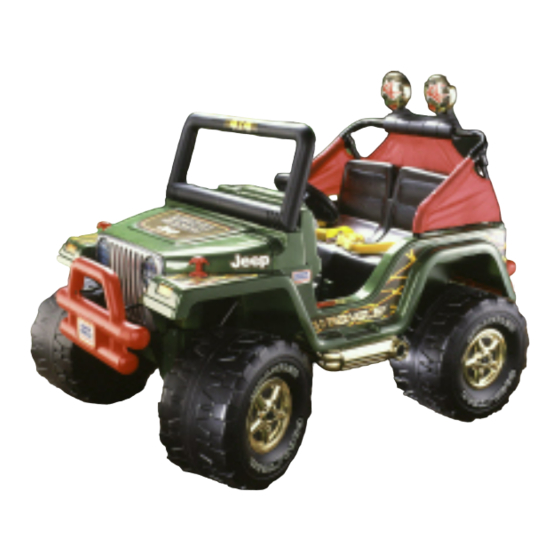
Product features and decoration may vary from the picture above.
JEEP and the Jeep grille design are registered trademarks of DaimlerChrysler Corporation and are used under license. ©DaimlerChrysler Corporation
Goodyear (and winged foot design) and Wrangler (for tires) are trademarks of The Goodyear Tire & Rubber Company, used with permission.
Fisher-Price, Power Wheels and Power Wheels by Fisher-Price are U.S. trademarks of Mattel, Inc.
Owner's Manual
with Assembly Instructions
Please read this manual and save it with your original sales receipt.
For Model 75598
Tools needed for assembly: Cap Nut Assembly Tool (included), Phillips Screwdriver, Hammer, and
Safety Scissors (not included). Use only with Power Wheels
®
12 Volt Lead-acid Rechargeable Battery
and Power Wheels
®
12 Volt Charger with Type "12V" Connector (included).
Requires three size "AA" (LR6) alkaline batteries (not included) for sound box.
Advertisement
Table of Contents

Subscribe to Our Youtube Channel
Related Manuals for Fisher-Price POWER WHEELS 75598

Summary of Contents for Fisher-Price POWER WHEELS 75598
- Page 1 Product features and decoration may vary from the picture above. JEEP and the Jeep grille design are registered trademarks of DaimlerChrysler Corporation and are used under license. ©DaimlerChrysler Corporation Goodyear (and winged foot design) and Wrangler (for tires) are trademarks of The Goodyear Tire & Rubber Company, used with permission.
-
Page 2: Table Of Contents
Important Information ..............2 Warnings and Cautions . -
Page 3: Warnings And Cautions
ELECTRICAL HAZARD • Battery can fall out and injure a child if vehicle tips over. Always use battery clamp. • PREVENT FIRE - Never modify the electrical system. Alterations could cause a fire resulting in serious injury and could also ruin the electrical system. - Use of the wrong type battery or charger could cause a fire or explosion resulting in serious injury. -
Page 4: Parts
• If you experience a problem with this product, or are missing a part, please call us at 1-800-348-0751, rather than return this product to the store. • Please identify all parts before assembly and save all packaging material until assembly is complete to ensure that no parts are discarded. - Page 5 Parts Rear Bumper Knob Plate Seat Dash Cap Nut Assembly Tool Steering Wheel Steering Column Dash Knob – 2 Key Assembly Hood Sound Box Brush Guard Spacer Tube – 2 Hood Latch – 2 Steering Wheel Cover...
- Page 6 Parts Windshield Frame - Front Windshield Frame - Back Windshield Hinge Pin – 2 Sport Bar Sport Bar Support - 2 Sport Bar Bracket Set Windshield Bracket – 2 Brush Guard Right Sidepipe Canopy Left Sidepipe Not Shown: Label Sheet - 2...
- Page 7 Parts " x " Machine Screw - 2 #8 x 4" Screw – 2 #8 x 1" Screw – 11 #10 x " Screw – 2 #8 x " Screw – 6 #10 x 1" Screw – 7 #6 x 1 "...
-
Page 8: Parts Diagram
Note: Some parts shown are assembled on both sides of the vehicle. Parts Diagram... - Page 9 Part Vehicle Body Steering Column .354 Cap Nut Hood Latch 12 Volt Battery Battery Clamp Unit #8 x 4" Screw Taillight Lens Taillight Housing #8 x 1" Screw Gas Cap Dash #10 x 1" Screw #10 x " Screw Windshield Hinge Pin Knob Plate Dash Knob Microphone...
-
Page 10: Battery Charging
ELECTRICAL HAZARD WARNING • Battery can fall out and injure a child if vehicle tips over. Always use battery clamp. • PREVENT FIRE - Never modify the electrical system. Alterations could cause a fire resulting in serious injury and could also ruin the electrical system. -
Page 11: Battery Charging
Battery Charging Battery • Plug the charger connector into the battery • Plug the charger into a standard 120 volt wall outlet Note: If power flow to the wall outlet is controlled by a switch, make sure the switch is “ON”. •... - Page 12 Battery Clamp Unit • Insert two #10 x 1" screws through the holes in the battery clamp unit and into the pegs in the dash. • Tighten the screws with a Phillips screwdriver. Do not over tighten. Battery Clamp • Position the dash on the vehicle body. •...
- Page 13 Dash Key Assembly Microphone Cord Dash View • Bend the end of the microphone cord so that it forms a “T”. • Insert the end of the microphone cord through the square opening in the dash pocket. Pull gently on the cord to make sure it is secure in the dash.
- Page 14 Steering Column Bottom View • Wipe the steering column with a paper towel to remove any excess lubricant. • Turn the vehicle body on its side. • Insert the straight end of the steering column up through the two holes in the vehicle body and out through the hole in the dash.
- Page 15 Wide Tab Wide Notch Lens Guard • Fit the wide notch in the side of a headlight lens under the wide tab on a lens guard. • Press firmly on the inside of the headlight lens to snap it into the lens guard. •...
- Page 16 Hood Latch Hole • Insert a hood latch into one of the holes in the vehicle body, near the hood area. • Twist the base of the hood latch vehicle body. • Repeat this procedure on the other side of the hood area to attach the other hood latch to the vehicle body.
- Page 17 Windshield Frame – Back Slots Windshield Frame – Front • Fit the back windshield frame onto the front windshield frame. Make sure the slots at the bottom of the two windshield frames are aligned. • Insert ten #8 x 1 "...
- Page 18 Seat Back Tab PUSH HERE Slot Tabs • With the seat at an angle, insert the tabs on the front edge of the seat into the slots in the foot-well wall • Push down firmly on the edge of the seat above each tab to insert and “snap”...
- Page 19 Sport Bar Bracket Ring Tunnel Sport Bar Support • Using safety scissors, remove the sport bar brackets from the plastic connector. Dispose of the plastic connector. • Position the sport bar upright. • Fit a sport bar support through a tunnel in a rear corner of the canopy.
- Page 20 PUSH HERE Side Fender PULL UP HERE • Fit the sport bar and sport bar support legs into the holes in the vehicle body. • Push down firmly on a sport bar side leg while pulling up on the side fender to fit the sport bar into the vehicle body.
- Page 21 Bumper Tabs • Lift the rear of the vehicle. • Align the holes in the bumper tabs with the screw pegs on the underside of the vehicle body. • Insert two #8 x 1" screws through the bumper tabs and into the vehicle body.
-
Page 22: Label Decoration
Right Side View Left Side View Label Decoration • Your Limited Edition Jeep Wrangler includes additional gold labels. These labels (29 and 30) should be applied over labels 1, 2 and 3 (on both sides of the vehicle). One-time assembly is now complete. -
Page 23: Battery Installation
IMPORTANT! Use only a Power Wheels Use of any other battery will damage your vehicle. Make sure that you charge the battery for at least 18 hours using the enclosed Power Wheels ® 12 volt charger before operating your vehicle for the first time. Charge the battery for at least 14 hours after each use of the vehicle. -
Page 24: Battery Care And Disposal
Battery Installation Hood Hood Latch • Lower the hood and secure the hood latches. Battery Care and Disposal Disposal • Your Power Wheels ® battery is a sealed lead-acid battery. It must be recycled or disposed of in an environmentally sound manner. •... -
Page 25: Rules For Safe Driving
RIDING HAZARD WARNING Prevent Injuries and Deaths • Direct Adult Supervision Required • Keep Children Within Safe Riding Areas These areas must be: - away from swimming pools and other bodies of water to prevent drownings - generally level to prevent tipovers - away from steps, driveways, roads and alleys. -
Page 26: How To Operate Your Vehicle
Beginner Use - Low Speed Drive As assembled, your vehicle is ready to roll in low speed mph, maximum). It has been pre-set so it will only operate in low speed. After your child has mastered the basic skills of driving and understands the rules for safe driving, it’s time to remove the high speed lock-out screw to allow the vehicle to operate in low or high speed. -
Page 27: High Speed Drive
How to Operate Your Vehicle Advanced Use - High Speed Drive Disconnecting the High Speed Lock-Out Shifter Lock-Out Screw • Before you disconnect the high speed lock-out, make sure your child knows how to steer, how to start and stop the vehicle and knows the rules for safe driving. When the high speed lock-out is disconnected, the vehicle can be driven forward in low speed (2 maximum) or high speed (5 mph, maximum). -
Page 28: Problems And Solutions Guide
Problems and Solutions Guide IMPORTANT! If you experience a problem with your vehicle, first check the Problems and Solutions Guide below. If you still experience a problem, please contact Power Wheels toll-free at 1-800-348-0751 between 8 AM and 6 PM (EST) Monday through Friday. Or, contact your local Power Wheels Authorized Service Center list beginning on page 32. -
Page 29: Problems And Solutions Guide
Problems and Solutions Guide Problem Vehicle was running but Loose wire or loose connectors suddenly stopped Tripped thermal fuse Short run time (Less than Undercharged battery 1 - 3 hours per charge) Overcharged battery Battery is old and will not accept full charge Tripped thermal fuse Possible Cause... - Page 30 Problems and Solutions Guide Problem Vehicle runs sluggishly Undercharged battery Battery needs charging Battery is old and will not accept full charge Vehicle is overloaded Driving conditions are too stressful Vehicle runs in low speed, but High speed lock-out not disconnected does not run in high speed Please Note: The vehicle is designed to operate in low...
- Page 31 Problems and Solutions Guide Problem When the foot pedal is pressed, Loose wire or connector the vehicle won’t run without a push “Dead Spot” on motor Loud clacking or grinding Broken gears noise from a motor-gearbox Sound box not working Improperly installed batteries Dead batteries Charger gets warm during use...
-
Page 32: Limited Warranty
Bumper-to-Bumper* Limited Warranty *One year limited warranty from the date of purchase on the Power Wheels Six month limited warranty on the 12 volt battery. For the original purchaser, this one year limited warranty covers the Power Wheels Wheels ® ) against defects in materials and workmanship. - Page 33 CAPE CORAL - Family Hardware/Do-It Express, 622 SE 47th Terrace, 33904, (941) 542-6365 DELRAY - Mister Fix It, 209 S.E. 2nd Avenue, 33483, (561) 243-9999 GAINESVILLE - Authorized Appliance Service Co., 2614 S.W. 34th Street, 32608, (352) 375-3886 HIALEAH - S-O Service Co., 925 Hialeah Drive, 33010, (305) 887-6275 HOMESTEAD - C.
- Page 34 QUINCY - Appliance Service and Parts, Inc., 582 Wash-ington Street, Rt. 3A, 02169, (617) 773-6656 SALEM - Fix Master, Inc., 190 North Street, 01970, (508) 745-0004 SPRINGFIELD - Utility Electric Service, Inc., 810 Main Street, 01101, (413) 781-1635 MICHIGAN ALMA - JTS Electronics, LLC, 306 East Center Street, 48801, (517) 463-5871 ALMONT - Almont Hardware, 4545 Van Dyke, P.O.
- Page 35 McCALESTER - Quality Upholstery, 803 East Gene Stipe Blvd., 74501, (918) 423-4747 OKLAHOMA CITY - Appliance Services by CK, 101 East Madison, 73105, (405) 525-8862 OKLAHOMA CITY - Oaklahoma Service Center, 1940 North May Street, 73107, (405) 946-9841 TULSA - H.L. Moss, Inc., 1714 E. 15th Street, 74104, (918) 744-1305, (800) 248-5948 OREGON EUGENE - Oldfield’s, 1465 West 7th, 97402,...
- Page 36 IMPORTANT! DO NOT use this vehicle for the first time until you have charged the battery for 18 hours. Remember to… ✔ Charge the battery immediately after each use. ✔ Charge the battery once a month during storage, even if the vehicle has not been used.
Need help?
Do you have a question about the POWER WHEELS 75598 and is the answer not in the manual?
Questions and answers