Table of Contents
Advertisement
Thanks for shopping with Improvements
!
7" Portable Multimedia Player
Item #
430645
If you have any questions regarding this product,
call 1-800-642-2112 and ask for our product
specialists (Mon.-Fri. 9:00-5:00 EST) or e-mail:
productspecialist@improvementscatalog.com
To order, call
See many more products on the Internet!
1-800-642-2112
0912
West Chester, OH 45069
www.ImprovementsCatalog.com
Advertisement
Table of Contents

Related Manuals for Coby TF-DVD777


Summary of Contents for Coby TF-DVD777
- Page 1 Thanks for shopping with Improvements 7” Portable Multimedia Player Item # 430645 If you have any questions regarding this product, call 1-800-642-2112 and ask for our product specialists (Mon.-Fri. 9:00-5:00 EST) or e-mail: productspecialist@improvementscatalog.com To order, call See many more products on the Internet! 1-800-642-2112 0912 West Chester, OH 45069...
-
Page 2: Precautions
Retain this information for future DO NOT OPEN reference. CAUTION: TO REDUCE THE RISK OF FIRE AND ELECTRIC Model No. TF-DVD777 SHOCK, DO NOT REMOVE THE COVER (OR BACK) OF THE UNIT. REFER SERVICING ONLY TO QUALIFIED Serial No. SERVICE PERSONNEL. - Page 3 PRECAUTIONS FCC Notice: FCC Statement:this device complies with Part 15 of the FCC Rules. Operation is subject to the following two conditions: (1) This device may not cause harmful interference, and (2) This device must accept any interference received, including interference that may cause undesired operation. Note: This equipment has been tested and found to comply with the limits for Class B digital devices, pursuant to Part 15 of the FCC rules.
-
Page 4: Important Safety Instructions
IMPORTANT SAFETY INSTRUCTIONS 1. Read Instructions: All the safety and operating instructions should be read before the product is operated. 2. Retain Instructions: The safety and operating instructions should be retained for future reference. 3. Heed Warnings: All warnings on the product and in the operating instructions should be adhered to. 4. - Page 5 IMPORTANT SAFETY INSTRUCTIONS Outdoor Antenna Grounding: If an outside antenna is connected to the product, be sure the antenna system is grounded so as to provide some protection against voltage surges and built-up static charges. Article 810 of the National Electrical Code, ANS/NFPA 70 provides information with regard to proper grounding of the mast and supporting structure, ground- ing of the lead-in wire to an antenna-discharge unit, size of grounding conductors, location of antenna-discharge unit, connection to grounding electrodes, and requirements for the...
- Page 6 IMPORTANT SAFETY INSTRUCTIONS Replacement Parts: When replacement parts are required, be sure that your service techni- cian has used replacement parts specified by the manufacturer or have the same charac- teristics as the original part. Unauthorized substitutions may result in fire, electric shock, or other hazards.
-
Page 7: Table Of Contents
TABLE OF CONTENTS PRECAUTIONS ..........................2 IMPORTANT SAFETY INSTRUCTIONS ..................4 TABLE OF CONTENTS ........................7 PACKAGE CONTENTS ........................9 ABOUT OPTICAL DISCS ......................10 Disc Requirements.........................10 Disc Care and Maintenance ....................10 Handling a Disc ......................10 Cleaning a Disc ......................10 LOCATION OF CONTROLS ......................11 Unit View .......................... - Page 8 TABLE OF CONTENTS DVD SETUP ...........................19 SYSTEM MENU ..........................21 TROUBLESHOOTING ........................23 SPECIFICATIONS .........................25...
-
Page 9: Package Contents
PACKAGE CONTENTS Please make sure the following items are included in the package. If any item is missing, please contact your dealer. Main Unit Repeat Power Cord Remote Control RCA Cable Antenna... -
Page 10: About Optical Discs
ABOUT OPTICAL DISCS Disc Requirements This DVD player supports playback of the following discs. Type Disc Mark Content Type Disc Size Max. Playback Time 133 min (SS-SL) 242 min (SS-DL) Audio + Video DVD-Video Discs 12 cm (moving picture) 266 min (DS-SL) 484 min (DS-DL) Audio Compact Discs (CDs) Audio... -
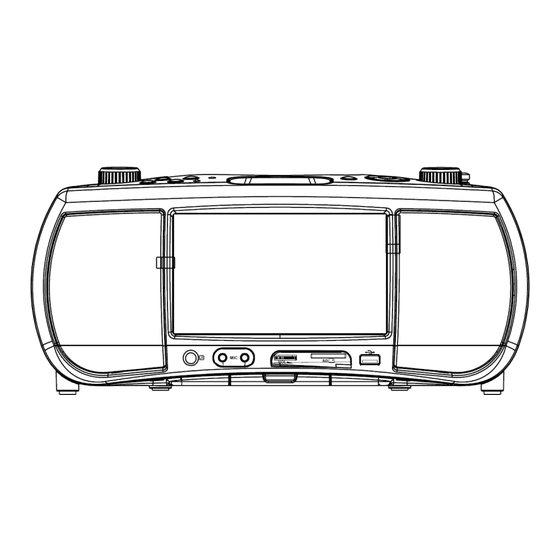
Page 11: Location Of Controls
LOCATION OF CONTROLS Unit View Function Switch Handle Set to VIDEO for TV and DVD modes. TV Disc Compartment is selected by default; press SOURCE to Radio Antenna switch to DVD . Extend the antenna for better radio reception. Radio Band Switch VIDEO RADIO Volume Dial... -
Page 12: Remote Control
LOCATION OF CONTROLS Menu Display / Setup Disc / USB / SD Source CH+ / UP Next Previous Repeat A-B Enter Repeat Reverse / LEFT Repeat Mode Forward / RIGHT Closed Caption / Play/Pause Disc Menu Stop CH– / DOWN Audio / MTS Number Buttons Angle / –... -
Page 13: Connections
CONNECTIONS Power Connections - Using an AC Power Source Make all other connections first before connecting power. After all other connections have been made, use the supplied AC power cord to connect the Power In jack on the rear of the unit to a wall outlet that supplices AC 120 V, 60 Hz power. AC 120 V, 60 Hz Outlet Caution: •... -
Page 14: Tv Antenna Input
CONNECTIONS TV Antenna Input Connect TV RF sources to the Coaxial TV Antenna In jack. TV RF sources include over-the-air transmissions and cable TV. You may use a 75 ohm coaxial cable to connect to the TV RF source. External Antenna A portable external antenna is supplied for your convenience. -
Page 15: Basic Operations
BASIC OPERATIONS Basic Operation DVD Basic Operation • To place the unit in DVD mode, set the FUNCTION switch to the VIDEO position; the unit will be in DTV mode. Press SOURCE once to switch to DVD mode. • Raise the lid of the disc compartment by hand. Load a disc with its label facing up. Close the lid. •... -
Page 16: Karaoke
BASIC OPERATIONS KARAOKE Connect microphones to the MIC input jacks on the front panel of the unit. Adjust the volume of the microphones with the MIC Input level dial located next to the input jacks. Karaoke mode works best with a karaoke disc containing karaoke background music;... -
Page 17: Function Buttons
FUNCTION BUTTONS The buttons referred to in the following instructions are located on the remote control unless indicated otherwise. Display/Setup • Press once to display current track or program information. • Press twice to display a quick setup menu. Use the direction buttons to adjust DVD playback options. -
Page 18: Menu
FUNCTION BUTTONS Menu Menu Press this button to display the player’s system setup menu. The system menu consists of the Picture Menu, Audio Menu, Setup Menu, and Channel Menu. Go to the relevant menu to adjust certain features of the player. Please read the “System Menu” section for details. CH List Press this button to display the DTV channel list. -
Page 19: Dvd Setup
DVD SETUP Use the DVD setup menu to adjust DVD-specific options. While the player is in DVD mode: 1. Press on the remote twice to enter the DVD setup menu. 2. Use the direction buttons to highlight an option; press ENTER to select it. 3. - Page 20 SETUP DVD SETUP Video Setup LCD display Set the LCD display as 16:9/4:3LB/4:3PS. The default is 16:9. TV standard Set the TV system as PAL/NTSC/AUTO. The default is NTSC Channel Output Set the audio channel mix mode as Stereo or Lt/Rt. Default is Stereo.
-
Page 21: System Menu
SYSTEM MENU System Setup Menu Use the System setup menu to adjust the unit's features and options. Press MENU to display the System menu. Use the direction buttons to highlight an option; press ENTER to select it. Where indicated, press RIGHT to adjust the highlighted option. - Page 22 SYSTEM MENU Setup Menu Item Description Menu Language Set the OSD language. Transparent Set the OSD transparency effect OSD Time Out Adjust how long the system menu will remain on screen after the last but- ton command. Closed Caption Set the closed caption mode. Press the right button to enter the option menu.
-
Page 23: Troubleshooting
If you have a problem with this unit, please read the troubleshooting guide below and check our website at www.cobyusa.com for Frequently Asked Questions (FAQ) and firmware updates. If these resources do not resolve the problem, please contact Technical Support. COBY Electronics Technical Support 150 Knowlton Way Savannah, GA 31407 Email techsupport@cobyusa.com... - Page 24 TROUBLESHOOTING There is no sound or distorted sound. • Ensure that the TV and amplifier have been turned on and properly set up. • Try a different Audio track of the DVD by pressing AUDIO. • Ensure that the MUTE function of the TV, Amplifier, or Player is not engaged. The remote control doesn’t work.
-
Page 25: Specifications
SPECIFICATIONS CD\VCD\SVCD\DVD5\DVD9\DVD+R\DVD-R\DVD+RW/DVD-RW\CD-R\ Disc Support CD+R\CD-RW\CD+RW SD/SDHC memory cards (max 32 GB) Memory Storage USB memory drives (max 32 GB) Support MPEG-1 (Extensions: mpeg, mpg, dat); MPEG-2 (Extensions: mpeg,vob); Video Formats MPEG-4 (Codecs: XviD ISO MPEG-4, XviD1.03, XviD 1.1.0, XviD 1.1.2, Final XviD 1.1.2, XviD 1.1.0-beta1, XviD1.1.0-beta2, XviD 1.2 SMP) Music Formats JPEG (baseline max 2150x1432;... - Page 26 COBY Electronics Corp. 1991 Marcus Ave, Suite 301 Lake Success, NY 11042 www.cobyusa.com www.ecoby.com...
Need help?
Do you have a question about the TF-DVD777 and is the answer not in the manual?
Questions and answers