
Related Manuals for Lampo SHOP 150


Summary of Contents for Lampo SHOP 150
- Page 1 SHOP 150 & 250 CYM continuous colour changer wash luminaire USER’ S MANUAL release 1.0 This manual must be considered an integral part of the projector.
-
Page 2: Table Of Contents
BEFORE CONNECTING AND USING THE PROJECTOR, IT IS IMPORTANT TO READ CAREFULLY ALL THE INSTRUCTIONS IN THIS MANUAL. QUALIFIED PERSONNEL ONLY, IN COMPLIANCE WITH ALL THE SECURITY LAWS, CAN DO THE INSTALLATION, THE MAINTENANCE AND THE UTILISATION OF THIS PROJECTOR. BEFORE CONNECTING THE PROJECTOR, MAKE SURE THAT THE FREQUENCY AND THE VOLTAGE VALUES ARE SUITABLE AS SPECIFIED ON THE PROJECTOR. -
Page 3: General Description
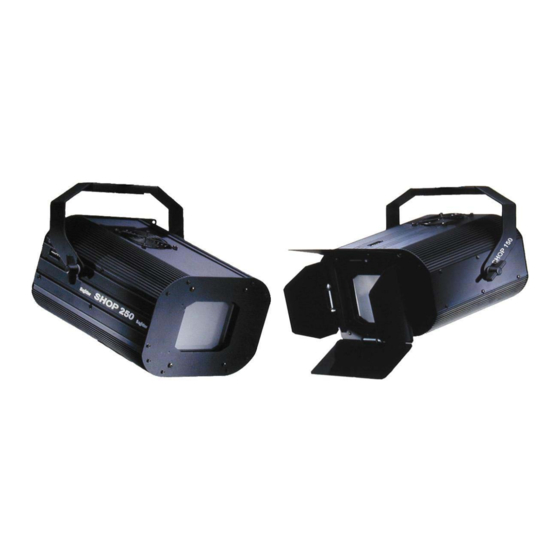
3. Cooling fan 4. Anchoring bracket 5. Projector body 6. Front panel 7. Barn doors kit (optional) 8. Fixing screws Features and Dimensions SHOP 250 SHOP 150 Voltage rating 230 V 230 V Rated current 3,2 A 2,0 A Absorbed power... -
Page 4: Description Of Parts And Controls
7. DMX Master 8. Auxiliary suspension system Adjustment of Projector Body Angle As shown in Figure 1.3, SHOP 150 and SHOP 250 can be adjusted at an angle between +70° and -90° compared to its anchoring bracket. - Loosen knob “A”. -
Page 5: Start-Up Procedures
Handling The projector, with or without packing, must be handled with care. Lifting and handling must be carried out with special equipment. Do not expose the projector, with or without its packing, to brusque accelerated or decelerated movements, knocks, dragging, or other stress caused by unsuitable handling methods. IMPORTANT The projector in its packing can be seriously damaged if it falls or suffers a blow during transportation. -
Page 6: Connections
SHOP 150 absorbs 460W at 230 V while SHOP 250 absorbs 730W. Makes sure the projector does not pull the cable in all different working positions, and that sources of heat are not placed in the vicinity. - Page 7 CHANNEL 1 = CYAN percent values decimal values 0 % >>> OPEN >>> 100% CYAN =255 CHANNEL 2 = YELLOW percent values decimal values 0 % >>> OPEN >>> 100% YELLOW =255 CHANNEL 3 = MAGENTA percent values decimal values 0 % >>>...
-
Page 8: Stand Alone Function
OFF position. When you want to operate the SHOP 150 with a DMX controller, verify that the Master/Slave switch on the rear of projector (11) will be in down position. (differently the signal will not pass through) Putting the dip-switch n°10 in position ON enable the unit to work in stand-alone functioning performing the menu... -
Page 9: Maintenaince
EXAMPLES LIGHT COLOURS FADING (white-cyan-yellow-magenta) The total value in binary code is 1+2+8+32=43 (fading colours from colour 1 to colour 4) LIGHT AND DARK COLOURS FADING (white-cyan-yellow-magenta-deep green-deep blue-deep red) The total value is 2+8+32+128=170 (fading colours from colour 2 to colour 7) very good for a self-demonstration of the product MAINTENANCE CAUTION... - Page 10 M1 - LAMP REPLACEMENT The lamp must be replaced with the same type of lamp and according to the same frequency. A less efficient lamp jeopardizes projector performance. Replace the lamp as follows: - When the projector is cold, turn off the ON/OFF switch to cut the electricity and follow the instruction as explained in page 3 of this manual .
-
Page 11: Troubleshooting
TROUBLESHOOTING Problem POSSIBLE CAUSE SOLUTION Make sure the mains power is ON and the circuit breaker hasn’t been triggered Make sure the switch on the back of No mains power the projector is ON. No power to the projector Make sure the top lid is tightly closed SHOP will not turn ON Burned-out fuse Replace the burned-out fuse *Use the type of fuse... -
Page 12: Optional And Beam Angle
OPTIONAL AND BEAM ANGLE BARN DOORS KIT The barn doors mounting kit is supplied if requested as a optional for SHOP 150 and 250. The mounting process is very easy: 1- Unscrew the 4 PH screws from the front panel. 2- Insert the 4 spacers you will find in the barn door kit and firmly tight.
Need help?
Do you have a question about the SHOP 150 and is the answer not in the manual?
Questions and answers