Table of Contents
Advertisement
Quick Links
Advertisement
Table of Contents

Related Manuals for Cirago Platinum CMC2000

Summary of Contents for Cirago Platinum CMC2000
- Page 1 Users Manual...
- Page 2 2 / 48...
-
Page 3: Table Of Contents
Table of Contents 1. Introduction .......................... 4 1.1 Preface ........................4 1.2 Packing List ......................... 5 1.3 Caution ........................5 1.4 Connection ........................6 1.5 First Time Usage ....................... 12 2. About the Player ........................ 13 2.1 Remote Control ......................13 2.2 Front Panel ....................... -
Page 4: Introduction
1. Introduction 1.1 Preface Dear Customer, Thank you for purchasing the CMC2000 CiragoTV Platinum Network Multimedia Center. This player has the following functionality: Video Recording Supports one button recording and scheduled recordings in MPG format. Record programs from cable / satellite box through the AV input;... -
Page 5: Packing List
The actual contents in the package might be different from the packing list in this manual. 1.3 Caution The CMC2000 was designed with your safety in mind. In order to safely and effectively use this product, please read the following before usage. -
Page 6: Connection
1.3.4 Repair If the player has a problem, contact Cirago Customer Service at 408-331-8822 or email support@cirago.com. Repairing the product yourself will lead to voiding the product warranty. 1.3.5 Disposing of the player When you dispose of the player, be sure to dispose it appropriately. Some countries may regulate disposal of electrical device, please consult with your local authority. - Page 7 1.4.3 Memory card connection A Memory card can be used by inserting it in to the memory card slot (1) Follow the picture to insert the memory card to the card slot properly; (2) Insert the card by following the arrow pointer in the picture. 7 / 48...
- Page 8 1.4.4 TV connection 1. A/V IN (1) Follow the picture and plug in the AV Cables (red, white and yellow cable) to the player‟s A/V IN jack; (2) Follow the picture and plug in the AV Cables to the A/V OUT jack of the Cable or Set-Top Box (STB).
- Page 9 3. Y/Pb/Pr Component OUT (1) Follow the picture and plug in the Component Cables (Red, Green and Blue cable) to the player‟s Y/Pb/Pr jack; (2) Follow the picture and plug in the Component Cables to the TV‟s Y/Pb/Pr jack. Audio Connection while using Y/Pb/Pr Video out: First method: use the audio output from the A/V OUT jack;...
- Page 10 1.4.5 Digital Audio Device connection (1) Follow the picture and plug in the RCA connector on your coaxial cable to the player‟s S/PDIF Coaxial jack. Or if you use optical fiber, please plug in the Toslink connector on your optical fiber to the player‟s S/PDIF Optical jack;(not supplied) (2) Follow the picture and plug in the other connector on your coaxial cable or optical fiber to the digital audio device.(not supplied) 1.4.6 Power connection...
- Page 11 (2) Plug a Wireless LAN USB Adapter into the USB HOST port of the player.(The wireless LAN feature will only work using an adapter which has the Realtek 8187 chipset. Please visit www.cirago.com/cmc2000 for more information or to purchase a wireless USB adapter. 11 / 48...
-
Page 12: First Time Usage
1.5 First Time Usage 1.5.1 Remote Control First time usage of Remote control Install the batteries before using the remote control, installation steps are as the picture shows: 1.5.2 Power on/off, language control 1. Power On / Off After connecting the power supply cord, press the POWER button on the front panel or remote control to turn on the player. -
Page 13: About The Player
2. About the Player 2.1 Remote Control All procedures in this manual can be carried out using the remote control buttons. Certain functions can also be carried out using the buttons located on the front panel of the product. See the following for details on each button and its function: 1. - Page 14 Button Function POWER Press to turn on / off the player. DISPLAY Press to display current status. Press during playback and an onscreen display appears, showing track number and time elapsed/remaining. Press during recording and an onscreen display appears, showing the recording quality setting and time elapsed.
- Page 15 details. PAUSE Press to pause current playback. Press PLAY to resume playback. REC LIST Press to show the recording list. INSTANT Press to go back 10 seconds of the current playback. REPLAY Press to set the beginning and end points of a recorded video. SUBTITLE Press to access the subtitle menu during video playback.
-
Page 16: Front Panel
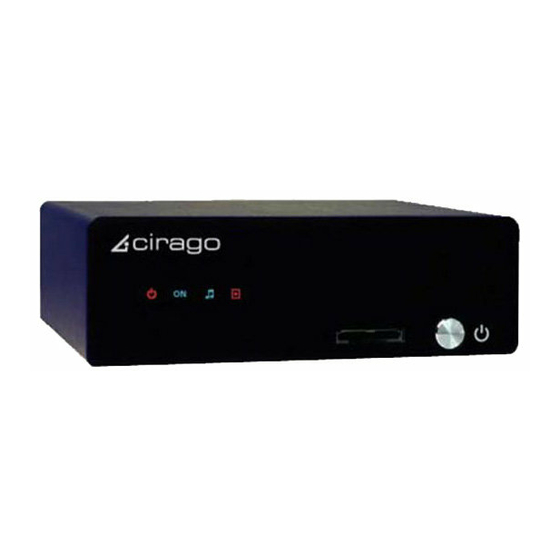
2.2 Front Panel Name Function Infrared receiver window Receives IR signals from the remote control. 4-in-1 Card slot Compatible with SD/MMC/MS/MS Pro cards. POWER / STANDBY button Press to enter standby mode or wake up. Indicator (red) turns on when recording starts. REC indicator MUSIC indicator Indicator (blue) turns on during music playback. -
Page 17: Getting Started
3. Getting Started Power on the system, and after a few seconds, the system will enter the home menu. You can also access this menu by pressing the HOME button on the remote control. 3.1 Video In – Live TV, Recording and Timeshift To view Live TV, connect your cable or satellite box to the AV input on the Multimedia Center, and select Video In to display what is playing. -
Page 18: Browser - Browse And Play Files
There are options listed in the tabs on the top of the Playback page. 1. Play – this shows you a list of all the recorded titles. It also shows you how many hours of recording time is available 2. Delete – deleted recorded titles 3. -
Page 19: Internet Radio - Listen To Internet Radio Stations
will display all the media files in the directory or folder you are in. Photo slideshows with music can be played when the music files are in the same folder as the photos. The navigation buttons on the remote control can be used to rotate images and the zoom button can be used to zoom in on photos. -
Page 20: Timer Record Menu
From the Home menu page, select Playlist. Choose the playlist you would like to listen to. Press the REPEAT button on your remote control to set your repeat options. 4. Timer Record Menu The Timer Record menu allows you to create, edit and delete recording schedules and view schedule status and history. -
Page 21: Editing Schedule
4.2 Editing Schedule Use the navigation keys on the remote control to select the Edit tab from the menu bar. Select the schedule you want to edit from the list and press the ENTER button. The schedule setting screen appears. Modify the schedule as described in 4.1 Create a New Schedule. -
Page 22: Setup Menu
5. Setup Menu The Setup Menu allows you to configure language, audio, video, record, network and system settings. To enter the menu, press the SETUP button on the remote control. 5.1 Changing Video Settings Use the navigation keys on the remote control to select the Video tab from the menu bar. Aspect Ratio Select to set aspect ratio. - Page 23 Brightness Use the navigation keys on the remote control to adjust the brightness. The new setting is previewed onscreen. Press the ENTER button to confirm. Contrast Use the navigation keys on the remote control to adjust contrast. The new setting is previewed onscreen. Press the ENTER button to confirm. Video Output Set your preferred video output type, depending on your viewing preferences.
-
Page 24: Changing Audio Settings
5.2 Changing Audio Settings Use the navigation keys on the remote control to select the Audio tab from the menu bar. Night Mode Select from Off, On, and Comfort. Press the ENTER button to confirm. Night Mode lowers the natural volume levels of audio playback automatically to reduce peak volume levels while experiencing all the details in the soundtrack, enabling late-night viewing of high-energy... -
Page 25: Changing Record Settings
5.3 Changing Record Settings Use the navigation keys on the remote control to select the Record tab from the menu bar. Quality Select your preferred recording quality. The highest quality setting is HQ which requires the most storage space. The other settings reduce recording quality sequentially but require less storage space. -
Page 26: Changing Network Settings
Record Device Select to set device you would like files to be recorded to. Select from HDD and USB. Press the ENTER button to confirm. Timeshift allows you to pause Live TV and resume watching it when Timeshift Device you are ready to do so. The media player has a preset timeshift recording buffer. - Page 27 4) Enable your PC‟s „Guest‟ account; 5) Please share the folders which you wish to browse on your PC, and make sure that „Everyone‟ or „Guest‟ has the right to access. Wired LAN Setup Use the navigation keys on the remote control to select DHCP IP (AUTO) or FIX IP (MANUAL).
- Page 28 USB Wireless Adapters using the Realtek 8187 chipset. USB Wireless Adapters are available for sale at www.cirago.com/cmc2000 Select Modify if it is your first time connecting to a wireless network. Choose between two connection modes: Infrastructure (AP) mode and Peer to Peer (Ad Hoc) mode.
- Page 29 Select the access point you wish to access from the SSID list. Note: In the Security list, WEP (Wired Equivalent Privacy) and WPA (Wi-Fi Protected Access) means the network is encrypted, i.e. an encryption key is needed to access the network. NONE means it is an open system network.
- Page 30 4) Wireless Address Setup Select DHCP IP (AUTO) to set the IP address automatically. Or select FIX IP (MANUAL) to set the IP address manually. 5) Setting List The Setting List displays the network settings you configured. 6) Test Connection The system will test your connection.
- Page 31 If the test is ok, the network information will be displayed. Peer to Peer (Ad Hoc) Peer to Peer mode, which is also called Ad Hoc mode or computer-to-computer mode, is used to connect wireless clients directly together, without the need for a wireless router or access point.
-
Page 32: Changing System Settings
2) Save and Startup Select OK to confirm the above settings. The system will automatically configure and test the connection. When the test passes, the network information will be displayed. 5.5 Changing System Settings Use the navigation keys on the remote control to select the System tab from the menu. 32 / 48... - Page 33 Menu Language Select to choose your preferred OSD (On Screen Display) language. Text Encoding Select to set text encoding. Time Select to set the system time. Use the navigation keys on the remote control to adjust each setting. Press the ENTER button to confirm. 33 / 48...
- Page 34 HDD Format Select to format the HDD. Select OK to proceed, or CANCEL to return to the previous menu. Timeshift Partition: This is the amount of hard drive space that will be allocated towards the automatic timeshift feature that is enabled while in the Video In mode.
- Page 35 Recording and Multimedia Partition: This is the amount of hard drive space that will be allocated towards scheduled recording of live TV. Press the ▲ and ▼to adjust the capacities of recording and multimedia partitions. Press ◄ and ►to select NEXT, and the ENTER button to confirm.
-
Page 36: Miscellaneous
MISC tab from the menu. This menu displays some basic information about the media player. This displays the Software (Firmware) Version on the media player. Check www.cirago.com/cmc2000 for any new firmware upgrades. The MAC address of the media player is also displayed here. -
Page 37: File Copy Menu
6. File Copy Menu Press COPY on the remote control to enter the File Copy menu, which allows you to copy files between HDD, USB devices and Network. Step 1: Select the source device and destination device. Use the navigation keys to select the source and destination device. - Page 38 Step 3: Select the destination folder to store the above files. Use the navigation keys to select the source and destination device. Use the left navigation key to Cancel and the right navigation key to proceed to the next step. Step 4: Proceed to copy selected files.
-
Page 39: Nas Function
File Copy function to copy the file into the HDD1. You can also connect the CMC2000 to your computer and copy the file over via USB. After copying the “sys” file to the CMC2000, restart the device and it will appear as “NAS” in your network. -
Page 40: Firmware Upgrades
2. Select the MISC tab. 3. The firmware version number is displayed as SW Version 4. Compare it with the latest firmware version number on www.cirago.com/cmc2000 If there is a newer firmware version, download it and follow the steps below: Step 1: Save files on a USB Flash Drive You will need a USB flash drive to perform the firmware upgrade. - Page 41 Note: The firmware upgrade status screen may not appear on your TV screen if the player is connected to your TV by a HDMI cable. Connect using the AV cables (red, yellow and white cables) instead of HDMI cables to ensure you can see the progress of the Firmware upgrade. Please wait for about 2 minutes for the installation to complete - the LED indicators will go off, and the player will be powered off automatically.
-
Page 42: Specifications
9. Specifications USB SUPPORTED: USB HDD Other USB Mass Storage Devices USB 2.0 Interface MEMORY CARDS SUPPORTED: SD/MMC/MS/MS Pro CONTENT FORMATS SUPPORTED: DAT/VOB/IFO/MPG/AVI/MPEG-2 TS MP3/OGG/WMA Compression rate: between 32 kbps and 320 kbps ... - Page 43 VIDEO OUTPUT SPECIFICATION Composite Output 1 Vpp 75 Ohm Components Output Y:1 Vpp 75 Ohm Cb:0.7 Vpp 75 Ohm Cr:0.7 Vpp 75 Ohm HDMI Output HDMI (Version 1.1) NETWORK FEATURE Ethernet 10/100Mbps Auto-Negotiation WLAN IEEE 802.11b/g, up to 54Mbps (supported by the optional WLAN USB Adapter) AUDIO PERFORMANCE DA Converter...
-
Page 44: Frequently Asked Questions
“Can‟t get any SSID” error. Also, if you are using a wireless adaptor other than the one Cirago sells, make sure that it has a Realtek 8187 chipset. - Page 45 4. When I try to connect to a computer over my network, it asks me for Net User ID and Net Password. What should I use to connect to that computer? The media center asks you to login as a security requirement. You can use the login information for your computer –...
- Page 46 There is a program called Transcode Server that allows you to play some formats that are not supported by the media player. Please note that Transcode Server is not a product that Cirago makes or supports. Transcode Server supports the playback of H.264 and MKV files on the media center.
-
Page 47: Copyrights And Trademarks
-Loss of customer‟s software, firmware, information, or memory data. -Improper handling or installation. 13. Contact Information Please call or email us if you are having any trouble with your media player. Cirago International Ltd. 611 Vaqueros Ave, Sunnyvale, CA 94085 Ph: 408-331-8834 Fax: 408-331-8830 Email: support@cirago.com... - Page 48 48 / 48...
Need help?
Do you have a question about the Platinum CMC2000 and is the answer not in the manual?
Questions and answers